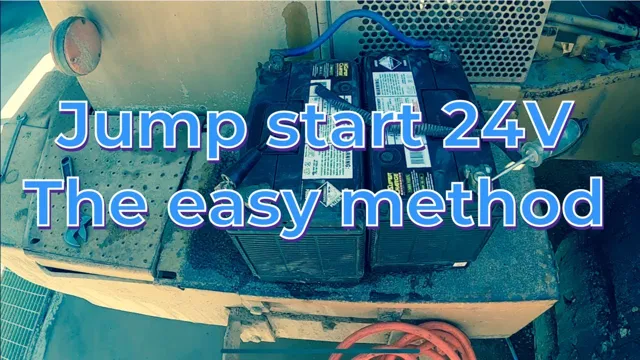
Unlocking the Power: A Guide on How to Jumpstart 24 Volt Systems
Jumpstarting a 24 Volt System can be a daunting task, especially if it’s your first time experiencing it. The thought of being stranded on the side of the road or unable to use your equipment can be stressful. Fortunately, with the right tools and knowledge, jumpstarting a 24 Volt System can be a quick and easy process.
In this blog, we’ll cover everything you need to know about jumpstarting a 24 Volt System, from the tools you’ll need to the steps you should take. So grab a cup of coffee, sit back, and let’s dive in!
Tools Needed
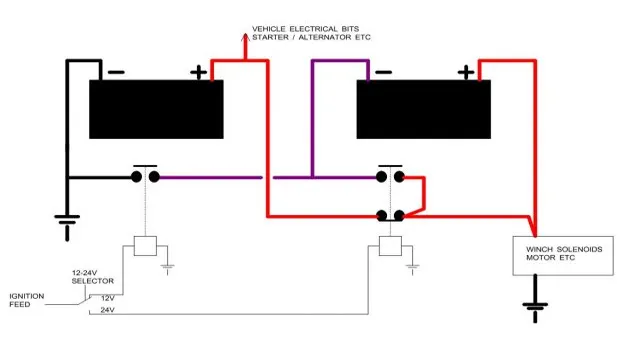
Jumpstarting a 24-volt system can seem intimidating, but it’s quite simple if you have the right tools. The key to a successful jumpstart is making sure you have two 12-volt batteries connected in series. To do this, you’ll need a set of jumper cables, two 12-volt batteries, and a multimeter.
First, make sure both vehicles are turned off and the keys are out of the ignition. Then, connect the red jumper cable to the positive terminal of the dead battery and the other end to the positive terminal of the fully charged battery. Next, connect the black jumper cable to the negative terminal of the fully charged battery and the other end to a ground on the dead vehicle.
Double-check all connections, and then turn on the fully charged vehicle. Allow it to run for a few minutes to provide a charge to the dead battery. Finally, try starting the vehicle with the dead battery.
If it doesn’t start, wait a few more minutes and try again. With these tools and steps, jumping a 24-volt system is easy and straightforward.
Multimeter
When it comes to working with electronic devices, having the right tools on hand can make all the difference. One essential tool for any technician or DIY enthusiast is a multimeter. This handy device allows you to measure voltage, current, and resistance, giving you the information you need to troubleshoot and repair electronic equipment.
To use a multimeter, you’ll also need a variety of accessories, including test leads, probes, and alligator clips. These tools help you make accurate readings and ensure your safety while working with potentially hazardous electrical components. While learning to use a multimeter may seem intimidating at first, with practice and a little guidance, you’ll soon be able to tackle electrical projects with confidence.
So if you want to take your electronics skills to the next level, investing in a multimeter is a smart choice.
Jumper cables
Jumper cables are a handy tool to have in your car in case of emergencies. However, it can be challenging to know what tools you need to jump-start your car successfully. In addition to having the jumper cables themselves, you will also need another vehicle to use as a power source.
It’s essential to make sure this car has roughly the same voltage as yours; otherwise, it can cause damage to your electrical system. It’s also crucial to ensure that both vehicles are turned off during the process. Once you have a power source, you can then use the jumper cables to connect the batteries, starting with the positive terminal on the dead battery and then to the positive terminal on the charged battery.
Next, connect the negative terminal on the charged battery, but instead of connecting it directly to the negative terminal on the dead battery, connect it to an unpainted metal surface on the car frame. Finally, start the engine of the vehicle with the good battery and let it run for a few minutes before starting the vehicle with the dead battery. These simple steps can help you jump-start your car safely and efficiently.
Safety First
Jump-starting a 24-volt system can be a bit intimidating, but with the right precautions and steps, it can be done safely. Firstly, ensure that both batteries are of the same type, age, and capacity. Then, turn off all electronics, including the radio and lights, and remove any jewelry that may come into contact with the batteries.
Next, connect the positive clamp of the jumper cable to the positive terminal of the dead battery, followed by the positive terminal of the fully charged battery. Then, connect the negative clamp of the jumper cable to the negative terminal of the fully charged battery and the other end to a solid metal ground, such as an engine bolt. Start the engine of the fully charged vehicle and let it run for a few minutes before trying to start the dead vehicle.
Once the dead vehicle is running, let it run for a few more minutes before removing the jumper cables in reverse order. Remember, safety should always come first when dealing with car batteries.
Turn off all electronics
When it comes to electronics and safety, it’s important to remember that electricity can be dangerous. That’s why it’s crucial to turn off all electronics when you’re not using them. Not only does this help prevent accidents such as electrical fires or shocks, but it can also save you money on your energy bill.
It’s easy to forget to turn off your devices or leave them on standby, but by doing so, you’re still using electricity. By turning off your electronics completely, you’re not only ensuring your safety, but you’re also reducing your carbon footprint. So, before you head out for the day, make it a habit to power down your electronics and unplug them if necessary.
It’s a simple step that can have a big impact and keep you safe.
Wear protective gear
When it comes to any activity, whether it’s a sport or manual labor, safety should always come first. One of the most important safety tips to keep in mind is wearing protective gear. Helmets, gloves, goggles, and other protective equipment are specifically designed to reduce the risk of injury and should be worn as directed.
For example, wearing a helmet can minimize the risk of head injuries during a fall or collision while playing sports such as biking or skateboarding. The same goes for wearing goggles, which can protect your eyes from harmful debris or chemicals in the workplace. Not only does wearing protective gear reduce the chances of injury, but it can also provide peace of mind, allowing you to focus on the task at hand rather than worrying about potential dangers.
So don’t take chances when it comes to safety – always wear the appropriate protective gear. It’s better to be safe than sorry.
Connecting the Jumper Cables
Jump starting a 24-volt system can be tricky, but with the right steps, you can get your vehicle back up and running. First, make sure the battery in your vehicle has a 24-volt system, as this is not common in most cars. Next, grab your jumper cables and connect the positive cable to the positive terminal on the dead battery, then connect the negative cable to the negative terminal on the good battery.
After that, connect the other end of the positive cable to the positive terminal on the good battery, and then connect the other end of the negative cable to a metallic surface on the vehicle’s engine block. This will help prevent damage caused by sparking. Once the cables are securely connected, start the vehicle with the good battery and let it run for a few minutes.
After that, try starting the vehicle with the dead battery. If it starts, let both vehicles run for a few minutes then carefully disconnect the cables in reverse order. With these simple steps, you’ll be able to jump start your 24-volt system and get back on the road in no time.
Attach the positive cable to the dead battery’s positive terminal
When jumpstarting a car, it’s important to connect the cables in the right order. The first step is to attach the positive cable, marked with a red clamp, to the dead battery’s positive terminal. You can identify the positive terminal by looking for the “+” sign next to it.
This is a crucial step since it creates a bridge between the two batteries, allowing electricity to flow from the functioning battery to the dead battery. It’s essential to ensure that the positive cable is securely fastened to the positive terminal. A loose connection can lead to a spark, which can be dangerous if there’s spilled fuel or other flammable substances around.
Once the positive cable is connected, move on to the next step, which is attaching the other end of the positive cable to the functioning car’s positive terminal. Remember not to touch the metal clamps together while connecting the cables since this can cause a spark. Additionally, be sure to connect the negative cable to the functioning car’s negative terminal before connecting it to the dead battery’s negative terminal.
This ensures that any electrical surge is grounded instead of damaging the car’s electronics. By following these steps in the right order, you can safely jumpstart a car and get it back on the road in no time. Just remember to take the necessary safety precautions and seek professional help if you’re uncertain about what to do.
With a little care and attention, you can help save your car’s battery from the brink of death.
Connect the other end of the positive cable to the live battery’s positive terminal
When it comes to jumpstarting a car, connecting the jumper cables properly is crucial to avoid any accidents or damage to your vehicle. Once you’ve found a donor car with a live battery, it’s time to connect the jumper cables. The first step is to connect the positive cable, which is usually colored red, to the positive terminal on your dead battery.
Make sure to attach it securely, as any loose connections can cause a short circuit. Next, connect the other end of the positive cable to the live battery’s positive terminal. It’s important to keep the cable away from any moving parts or engine components to avoid any injury or damage.
Once the positive cable is in place, it’s time to connect the negative cable. Take the negative cable, which is usually colored black, and connect it to the donor car’s negative terminal. Finally, attach the other end of the negative cable to a metal surface in your car, preferably on the engine block or chassis.
This will help to ground the circuit and prevent any sparks or electric shocks. Remember, always double-check your connections, wear protective gear, and follow these simple steps to jumpstart your car safely and effectively.
Attach the negative cable to the live battery’s negative terminal
When it comes to jump-starting a dead car battery, it’s essential to properly connect the jumper cables. The first step is to attach the negative cable to the live battery’s negative terminal. This ensures a safe electrical connection and can prevent any damage to the car’s electrical system.
It’s important to note that the negative cable should not be attached to the dead battery’s negative terminal, as this can cause a spark and potentially lead to an explosion. By connecting the negative cable to the live battery first, you’ll be able to ensure that you’re jump-starting your car in the safest way possible. Once the negative cable is properly attached, you can move on to connecting the positive cable and jump-starting your car.
With a little knowledge and safety precautions, jump-starting a dead battery can be done quickly and efficiently.
Connect the other end of the negative cable to a metal surface on the dead vehicle
Connecting the jumper cables is an essential step in jump-starting a vehicle. Start by finding a good and stable surface in the dead vehicle’s engine bay to attach the positive jumper cable. Hook one end of the cable to the battery terminal marked with a positive sign (+) and then connect the other end of the cable to the positive terminal in the live car’s battery.
Once this step is completed, attach the negative cable to the negative terminal in the live battery. Next, attach the other end of the negative cable to a metal surface on the dead vehicle. Make sure that the metal surface is not painted or coated, and ensure the connection is secure.
Connecting the jumper cables can be tricky, but with care and attention, you can successfully jump-start your car and be back on the road in no time.
Starting the Vehicle
When jump-starting a 24-volt vehicle system with a 12-volt source, it’s crucial to follow the correct steps to avoid any potential issues. Ensure that both vehicles are turned off, and the batteries are of the same voltage before proceeding.
To begin, connect the jumper cables in the correct order: start with the positive terminal of the dead battery, then move on to the positive terminal of the live battery.
Next, connect the negative terminal of the live battery, and finally, attach the negative terminal of the dead battery.
Once all connections are secure, start the vehicle with the live battery and allow it to run for a few minutes. Following this, you can attempt to start the vehicle with the dead battery.
If the dead battery fails to start, wait a few more minutes before retrying or consider seeking professional assistance. Remember, the process of jumping a 24-volt system demands meticulous attention to detail and caution.
Take your time to double-check all connections before initiating the vehicle’s start-up.
Start the live vehicle
Starting the engine of your vehicle can be intimidating at first, especially if it’s a new one. However, the process is relatively simple and can be completed in just a few steps. First, ensure that the vehicle is in “Park” mode and that the emergency brake is engaged.
Then, insert the key into the ignition and turn it to the “On” position. You may hear a series of clicks or humming sounds as the fuel pump and other systems activate. Once everything has settled down, turn the key to the “Start” position.
The engine should now come to life, with the sound of the combustion process causing the vehicle’s frame to tremble slightly. If the engine does not start, try turning the key back to the “On” position for a few moments before attempting to start it again. With these simple steps, you can start your vehicle and get ready to hit the road.
Wait a few minutes
When you first start your vehicle, it’s important to give it a few minutes before hitting the gas pedal. This gives the engine time to warm up and lubricate all the moving parts with oil. Waiting just a couple of minutes can make a big difference in the long-term health of your engine, as it reduces the amount of wear and tear on the components.
So take a deep breath, adjust your mirrors, and wait a few moments before revving your engine and taking off down the road. Your car will thank you for it, and you’ll have a smoother, more reliable ride as a result. Remember, a little patience now can save you a lot of heartache later on.
Try to start the dead vehicle
Starting a dead vehicle can be a frustrating experience, but with a few simple steps, you can get your car running smoothly again. First, turn off all electronic devices and make sure the headlights are off to conserve battery life. Next, connect the jumper cables to the dead battery and the working battery, making sure to attach the red cable to the positive terminal and the black cable to a metal surface on the dead vehicle.
Once everything is connected, try to start the dead vehicle. If it doesn’t start, wait a few minutes and try again. Once it does start, keep the engine running for at least 20 minutes to recharge the battery.
Remember to drive the vehicle for at least 30 minutes to further recharge the battery and prevent it from dying again. Patience and persistence are key when starting a dead vehicle, but following these steps can get you back on the road in no time.
Final Precautions
Before attempting to jump a 24-volt system, there are a few final precautions to keep in mind. First and foremost, ensure that the batteries are not damaged or leaking. If there is any damage, do not attempt to jump-start the system and take it to a professional as soon as possible.
Additionally, make sure that the cables being used for the jump-start are of the correct size and gauge rating. Using cables that are too thin can result in a fire hazard, while cables that are too thick can damage the starter motor. Finally, be cautious when connecting the cables to the positive and negative terminals on both batteries to avoid potential electrical shock.
By taking these final precautions, you can jump-start a 24-volt system safely and with confidence.
Remove the cables in reverse order
When it comes to removing cables, there are a few final precautions you should take to ensure everything goes smoothly. The first step is to remove the cables in reverse order. This means you should start by unplugging the cable from the device, or the power source, and work your way back to the outlet.
Another important thing to keep in mind is to avoid tugging on the cables too hard. This can cause damage to the cables themselves, and the ports they connect to. Instead, gently wiggle the cable side to side until it comes loose.
It’s also a good idea to double-check that you’re unplugging the right cable before you pull it out. You don’t want to accidentally unplug something important! Finally, always make sure you’re handling the cables properly. Avoid twisting or bending them in unnatural ways, and keep them safely coiled when not in use.
By following these simple precautions, you can safely remove your cables without any mishaps. Keyword: Remove cables.
Drive the vehicle around for a while to recharge the dead battery
If you find yourself with a dead battery, one of the best things you can do is drive the vehicle around for a while to recharge it. As you drive, the alternator will work to restore the battery’s charge, and you will hopefully have enough power to start the car again later. However, it’s important to remember that this method may not work in all situations.
If the battery is completely dead, it may need to be replaced entirely. Additionally, if there is something wrong with the alternator, driving the vehicle around may only work temporarily. In any case, it’s always a good idea to have a backup plan, such as jumper cables or a portable battery charger, just in case.
By taking these precautions, you can ensure that you are prepared for any battery-related emergencies that might arise. So, next time you experience a dead battery, remember to give your car a little drive around the block, but be prepared with backup options just in case.
How can you jump-start a 24 Volt system using a 12 Volt ordinary vehicle?
To jump-start a 24 Volt system using a 12 Volt ordinary vehicle, follow these steps: 1. Connect the positive (red) jumper cable from the 12V car battery to the Positive to Starter and Ignition terminal on the 24 Volt system. Ensure that the cable does not touch anything else. 2. Attach the negative (black) jumper cable from the 12V car battery to the Earth terminal (-/Negative) of the same battery. 3. Start the 12V car. 4. Connect the negative (black) jumper cable to the negative terminal marked “B” on the 24 Volt system. 5. Check that the jumper cables are all connected to the same battery in the 24V system. 6. Run the 12V car at higher revs for approximately one minute before trying to start the bus/truck. 7. Once the bus starts, promptly disconnect the jumper cables to allow the bus alternator to take over charging the 24 Volt system.
What precautions should be taken when attempting to jump-start a 24 Volt system with a 12 Volt source?
When jump-starting a 24 Volt system using a 12 Volt source, there are several important precautions to keep in mind to ensure a safe and successful procedure. Firstly, make sure to connect the jumper cables correctly by attaching the positive cable to the corresponding terminals and the negative cable to the appropriate terminals. Take care to avoid any accidental contact between the jumper cables and other parts of the vehicles. Pay close attention to the battery terminals and their polarities to avoid potential short circuits. Double-check the connections to ensure that the jumper cables are correctly hooked up to the 12 Volt source and the 24 Volt system. Confirm that each cable is connected to the appropriate terminals on both batteries. Before starting the vehicle with the 12 Volt source, ensure that all connections are secure and that there is no risk of the cables coming loose during the jump-start process. Additionally, be vigilant during the jump-start process and monitor the revs of the vehicle carefully as the alternator begins to charge the truck/bus batteries. By following these precautions and ensuring proper connections, you can safely jump-start a 24 Volt system with a 12 Volt source.
Conclusion
Jumping a 24 volt system is like juggling chainsaws – it looks intimidating, but with the right approach, it can be done safely and effortlessly. Just remember to connect the positive and negative terminals of both batteries in the correct order, and use protective gear and common sense. So go ahead, jump that 24 volt system like a boss and impress your friends with your electrifying skills!”
FAQs
What is a 24 volt system and why is it important to know how to jump it?
A 24 volt system is a type of electrical system that is commonly used in heavy-duty equipment and vehicles. Knowing how to jump it is important in case of a dead battery or other electrical issues.
Can you use the same technique to jumpstart a 24 volt system as you would a 12 volt system?
No, the technique to jumpstart a 24 volt system is slightly different. You will need two 12 volt batteries connected in series to provide the necessary power.
Passage_1 provides a concise answer to the question of whether a 12 Volt battery jumper pack can be used to jump-start a 24 Volt system. It states, ‘No, the technique to jumpstart a 24 volt system is slightly different. You will need two 12 volt batteries connected in series to provide the necessary power.’ While the simplicity of this response is appreciated, it is essential to note that if you find yourself in a situation where a 12 Volt battery jumper pack is the only option available, there is a way to proceed. By following a specific set of steps, you can safely utilize a 12 Volt battery to jump-start a 24 Volt system. The process involves making precise connections between the 12 Volt battery and the 24 Volt system, ensuring that the positive and negative jumper cables are correctly attached to the respective terminals. Taking these precautions will help avoid any potential issues and effectively provide the power needed to jump-start the 24 Volt system.
Do you need any special equipment to jumpstart a 24 volt system?
Yes, you will need a set of jumper cables that are rated for 24 volts and two 12 volt batteries of the same type.
Is it safe to jumpstart a 24 volt system?
Yes, it is safe as long as you follow the proper techniques and precautions. Always wear safety gloves and goggles and make sure the batteries are connected properly before attempting to jumpstart the system.
What are some recommended products for jump starting and maintaining battery health in vehicles?
Recommended products for jump starting and maintaining battery health in vehicles include portable car jump starters such as the iMars Portable Car Jump Starter 1000A 13800mAh Powerbank, BlitzWolf BW-JS1 Portable Car Jump Starter 12000mAh 800A, and AUTOOL BT460 12V 24V Battery Measurement Analyzer. These gadgets not only excel in jump-starting vehicles but are also effective in keeping batteries in good condition. For added convenience and reliability, a 12-volt battery jumper pack is suggested, allowing for multiple vehicle starts before requiring recharging. These versatile tools can also double as power banks for charging mobile phones and other devices during emergencies, providing a practical and hassle-free solution for addressing battery issues when on the road.
Which 24 Volt systems can be jumped from a 12 Volt system?
In discussing the compatibility of 24 Volt systems with 12 Volt systems for jumping, one key consideration is the configuration of the starting battery setup. If the 24 Volt system consists of two 12 Volt batteries connected in series, it may be possible to jump-start it using a 12 Volt system. In this specific scenario, where two 12 Volt batteries are connected in series to achieve the required 24 Volts, the jump-starting procedure can be relatively straightforward. The 12 Volt system can be used to provide the necessary power to get the 24 Volt system up and running.
How can you jump start a 24 Volt system using a 12 Volt ordinary vehicle?
To jump start a 24 Volt system using a 12 Volt ordinary vehicle, follow these steps: 1. Connect the positive (red) jumper cable to the positive terminal of the 12V car battery and to the Positive to Starter and Ignition terminal on the 24 Volt system. 2. Ensure the positive cable does not touch any other components. 3. Connect the negative (black) jumper cable to the Earth terminal of the 12V car battery. 4. Start the 12V car. 5. Attach the other end of the negative jumper cable to the negative terminal marked ‘B’ on the 24 Volt system. 6. Confirm that both ends of the jumper cables are securely connected to the correct terminals. 7. Increase the revolutions per minute (RPM) of the car engine for about one minute. 8. Attempt to start the bus or truck using the now-charged 24 Volt system. 9. Once the bus starts, promptly disconnect the jumper cables to allow the bus alternator to take over the charging of the 24 Volt system. Following these steps will help you successfully jump start a 24 Volt system using a 12 Volt ordinary vehicle.