How to Check IPR Valve: A Step-by-Step Guide for Diesel Engine Owners
If you own a diesel engine, chances are you’ve heard of the IPR valve. This important component controls the pressure of your fuel system, making it crucial to maintain its proper functioning. But with so many different parts in your engine, it can be difficult to pinpoint exactly where the problem lies.
Luckily, checking your IPR valve doesn’t have to be a complicated process. In this step-by-step guide, we’ll show you exactly how to check your IPR valve and ensure that your engine is running smoothly. So, grab your wrench and let’s get started!
Introduction
Are you wondering how to check the IPR valve in your diesel engine? Well, you’ve come to the right place! The IPR valve, or the Injector Pressure Regulator valve, is an important component in your diesel engine that regulates the fuel pressure. It is crucial to ensure that it’s working properly so that your engine can run smoothly and efficiently. To check the IPR valve, you will need a few tools, including a multimeter, a wrench, and an IPR valve removal tool.
First, locate the IPR valve, which is typically located on the high-pressure oil pump. Then, remove the valve and put it aside. Check the valve for any damage or debris, such as metal shavings or dirt.
Next, using a multimeter, check the resistance of the valve. If it fails to meet the resistance specified in your vehicle’s manual, then the valve needs to be replaced. Follow these steps carefully to ensure that your diesel engine runs smoothly and reliably.
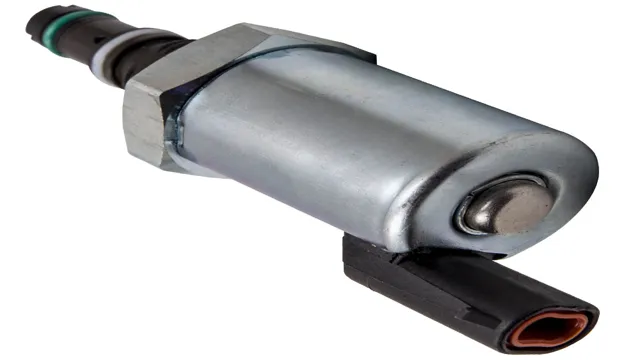
What is an IPR Valve?
An IPR valve, short for Injection Pressure Regulator valve, is a device commonly found in diesel engines that regulates the high-pressure oil system. It is responsible for maintaining the necessary pressure needed for the engine’s fuel injectors to function properly. In essence, the IPR valve acts as a switch to control oil flow to the injectors.
It achieves this by monitoring the pressure of oil flowing through the system, and adjusting the valve accordingly to ensure consistent fuel delivery to the engine. Think of the IPR valve as the gatekeeper to the engine’s fuel injection system, controlling the flow of oil to keep the engine running smoothly. Without it, the engine would experience a range of problems, including poor fuel efficiency, reduced power output, and misfires.
So, the IPR valve plays a critical role in the proper functioning of a diesel engine, ensuring peak performance and efficiency.
Why It’s Important to Check Your IPR Valve
Checking your IPR valve is an important aspect of maintaining the optimal performance of your vehicle. The IPR (Injection Pressure Regulator) valve is responsible for regulating the pressure of the fuel that is injected into the engine. If the valve is not functioning properly, it can lead to poor fuel efficiency, loss of power, and potential damage to your engine.
As a vehicle owner, it is essential to understand what the IPR valve does and how to troubleshoot it if there are any issues. Checking your IPR valve regularly can help you avoid costly repairs and ensure that your vehicle is functioning at its best.
Tools and Materials You Will Need
If you’re wondering how to check the IPR valve on your diesel engine, there are a few tools and materials that you will need. The first, and most important, is a diagnostic scanner that is capable of reading trouble codes and live data. Additionally, you’ll want to have a multimeter on hand to help you check voltages and continuity.
Other tools that may come in handy include a set of socket wrenches, a torque wrench, and a pry bar for removing the IPR valve from the engine. Finally, it’s important to have new O-rings and a tube of high-temp silicone sealant on hand, as these will be necessary to properly reinstall the valve. By gathering all of these tools and materials before you begin, you can ensure that you have everything you need to efficiently and effectively diagnose and fix any issues with your IPR valve.
Socket Wrench
If you are planning to work on your car or any mechanical project, a socket wrench will come in handy. Before you start, make sure you have the right tools and materials. You will need a socket wrench set consisting of various socket sizes, a ratchet handle, an extension bar, and sockets with both standard and metric measurements.
Additionally, have a torque wrench to ensure that bolts and nuts are tightened to the correct level. Materials such as lubricant or penetrating oil and shop towels will also be useful. With the right tools and materials, you can easily tackle any project.
A socket wrench is a versatile tool that can be used in many different ways, from changing tires to repairing engines. It is crucial to have the correct size of socket for the job. Trying to force a socket that is too small or large onto a nut or bolt can lead to stripped threads and expensive repairs.
For this reason, it is essential to have a socket wrench set with various sizes. A ratchet handle is also a crucial component. It allows you to apply different amounts of force to the socket without stopping and repositioning the tool.
An extension bar can provide extra length to reach bolts in hard to access areas. A torque wrench ensures that nuts and bolts are tightened to the correct force. Tightening them too much could damage threads, while not tightening them enough could lead to parts coming loose.
A torque wrench takes the guesswork out of tightening nuts and bolts to the correct torque specifications. Finally, having the right materials such as lubricant or penetrating oil and shop towels can make a huge difference. Lubricant or penetrating oil helps loosen tight nuts and bolts, while shop towels can be used to clean up any spills or messes.
Torque Wrench
If you’re planning to use a torque wrench for a project, there are a few tools and materials you’ll need to have on hand. First and foremost, you’ll need the torque wrench itself. There are a variety of torque wrench models on the market, so make sure you choose one that’s appropriate for the specific project you’re undertaking.
You’ll also need the appropriate sockets or adapters for the torque wrench to work with. These can usually be purchased separately. It’s helpful to have a set of sockets in different sizes so you’re prepared for different types of bolts.
Additionally, you may want to have some lubricating oil or grease on hand to keep your tools in good condition. Another important consideration is safety gear. Make sure you have gloves and eye protection to protect yourself from flying debris.
With the right tools and materials, you can tackle your torque wrench project with confidence and precision.
IPR Socket Tool
When it comes to working with IPR sockets, having the right tools is essential for getting the job done quickly and efficiently. Some of the materials you will need include a socket wrench handle, IPR socket bits in various sizes (3/8″, 1/2″, and 3/4″), and a torque wrench for precise tightening. These tools are designed specifically for working with IPR sockets, which are used to tighten and loosen bolts in a variety of applications.
The IPR socket tool allows you to apply torque evenly and avoid stripping or damaging the bolt, which can be especially important when working with high-stress applications. With the right tools and materials, working with IPR sockets can be a breeze, and you can tackle any job with confidence.
Step-by-Step Guide
If your vehicle doesn’t start up like it used to, or you notice a decrease in mileage, your IPR valve may be the culprit. Checking the IPR valve is a simple process that you can do at home in no time. First, locate the IPR valve, which is usually located on the high-pressure oil pump or on the fuel injection control module.
Then, remove the wire connector to the valve and check that there’s no visible wear or corrosion. Next, use a multimeter to test the valve’s resistance, which should measure between 18 and 1
6 ohms. If the reading is off, it’s time to replace the valve. Finally, check the oil level, as low oil can also cause issues with the IPR valve.
By following these simple steps on how to check your IPR valve, you should be able to identify any problems and get your vehicle running smoothly again.
Step 1: Locate the IPR Valve
If you’re experiencing some issues with your diesel engine, chances are the IPR valve may be the culprit. The Injection Pressure Regulator valve controls the high pressure oil that injects fuel into the engine. Finding it may seem daunting, but we’ve got you covered with this step-by-step guide.
First, locate the valve cover gasket and remove it to see the valve. It is usually located on the driver’s side valve cover towards the front of the engine. Once you’ve located the valve, you need to remove the electrical connector and fuel lines to gain access to it.
It is important to note that you need to drain your engine oil first before proceeding with the removal. Once that’s done, you can use a 1 1/4 inch or 32 mm deep socket to remove the valve itself. Carefully remove the valve to avoid damaging any surrounding parts.
Now that you’ve successfully located and removed your IPR valve, you can inspect it for any damage or wear and tear. It’s also a good idea to clean the valve port using a specifically formulated cleaner. After cleaning and inspection, reinstall the valve, fuel lines and electrical connector.
Don’t forget to refill your engine oil before starting it up again. In conclusion, locating and accessing the IPR valve may seem like a daunting task, but with this guide, you’ll be able to do it like a pro. Always make sure to take necessary precautions and follow safety guidelines when dealing with engine parts.
A little bit of extra maintenance can go a long way in keeping your diesel engine running smoothly.
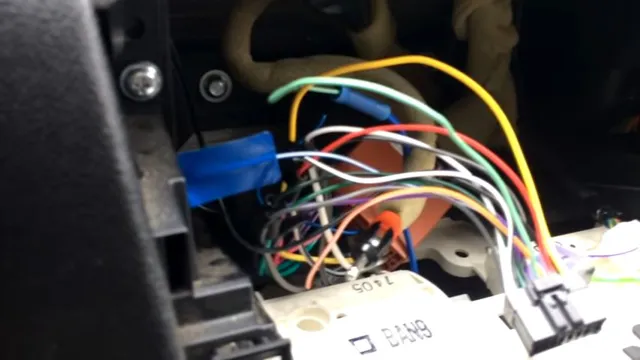
Step 2: Remove the Electrical Connector
To remove the electrical connector, the first step is to locate it. You can refer to the owner’s manual to learn more about the placement of the electrical connectors in your vehicle. Once you’ve identified the connector, you should carefully examine it and look for the locking mechanism.
The locking mechanism is usually a plastic tab or a clip that holds the connector in place. You’ll need to use a small screwdriver or a similar tool to gently press down on the locking mechanism while at the same time pulling the connector away from the fitting. Be sure to avoid using excessive force or pulling on the wires themselves, as this could cause damage to the connector and potentially harm the electrical components of your vehicle.
Once the connector is disconnected, you can proceed with the required repairs or maintenance. With a little practice and patience, removing electrical connectors can become fairly simple and straightforward. Always remember to exercise caution and read up on the specific instructions for your particular vehicle before attempting any repairs or maintenance.
Step 3: Remove the IPR Valve
Removing the IPR valve can be a daunting task for most people, but it doesn’t have to be. With our step-by-step guide, you’ll be able to remove the IPR valve without any difficulties. The first step is to disconnect the battery to ensure your safety.
After that, you’ll need to locate the IPR valve, which is usually located on the high-pressure oil pump. Once you’ve located it, you can use a socket wrench to loosen the bolts that hold it in place. Be sure to wear gloves so that you don’t damage the valve or hurt yourself.
Once the bolts have been loosened, you can remove the IPR valve by gently pulling it out of the high-pressure oil pump. Keep in mind that the IPR valve plays a critical role in regulating fuel pressure, and it should only be removed if necessary. By following our step-by-step guide, you’ll be able to remove the IPR valve safely and efficiently.
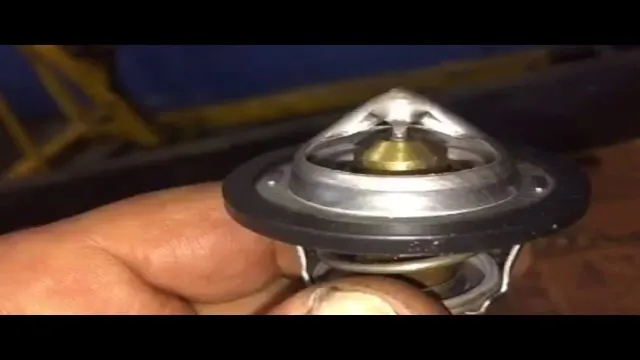
Step 4: Inspect the IPR Valve
Now it’s time to take a closer look at the IPR valve, which is an essential component of your diesel engine. Start by disconnecting the electrical connector and removing the valve from the high-pressure oil pump. Inspect the valve thoroughly for any signs of damage or wear.
Pay special attention to the valve plunger and the valve’s body, ensuring there are no visible cracks or holes. If you notice any significant damage, it’s best to replace the valve altogether to avoid further problems down the line. However, if everything looks okay, clean the valve with a specialized cleaner that is safe for use with diesel engines.
Remember to avoid using any harsh chemicals or solvents that may damage the valve. Once you’ve cleaned the valve, thoroughly dry it off using compressed air and then reinstall it onto the high-pressure oil pump. Ensure that it is securely fastened in place to prevent any oil leaks.
By inspecting and cleaning your IPR valve, you can help to keep your diesel engine running smoothly and efficiently for years to come.
Step 5: Reinstall the IPR Valve
Now that you’ve pulled out the old IPR valve, you’re ready to install a new one. Before you do, give the area around the valve a good clean to remove any debris or dirt. This will help prevent any contamination from interfering with the valve’s operation.
Then, install the new IPR valve by reversing the steps you followed earlier to remove the old one. Make sure that you don’t cross-thread the valve, as this can cause damage to both the valve and the engine. When the valve is in place, tighten the bolts using a torque wrench to ensure that they’re properly secured.
Finally, do a quick check to ensure that everything is in place and fully tightened. Once you’re satisfied, you’re ready to move on to the next step in the IPR valve replacement process.
Conclusion
In conclusion, checking the IPR valve is a critical step in maintaining the optimal performance of your diesel engine. Just like how a doctor checks your pulse, monitoring the IPR valve ensures that your engine is running smoothly and efficiently. So, always remember to give your IPR valve some love, and your engine will thank you with smooth, reliable, and powerful performance.
Happy wrenching!”
Summary of Steps
If you’re looking to follow a step-by-step guide for accomplishing a task, it can sometimes be overwhelming knowing where to start. That’s why we’ve put together a summary of steps to help guide you through the process. First, identify the task or goal you want to achieve.
Next, research and gather any necessary materials or tools needed. Then, break the task into smaller, manageable steps to create a clear plan of action. From there, work through each step methodically, taking breaks and asking for help if needed.
Finally, review your work to ensure it meets your standards and make any necessary adjustments. By following these steps, you can tackle any task with confidence and achieve the results you’re after.
Final Thoughts
In conclusion, following a step-by-step guide can be extremely beneficial for tackling complex tasks, especially when it comes to technical processes. By breaking down a complicated process into smaller, more manageable steps, the task becomes less daunting and easier to accomplish. However, it’s important to keep in mind that everyone’s learning process is different, so it’s okay to take your time and move at your own pace.
It also helps to ask for help when needed, whether it be from a colleague, friend, or online community. Ultimately, following a step-by-step guide can lead to a more efficient and successful outcome as long as you remain patient, persistent, and open to learning.
FAQs
What is an IPR valve?
The IPR valve, or Injection Pressure Regulator valve, is a vital component of the engine’s fuel system. It regulates the high-pressure oil that powers the fuel injectors.
How do I know if my IPR valve is faulty?
If your engine is experiencing low power, rough idling, or stalling, your IPR valve could be the culprit. You can test it with a multimeter to check for proper voltage and resistance.
Can I clean my IPR valve instead of replacing it?
In some cases, it’s possible to clean a dirty or clogged IPR valve. However, if the valve is severely damaged or malfunctioning, it’s best to replace it to ensure proper engine function.
Is a faulty IPR valve dangerous for my engine?
Yes, a faulty IPR valve can cause serious damage to your engine. If it’s not regulating the high-pressure oil correctly, it can cause the fuel injectors to over pressurize and lead to fuel leaks or even engine fires. It’s essential to address any IPR valve issues as soon as possible.