Step-by-Step Guide: Installing Fifth Wheel Rails Made Easy
If you’re planning to tow your RV with a fifth wheel, one of the essential things you’ll need to do is install the fifth wheel rails. It’s a crucial process that must be done accurately to ensure safety and proper weight distribution. But if you’re new to this, you may be wondering where to start or how to go about installing your fifth wheel rails.
Don’t worry, though—this step-by-step guide has got you covered! In this article, we’ll walk you through everything you need to know to install your fifth wheel rails and make your towing experience smooth and secure. From the tools you’ll need to the actual installation process, we’ve got it all covered! So, let’s dive in and get your fifth wheel rails installed in no time!
What are some considerations when choosing a 5th wheel hitch that fits into an existing B&W turnover ball hole?
When choosing a 5th wheel hitch that fits into an existing B&W turnover ball hole, it is essential to consider a few key factors. Firstly, ensure that the hitch is compatible with the B&W Turnover Ball system, as not all hitches are designed to work seamlessly with this specific setup. It’s crucial to select a hitch that is specifically designed to fit into the B&W turnover ball hole to avoid compatibility issues during installation. Additionally, consider the ease of installation when choosing a 5th wheel hitch. Opt for a hitch that offers straightforward installation instructions and requires minimal drilling or cutting. This will not only save time during the installation process but also ensure that the hitch is correctly and securely installed. Furthermore, look for user-friendly resources such as installation guides and online tutorials to assist you in installing the hitch correctly. Leveraging resources like instructional videos can provide additional guidance and troubleshooting tips to make the installation process smoother and more manageable. Lastly, take your time during the installation process and treat it as a learning experience. By proceeding carefully and methodically, you can ensure that the 5th wheel hitch is installed correctly and securely into the existing B&W turnover ball hole. Remember that proper installation is crucial for the safe and effective operation of the hitch, so patience and attention to detail are key considerations when choosing a hitch for this specific setup.
Gathering Necessary Tools and Materials
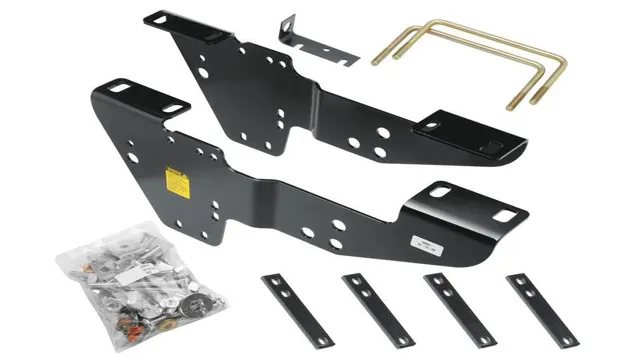
When installing fifth wheel rails, it’s crucial to gather all necessary tools and materials beforehand to ensure smooth and seamless installation. These tools may include drills, socket sets, wrenches, and a torque wrench, depending on your fifth wheel rail kit’s requirements. Additionally, you’ll need to have the appropriate rails and brackets that fit your specific vehicle make and model.
It’s essential to read the instructions carefully and double-check that you have all the correct components before beginning the installation process. Taking a little extra time in the preparation phase can save you from unexpected delays and errors later on. Remember, having everything you need on hand before you begin will make the process much easier and less frustrating.
Check manufacturer’s instructions for specific tools and materials needed
Before starting any DIY project, it is essential to check the manufacturer’s instructions for specific tools and materials needed. This step will save you a lot of time and effort because you won’t have to make multiple trips to the hardware store. Also, it will help you avoid using the wrong tools or materials that could compromise the final product’s quality.
Depending on the project, you might need hand tools, power tools, adhesives, or different types of hardware. Make a list of all the recommended tools and materials and double-check if you have them or need to purchase them. Don’t forget that using the right tools and materials not only ensures good results but also guarantees your safety while working.
For instance, using a power drill with an appropriate bit will make a difference when drilling on wood or metal, and wearing gloves, goggles, or respirators can prevent accidents or respiratory problems while handling chemicals or dusty materials. Remember that manufacturers know their products better than anyone, so following their instructions and recommendations is always a smart move for a successful DIY project.
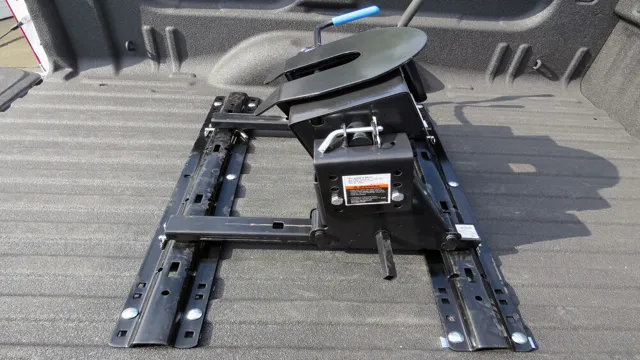
Positioning the Rails on the Truck Bed
If you’re looking to install fifth wheel rails on your truck bed, positioning them correctly is crucial. The first step is to measure the distance from the center of your truck bed to the center of the rear axle. Next, mark the position of the rails on the truck bed in line with the distance measurement previously taken.
Once you have marked the positions, drill holes using a drill bit and a drill. In case the truck bed edges are uneven or raised, shims or wooden blocks can be used to level the surface for a stronger fit. After drilling, slide the rails in place and secure them using bolts and nuts.
Make sure the bolts are tight and check for any loose ends before proceeding. With this task completed, you’re now ready to attach the fifth-wheel hitch and start towing. Always follow the manufacturer’s instructions and guidelines provided to ensure a safe and secure installation.
That’s all there is to it – happy towing!
Measure and mark centerline on the bed
When it comes to positioning the rails on your truck bed for your tonneau cover, it’s crucial to measure and mark the centerline on the bed. This is especially important if you’re looking for a perfectly aligned and symmetrical look. To do this, you’ll need to start by measuring the bed’s width and then divide it in half to get the centerline.
Once you’ve done this, use a chalk or pencil to mark the line from the front to the back of the bed. This will serve as your guide when installing the rails so that they’re placed in the centerline. By ensuring that the rails are positioned in the center, you’ll have a tonneau cover that sits straight and looks clean, making for a professional installation.
Align crossmember with the centerline and attach to bed
When it comes to installing a bed-lining, aligning the crossmember with the centerline of your truck bed is crucial. It helps to ensure a consistent fit and prevents any issues with tilting or shaking. But before you get to this step, the first thing to do is position the rails on the truck bed accurately.
You can start by laying out the rails parallel and centered on your truck bed. After mapping out the correct position, you can attach the rails to your truck bed, using clips or bolts. Once the rails are secured, the crossmember can be placed across them, making sure to align it with the centerline.
At this point, make any necessary adjustments and fasten the crossmember to the rails. By following these steps and aligning the crossmember with the centerline of your truck bed, you can ensure a snug and secure bed-liner installation.
Assembling the Frame Brackets
If you’re wondering how to install fifth wheel rails, one of the first steps is to assemble the frame brackets. This involves attaching the brackets to the underside of the truck bed, which will provide a secure anchor for the rails. Before you begin, make sure you have all the necessary tools and hardware, including bolts, nuts, and washers.
Once you’ve positioned the brackets where they need to go, use a torque wrench to tighten the bolts to the manufacturer’s specifications. It’s important to ensure that the brackets are installed level and in the correct location to prevent any issues down the road. With the brackets securely in place, you’ll be one step closer to installing your fifth wheel rails and getting your rig ready for your next adventure on the road.
Attach brackets onto rails according to manufacturer’s instructions
Assembling the frame brackets is a crucial step in setting up your rail system. To do it right, you need to follow the manufacturer’s instructions carefully. First, you need to determine the placement of the brackets on the rails.
Make sure that they are evenly spaced and at the correct height. Then, use screws or bolts to attach the brackets firmly to the rails. Remember, the brackets will support the weight of the solar panels, so it’s essential that they’re secure.
As you work, be sure to check that the brackets are level and plumb. If not, adjust them until they are. It’s also a good idea to double-check that the brackets are facing the right direction.
Once all the brackets are attached, give them a final tightening to ensure that they’re secure. This step will be a crucial factor in supporting your panels, giving you peace of mind that they’ll stay adequately mounted. With the brackets firmly in place, you are now one step closer to having a fully functional solar system that will save you money on energy costs and help the environment.
Ensure brackets are properly aligned and level
When assembling the frame brackets for your project, one crucial step is ensuring they are properly aligned and level. This may seem like a simple task, but it can make all the difference in the stability and functionality of your final product. To achieve the best results, start by laying out all your materials and hardware.
Double-check that you have all the necessary tools to complete the job before beginning. Once you’ve gathered everything you need, carefully attach the brackets to the frame, making sure they are level and evenly spaced. It’s essential to take your time during this process, as rushing can result in uneven brackets that compromise the structure’s integrity.
Additionally, proper bracket alignment can enhance overall aesthetic appeal, enhancing the look of your finished project. So, make sure to double-check your work and take the necessary steps to ensure the brackets are appropriately aligned and level.
users typically take about 2-3 hours to install a set of fifth wheel rails. Additionally, users shared their firsthand experiences with installing 5th wheel hitches, mentioning specific time frames such as “about 4 hours total,” “about 3 hours,” and installing them in their driveway. This indicates that the installation time can vary depending on individual circumstances and the type of hitch being installed.
Mounting the Fifth Wheel Hitch
If you’re looking to install fifth wheel rails on your truck bed, you may be wondering where to start. First, determine the correct location for the rails by using a rail placement guide specific to your truck’s make and model. Once you have the rails in place, it’s time to mount the fifth wheel hitch.
Begin by positioning the hitch onto the rails and securing the bolts into place. Make sure the hitch is level and aligned correctly before fully tightening the bolts. Once the bolts are securely fastened, test the hitch to ensure it’s stable and there’s no movement.
It’s important to consult the hitch and truck owner’s manual for specific instructions and weight limits. With proper installation and maintenance, your fifth wheel hitch should provide you with many successful trips ahead.
Attach hitch onto the frame brackets and secure in place
Once you’ve selected the perfect fifth wheel hitch for your vehicle and trailer, it’s time to mount it onto your frame brackets. First, ensure that the brackets are securely attached to your vehicle’s frame and that the hitch is properly aligned with them. Then, attach the hitch onto the brackets and secure it in place using the required bolts and washers.
Tighten the bolts thoroughly to ensure that the hitch is stable and won’t shift during travel. Remember to periodically check the bolts and tighten them as needed to ensure your hitch remains secure and stable. With your fifth wheel hitch mounted securely, you’ll be ready to hit the road and enjoy your next adventure.
Test hitch for stability and proper function
Mounting a fifth wheel hitch is an essential task that needs careful attention. Before doing anything else, it is crucial to ensure that the hitch is compatible with your trailer and your towing vehicle. Once you have received the hitch, read the manufacturer’s instructions carefully to know the required tools and mounting steps.
The first step is to assemble the hitch components, including the legs and the crossbar. After that, attach the mounting brackets to the frame rails of your truck bed. Make sure to keep the brackets level and at the appropriate distance according to the instructions.
Next, place the assembled hitch onto the mounting brackets and secure it by tightening the bolts. Finally, test the hitch for stability and proper function by connecting the trailer to your towing vehicle. Ensure that you adjust the height and the weight distribution of the trailer to achieve a smooth and safe towing experience.
Proper mounting of a fifth wheel hitch is crucial for the safety of your tow vehicle, trailer, and you as a driver.
Where can one purchase the necessary parts and accessories for truck hitch installations at competitive prices?
One excellent option for acquiring the required parts and accessories for truck hitch installations at competitive prices is etrailer.com. This website offers a wide range of truck hitch components at affordable rates. Customers have reported favorable experiences with etrailer.com, praising their quick shipping services and competitive pricing. It has been a reliable source for high-quality truck hitch parts and accessories, making it a recommended choice for those seeking competitive pricing on these items.
Final Steps
Now that you have properly drilled the holes in your truck bed, it’s time to install the fifth wheel rails. Start by positioning the rails in the appropriate location and secure them with bolts that fit the holes previously drilled. It’s important to make sure the bolts are tightened down properly so there is no movement of the rails.
Next, install the brackets that come with the fifth wheel hitch on top of the rails, and secure them in place using bolts and nuts. It’s important to double-check that the brackets are aligned properly before tightening them down. Lastly, you can now install the fifth wheel hitch onto the brackets and tighten it down, making sure to test the hitch’s movement before starting to tow.
Congratulations! You’ve successfully installed your fifth wheel rails and hitch, and you’re ready to hit the road with your fifth wheel trailer!
Tighten all bolts and nuts
If you’re putting together a piece of furniture or DIY project, it’s important to make sure everything is secure. This means tightening all the bolts and nuts. Double-check each one to ensure that they’re tight enough to hold everything in place.
It’s a good idea to use a torque wrench to measure the tightness of each nut and bolt. This will help you ensure that everything is tightened to the right specifications. Once everything is tightened, give it a little wiggle to make sure that nothing is loose.
You don’t want to find out that something is wobbly after you’ve finished your project! Following these simple steps will keep everything in place, ensuring that your finished product is sturdy and safe to use.
Double check alignment and function of all parts
Double check alignment and function of all parts before completing any DIY project is a critical step, as it guarantees the effectiveness and longevity of your creation. Whether you’re working on furniture, electronics, or even a simple toy, it is essential to ensure that every piece is properly aligned and functioning correctly. One loose screw or improperly attached part can compromise the entire structure and ultimately render all your hard work useless.
Think of it like a puzzle – it doesn’t matter how perfect each piece is individually; if it doesn’t fit together correctly, the whole thing falls apart. So, take the extra time to go over every inch of your project, checking for any discrepancies or missing elements. It’s better to be safe than sorry and avoid the hassle of having to start all over again.
Enjoy your newly installed fifth wheel rails!
Congratulations on installing your fifth wheel rails! Now that the installation process is complete, it’s time to take some final steps to ensure that your new rails are functioning correctly. Take some time to double-check the torque on your bolts, ensuring that they are fastened securely. This will help prevent your rails from shifting or moving while you’re on the road.
It’s also important to test out your fifth wheel hitch to ensure that it’s aligned properly and functioning correctly. A well-installed fifth wheel hitch will help distribute weight evenly and reduce sway while driving. With these final steps, you’re ready to hit the road with confidence knowing that your newly installed fifth wheel rails are working perfectly.
Conclusion
Well folks, there you have it – the ins and outs of installing fifth wheel rails! It may seem like a daunting task at first, but with the right tools and a bit of patience, you’ll be up and running in no time. And let’s face it, there’s nothing quite like cruising down the open road with your fifth wheel in tow, knowing you installed those rails all by yourself. So go forth, my fellow adventurers, and install those rails with confidence – the road awaits!”
FAQs
What tools do I need to install fifth wheel rails?
You will need a torque wrench, drill, drill bits, socket set, pliers, and a level for a successful installation of fifth wheel rails.
Do fifth wheel rails come with installation instructions?
Yes, most fifth wheel rails come with detailed instructions to guide you or your installer through the installation process.
How long does it take to install fifth wheel rails?
The installation time varies depending on your experience and the complexity of the installation. However, it usually takes about 2-3 hours to install a set of fifth wheel rails.
Can I install fifth wheel rails on my own or do I need to hire a professional?
While it is possible to install fifth wheel rails on your own if you have the necessary tools and experience, it is highly recommended to hire a professional installer to ensure a safe and secure installation.
Which brands of 5th wheel hitches are being discussed in the forum thread?
In the forum thread, participants are focusing on several brands of 5th wheel hitches. These include the B&W Companion, Drawtite/Reese/Bulldog Highrise, and the Colibert Companion.

