Revamp Your Ride: A Step-by-Step Guide on How to Change Your Brake Switch!
If you’re experiencing issues with your brake lights not turning on, the problem may lie in your brake switch. A faulty switch can cause serious safety concerns while driving, making it crucial to address the issue promptly. While taking your car to a mechanic may seem like an obvious choice, changing your brake switch yourself can save you time and money.
In this step-by-step guide, we’ll walk you through the process of changing your brake switch, helping you get your lights back on and your vehicle back on the road safely. So grab your tools and let’s get started!
Preparation
If you’re experiencing issues with your brake lights or notice they’re not functioning properly, it’s important to take action and replace the brake switch. Before diving into switching out the part, make sure to prepare your workspace and have the necessary tools on hand. Start by finding a safe area to work on your vehicle, such as in a garage or on a flat surface away from traffic.
Next, gather a set of pliers, a screwdriver, and a replacement brake switch. It’s also recommended to wear gloves and safety glasses to protect your hands and eyes from any debris or chemicals. Once you have everything you need, you can begin the process of replacing the brake switch and restoring your brake lights to proper operation.
With a little preparation and the right tools, the task can be easily accomplished.
Gather Necessary Tools and Materials
Preparation is key when it comes to gathering the necessary tools and materials for any project. Ensuring that you have everything you need before starting can help you save time and avoid unnecessary trips to the hardware store. Depending on the project you’re working on, the tools and materials needed may vary, so it’s essential to have a comprehensive list before you start.
Whether you’re planning on building a piece of furniture or doing some landscaping work, make sure you have all the necessary tools and materials before you begin. Some essential tools you may need include a hammer, screwdriver, drill, saw, and measuring tape. As for materials, it’s essential to have enough of everything you need to avoid running out midway through the project.
Furthermore, make sure to select materials that are appropriate for the project and the environment they’ll be in, ensuring that they’ll last as long as possible. By being prepared and gathering all necessary tools and materials beforehand, you’ll be able to complete your project with ease and avoid any unnecessary headaches along the way.
Park Your Vehicle in a Safe Area
When it comes to parking your vehicle, safety should always be the top priority. Before heading out, it’s important to do some preparation and research to ensure you’re parking in a safe area. One key factor to consider is the location – parking in well-lit areas with high foot traffic is always a good idea.
Try to avoid parking on the street or in dimly-lit areas, as they can put your vehicle at a higher risk of theft or damage. It’s also helpful to look for parking lots or garages that offer security measures like surveillance cameras or attendants. By taking these precautions, you can lessen the chances of your vehicle being targeted by criminals or encountering any other unexpected issues.
So, always remember that a little bit of preparation can go a long way in keeping your vehicle safe while parked.
Locating the Brake Switch
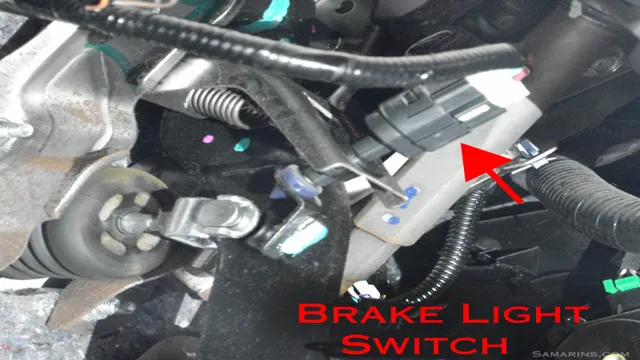
If you are experiencing issues with your brake lights or your brake lights are not turning on, it could be time to change your brake switch. But before you can change your brake switch, you need to know where it is located. Typically, the brake switch is located under the brake pedal of your vehicle.
To locate it, take a closer look at the brake pedal and you’ll notice a small switch that connects to the pedal arm. This switch is the brake switch and it works by activating the brake lights when you press on the brake pedal. Once you locate the switch, you can easily replace it by disconnecting the wiring harness and unscrewing the mounting bolts.
Just make sure to replace it with a new one that matches the make and model of your vehicle, so that the brake lights will function properly once again. So if you’re wondering how to change brake switch, start by locating it under the brake pedal first.
Consult Your Vehicle Manual for Location
When it comes to locating the brake switch in your vehicle, one of the best pieces of advice is to consult your vehicle manual for precise information. While the location of the brake switch may vary slightly from one vehicle to another, most brake switches are typically located near the brake pedal. In some vehicles, the brake switch may be found next to or under the brake pedal.
Meanwhile, in others, it may be located near the brake pedal, but higher up on the pedal assembly. The brake switch is an essential component of your vehicle’s braking system, and it is responsible for activating the brake lights whenever you apply the brake pedal. To ensure that you can quickly locate the brake switch in your vehicle, consider checking your vehicle’s manual today.
Locate and Remove the Old Brake Switch
Locating the old brake switch is an essential step in replacing it with a new one. Typically, the brake switch is located near the brake pedal. So, the easiest way to find it is by examining the area around the pedal.
Look for a small rectangular box or switch attached to the pedal arm or the brake pedal assembly. Sometimes, you may need to remove a cover or unscrew panels to access the brake switch. Once you find the switch, disconnect the old one by unplugging its wiring connector.
Remember to take note of the location of the wires and the connector to avoid confusion when installing the new brake switch. With this straightforward approach, locating and removing the old brake switch should be a breeze.
Installing the New Brake Switch
If you’re experiencing issues with your car’s brake lights not working or staying on even when the pedal isn’t depressed, it may be time to change your brake switch. Thankfully, changing a brake switch is a relatively simple process that you can complete yourself with just a few basic tools. The first step is to locate the brake switch, which is typically located near the brake pedal assembly.
Once you’ve found it, you can disconnect the wires and remove the old switch, making sure to keep track of any screws or clips needed for the new switch. Installing the new brake switch is just a matter of reversing the process, making sure to double-check your connections and test the new switch before taking your car out on the road. By following these easy steps, you’ll be back on the road with a reliable set of brake lights in no time.
Install the New Brake Switch in Place of the Old One
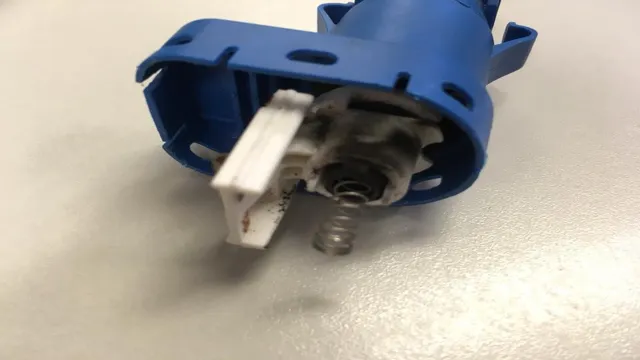
Installing the new brake switch is a crucial step in ensuring your vehicle’s safety. To start, locate where the old switch is connected to the brake pedal. Gently remove the old switch and disconnect it from the wiring harness.
Take note of the positioning of the old brake switch as this will help you align the new one. Next, connect the wiring harness to your new brake switch and adjust it in the same position as the old switch. Make sure the new switch is securely in place and test it by pressing the brake pedal down.
If all is well, the brake lights should turn on. Installing the new brake switch may seem like a small step, but it is a crucial component of your vehicle’s brake system that should not be overlooked. By taking care of this step, you can ensure the safety of yourself and those around you on the road.
So, what are you waiting for? Get your new brake switch installed today!
Secure the New Brake Switch
When installing a new brake switch, it’s important to prioritize security. After disconnecting the battery and removing the old switch, the new one should be firmly affixed to the brake pedal arm using screws or bolts. Check that it is securely attached and won’t come loose with repeated use.
It’s also a good idea to wrap any exposed wires with electrical tape to prevent them from coming into contact with other metal parts or causing a short circuit. Once everything is in place, reattach the battery and test the brake lights to make sure they’re working properly. Don’t rush through this process – taking the time to ensure the brake switch is securely installed can help prevent dangerous accidents on the road.
Testing the Brake Switch
If you’re experiencing issues with your brake lights, it could be caused by a faulty brake switch. Changing the brake switch is a relatively easy process, but before you do that, it’s important to test if the switch is the root of the problem. The first step in testing the brake switch is to locate it, which is typically near the brake pedal.
Next, you’ll need to use a multimeter to test the switch’s continuity. If the switch does not have continuity when the brake pedal is pressed down, then you’ll know it’s faulty and needs to be replaced. Changing the brake switch can be done in a few easy steps, but it’s important to first make sure that it’s the culprit causing the brake light issues.
Keep in mind that ensuring your vehicle’s brake system is functioning properly is crucial for your safety and the safety of others on the road.
Turn On Your Vehicle and Test the Brakes
Testing the brake switch is an essential step in ensuring your vehicle is safe to drive. To start, turn on your engine and press down on the brake pedal. If you notice that your brake lights do not turn on, it could indicate a faulty brake switch.
This switch is responsible for illuminating the brake lights every time you press the pedal, signaling to other drivers that you are slowing down or stopping. Without this function, you increase the risk of accidents on the road. Therefore, it is vital to get this checked as soon as possible.
Don’t let a faulty brake switch compromise your safety. Regularly testing this component is crucial to ensure your brakes function correctly and reduce the risk of accidents while driving.
Ensure Proper Functionality of the Brake Switch
Brake Switch Safety should always be your top priority when driving a car, and that includes ensuring that your brake system is functioning correctly. That’s where the brake switch comes in–it’s a small component that controls the brake lights. If the brake switch is not working correctly, it can cause a range of issues, including the brake lights not coming on, or the transmission not shifting out of park.
So, if you suspect that the brake switch may be faulty, it’s essential to test it. Testing the brake switch involves checking the circuit for continuity, which can be done using a multimeter. First, locate the brake switch–it’s usually located near the pedal, under the dashboard.
Then, disconnect the wiring harness, and use the multimeter to test the switch’s continuity. If the multimeter does not display continuity when the brake pedal is depressed, it means the switch is faulty and should be replaced. Remember, always ensure proper functionality of the brake switch, as it is a crucial safety component of your vehicle.
Final Thoughts
Changing the brake switch in your vehicle is a straightforward procedure that you can do yourself. The brake switch is an essential component of your car’s braking system, as it enables the brake lights to illuminate when you apply the brakes. If your brake lights are not working, the brake switch is likely to be the culprit.
The first step in changing the brake switch is to locate it, which is usually underneath the brake pedal. Once you have located the switch, disconnect it from the wiring harness. You can then compare the old switch to the new one to ensure that they are the same size and fit.
Installing the new switch is a simple matter of reversing the process, reconnecting the wiring harness, and testing the brake lights to ensure that they are working correctly. With a little patience and attention to detail, you can save yourself a trip to the garage and change your brake switch in no time.
Conclusion
In conclusion, changing the brake switch may seem like a daunting task, but with the right tools and a little bit of patience, it can be a breeze. Just remember to disconnect the battery and follow the instructions carefully. And when it’s all done, you can hit the brakes with confidence knowing that your car will come to a smooth and safe stop.
As the saying goes, it’s always better to be safe than sorry – especially when it comes to your brakes!”
FAQs
What is a brake switch and what does it do?
A brake switch is a component located near the brake pedal that sends a signal to the brake lights when the brake pedal is pressed.
How do I know if my brake switch needs to be replaced?
Signs that your brake switch may need to be replaced include brake lights staying on or not coming on at all, cruise control not working, or problems shifting out of park.
Can I replace the brake switch myself or do I need a professional?
Depending on your level of experience and comfort with automotive repairs, you may be able to replace the brake switch yourself. However, if you are unsure of what you’re doing, it’s best to seek the help of a professional.
How much does it cost to replace a brake switch?
The cost of replacing a brake switch varies depending on the make and model of your vehicle and the labor costs in your area. On average, you can expect to pay between $50 and $200 for parts and labor.