Expert Guide: A Step-by-Step Tutorial on Installing a Throwout Bearing on a Clutch Fork
Are you struggling to install a throwout bearing on your clutch fork? Don’t worry, you’re not alone. This is a common issue that many people face when working on their cars. But with the right tools and some guidance, you can easily get the job done.
The throwout bearing plays an important role in the clutch system of your car. It is responsible for disengaging the clutch plate from the flywheel when you press the clutch pedal. If the throwout bearing is damaged or worn out, you may experience problems when changing gears or hear a squeaking noise from your clutch.
Installing a throwout bearing on a clutch fork can be a tricky task. You need to ensure that the bearing is seated properly and that the fork is aligned with the pressure plate. To begin with, you’ll need a few tools such as a socket set, pry bar, and a torque wrench.
Before you start installing the throwout bearing, it’s important to clean the clutch fork and all the mating surfaces. This will ensure that there is no dirt or debris that could cause damage to the bearing or affect its performance. Once you have everything prepared, it’s time to install the throwout bearing.
One of the key things to keep in mind is that you need to be careful when handling the bearing as it is a sensitive component. You can use a special tool called a bearing installer to ensure that the bearing is seated properly on the fork. As you work on this task, it’s important to stay patient and take your time.
Don’t rush through the process as that could lead to mistakes or damage to your clutch system. Once the throwout bearing is installed, make sure to test the clutch to ensure everything is working properly. In conclusion, installing a throwout bearing on a clutch fork can be daunting, but it doesn’t have to be.
Introduction
Installing a throwout bearing on a clutch fork may seem like a daunting task for some, but with the right tools and guidance, it can be done without any major issues. The first step is to remove the old bearing from the clutch fork and inspect it for any signs of wear or damage. Once removed, the new bearing should be lubricated with high-temperature grease before being slid onto the clutch fork.
A retaining clip should then be secured to keep the bearing in place. It is important to make sure the bearing is properly seated and aligned on the fork, as any misalignment can lead to premature wear and potential damage to the clutch system. With the new bearing installed and secured, the clutch fork should be reattached to the transmission, making sure everything is tightened and torqued to the manufacturer’s specifications.
Overall, installing a throwout bearing on a clutch fork may take some time and patience, but with proper care and attention to detail, it can be done successfully.
What is a throwout bearing?
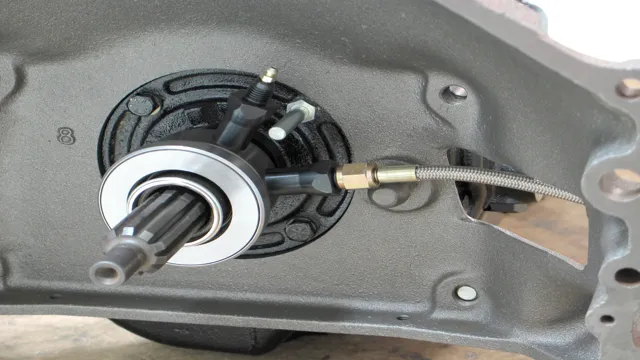
A throwout bearing, also known as a clutch release bearing, is a crucial component of a manual transmission system. This small bearing is responsible for enabling the clutch to disengage from the engine, which allows the driver to shift gears smoothly. Essentially, when the driver presses down on the clutch pedal, the throwout bearing pushes against the pressure plate, which in turn separates the clutch disc from the flywheel.
Without a functioning throwout bearing, the clutch system would be unable to function properly, making it difficult to shift gears and, ultimately, damaging other components of the transmission. Therefore, keeping an eye on your throwout bearing’s condition is crucial for ensuring the longevity of your vehicle’s transmission system.
Why do you need to install it on a clutch fork?
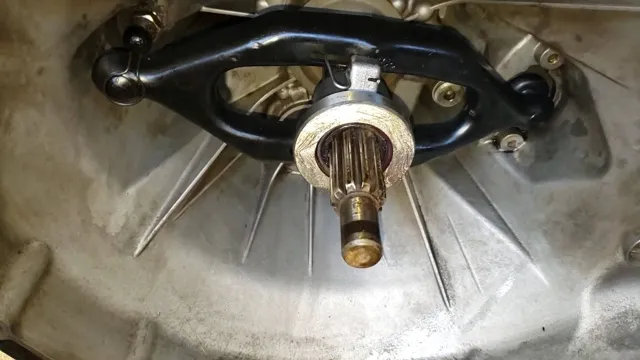
When it comes to manual transmission vehicles, the clutch is a crucial component that connects the engine to the gearbox. And within the clutch system, the clutch fork plays a vital role, acting as a lever that engages and disengages the clutch. But why do you need to install something on the clutch fork? Well, the answer lies in the fact that the clutch fork is prone to wear and tear over time.
This is where a clutch fork protector comes in handy, offering an extra layer of protection to prevent damage and prolong the life of your clutch fork. By installing a clutch fork protector, you can avoid the inconvenience and expense of having to replace the entire clutch system. So, if you want to ensure that your clutch continues to function smoothly and efficiently, it’s essential to consider installing a clutch fork protector.
Step-by-step Guide
Installing a throwout bearing on a clutch fork might sound intimidating at first, but with the right tools and a step-by-step guide, it can be done in no time. To start, make sure to have a new throwout bearing and a clutch alignment tool on hand. Begin by removing the transmission and clutch components until the clutch fork is exposed.
Next, remove the old throwout bearing and slide the new one onto the fork, ensuring that it is properly aligned. Be sure to grease the bearing before installing it onto the fork. Once the bearing is in place, slide the clutch fork back into the transmission and tighten any bolts or screws that were loosened during the removal process.
Lastly, use the clutch alignment tool to ensure that the clutch disc is aligned properly before putting the transmission back into place. With these steps executed properly, your clutch system should be back in working order in no time.
Step 1: Remove the old bearing
If you’re looking to replace an old bearing, the first step is to remove the old one. This process can be relatively simple or quite complicated, depending on the type of bearing and its location. If the bearing is easily accessible, all you may need are basic tools like a wrench, hammer or pliers.
Simply remove any retaining clips, bolts, or retaining rings, and gently tap the bearing out of place. However, if the bearing is located in a tight or hard to reach area, a specialized tool such as a gear puller may be necessary. Care should be taken to avoid damaging nearby components, and appropriate safety gear should always be worn during the process.
Overall, while it may seem like a small step, correctly removing the old bearing is crucial to ensuring a secure and successful replacement. By following the appropriate steps, including choosing the right tools and taking safety precautions, you can confidently remove the old bearing and move on to the next stage of the process.
Step 2: Prepare the new bearing
To prepare the new bearing, first, make sure that the bearing and the surrounding area are clean and free of any dirt or debris. This will ensure that the bearing will be able to rotate smoothly without any interference. If necessary, use a cleaning agent and a rag to wipe down the area.
Next, apply a small amount of lubricant to the bearing. This will help to reduce friction and ensure that the bearing lasts as long as possible. You can use any type of lubricant that is recommended for the type of bearing you are replacing.
Finally, make sure that the new bearing is properly seated in the housing or mounting bracket. This will ensure that the bearing is securely in place and will not move around or become loose while in use. With these simple steps, you can prepare the new bearing and ensure that it will work effectively for your needs.
Step 3: Install the new bearing on the clutch fork
After successfully removing the old bearing from the clutch fork, the next step is to install the new one. This step is crucial because it ensures the proper functioning of the clutch. The new bearing should easily slide onto the fork, with no resistance.
To help with this, apply some grease to the fork before sliding the bearing in place. Once the bearing is in position, secure it with the retaining clip that came with the assembly. Double-check that the clip is snugly fitted to ensure that the bearing is securely attached to the fork.
This process might seem simple, but it plays a vital role in extending the lifespan of your car’s clutch. By following this step-by-step guide to install the new bearing on the clutch fork, you will significantly reduce the chances of clutch failure. So don’t take this step for granted and ensure that it’s done correctly.
Step 4: Reassemble the clutch
Now that you’ve replaced the clutch parts and installed the new bearing, it’s time to reassemble the clutch. Start by placing the pressure plate onto the flywheel, aligning the dowel pins, and hand-tightening the bolts. Then, using a torque wrench, tighten the bolts in a star pattern to the manufacturer’s recommended torque specification.
After that, install the disc and align the splines with the input shaft. Next, install the release bearing onto the fork by sliding it onto the fork, being careful not to damage the bearing or fork. Finally, install the clutch fork and pivot ball, ensuring that everything is in the correct position.
Double-check your work and make sure everything is tightened and secure. Congratulations! You’ve successfully reassembled your clutch. Now it’s time to test it out and see how it performs.
Remember, proper installation and maintenance are crucial to the longevity and reliability of your clutch system. Always follow manufacturer guidelines and seek professional help if needed.
Tips and Tricks
Installing a throwout bearing on a clutch fork can be a tricky process, but with the right tips and tricks, it can be done easily. First, make sure the clutch fork and bearing are clean and free of any dirt or debris. Then, lubricate the bearing with grease or oil and align it properly onto the fork.
Use a bearing installation tool to press the bearing onto the fork until it clicks into place. Finally, reattach the fork onto the transmission and make sure it moves smoothly. Remember to take your time and use caution when working on your vehicle’s clutch system.
By following these steps, you can successfully install a new throwout bearing on your clutch fork and improve your car’s overall performance.
Check for wear and tear before installing
When it comes to installing new components, whether it be in your car or home, it is important to check for wear and tear before installing. This can save you from potential hazards and costly repairs in the future. Before installation, make sure to thoroughly inspect the item for any cracks, rust, or other signs of deterioration.
It is also important to check if any screws or other fasteners are missing or loose. A missing screw or bolt can cause the component to become loose, creating a potential safety hazard. By taking the time to check for wear and tear beforehand, you can ensure that the component will work properly and safely once installed.
This can save you from unnecessary headaches and repairs in the long run. So, always be sure to perform a thorough inspection before installation to prevent any potential issues down the road.
Lubricate the bearing before installation
When it comes to installing bearings, there’s one crucial step you shouldn’t overlook: lubrication. Lubricating the bearing prior to installation is critical in ensuring its long-term performance and lifespan. The process is straightforward- simply apply a small amount of lubricant to the inner and outer surfaces of the bearing.
This can be done using a brush, spray, or even directly from a tube. The lubrication helps prevent friction between the surfaces, allowing them to rotate smoothly and reducing wear and tear over time. The type of lubricant used should be compatible with the bearing material and operating conditions.
Remember, the little bit of extra time you spend lubricating your bearings before installation can save you a great deal of time, money, and headaches in the long run.
Conclusion
After following these simple steps for installing a throwout bearing on your clutch fork, your transmission woes will be a thing of the past. Just remember to take your time, stay focused, and don’t let the task get the better of you. With a little bit of elbow grease and a few hours of your time, you’ll be back on the road and shifting gears like a pro.
So go ahead and get your hands dirty – you’ll thank yourself later and impress your friends with your newfound mechanical skills!”
FAQs
What is a throwout bearing and why is it important for a clutch fork?
A throwout bearing is a component of the clutch system that helps to disengage the clutch by pressing against the clutch springs. It is important for the clutch fork to properly engage and disengage the clutch without causing damage to the transmission.
What are the steps to installing a throwout bearing on a clutch fork?
Firstly, remove the transmission and clutch assembly. Then, remove the old throwout bearing and inspect the clutch fork for any damage. Grease the new throwout bearing and carefully slide it onto the clutch fork, ensuring that it is properly aligned. Reinstall the clutch assembly and transmission.
How do I know if my throwout bearing needs to be replaced?
Signs of a failing throwout bearing include a squeaking or grinding noise when pressing the clutch pedal, difficulty shifting gears, and a vibrating clutch pedal. If you notice any of these symptoms, it is recommended to have a mechanic inspect your clutch system.
Can I install a throwout bearing myself or should I seek professional help?
The installation process for a throwout bearing can be complex and requires special tools. If you are experienced with vehicle mechanics and have the proper tools, you may be able to install a throwout bearing yourself. However, it is recommended to seek professional help to ensure proper installation and avoid potential damage to your vehicle.

