How to Install a Light Switch And Outlet Combo: Step-by-Step Guide
To install a light switch and outlet combo, follow these steps: Turn off the circuit breaker supplying power to the switch, remove the existing switch, and disconnect the wires. Connect the new combo switch and outlet using the provided wiring diagram, ensuring that the hot and neutral wires are connected correctly.
Secure the combo device in place and reattach the faceplate. Finally, restore power at the circuit breaker and test the switch and outlet for functionality. This installation provides a convenient solution for controlling a light and powering a device from a single switch.
Necessary Tools And Materials
To install a light switch and outlet combo, you will need necessary tools and materials such as a screwdriver, wire stripper, electrical tape, wire nuts, and the combo unit itself. For safety reasons, ensure that the power is turned off before beginning the installation process.
List Of Tools Required
Before you can start installing a light switch and outlet combo, you will need to gather the necessary tools to ensure the job goes smoothly. Here is a list of tools you will need:
- Screwdriver
- Wire stripper
- Needle-nose pliers
- Utility knife
- Voltage tester
- Wire cutters
- Electrical tape
Materials Needed For Installation
Aside from the tools, you will also need a few materials to complete the installation of the light switch and outlet combo. Here are the materials you should have on hand:
- Light switch and outlet combo
- Electrical box
- Wire nuts
- Electrical wire
- Wire connectors
- Mounting screws
- Faceplate
Make sure you have all the necessary tools and materials ready before you begin the installation process. This will save you time and ensure you have everything you need to complete the project successfully.
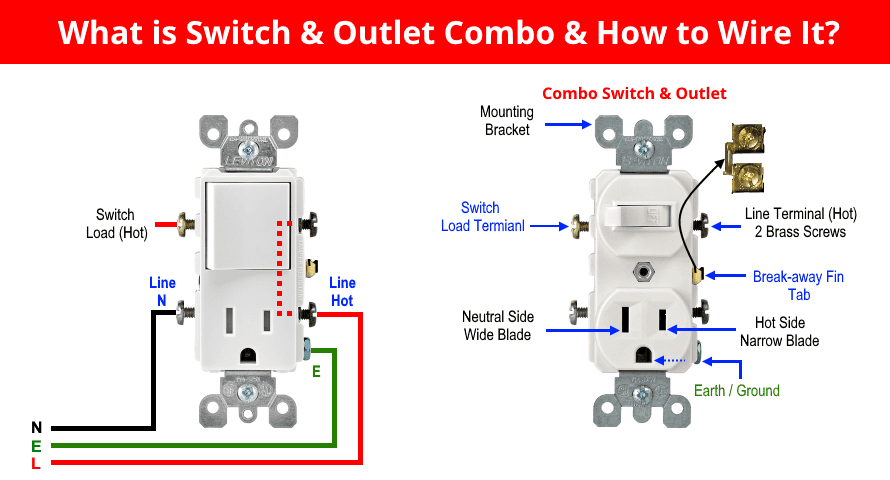
Credit: www.electricaltechnology.org
Step-by-step Installation Guide
Installing a light switch and outlet combo can be a simple and satisfying DIY project that can enhance the functionality and aesthetics of your home. In this step-by-step installation guide, we will walk you through every phase of the process, ensuring that you have all the necessary information and instructions to complete the installation successfully. Let’s get started!
Preparation And Safety Measures
Before starting the installation, it is vital to take some necessary precautions to ensure your safety and the integrity of the electrical system. Safety should always be your priority when working with electrical wiring. Follow these steps:
- Gather all the required tools and materials for the installation, including a voltage tester, wire stripper, pliers, and a screwdriver.
- Turn off the power at the circuit breaker that supplies electricity to the switch and outlet.
- Double-check that the power is off by using a voltage tester to test the wires.
- Wear appropriate safety gear, such as safety glasses and non-conductive gloves, to protect yourself during the installation process.
Turning Off The Power
Before you begin, it’s important to ensure that the power to the switch and outlet combo is turned off. Follow these steps:
- Locate the circuit breaker that controls the power to the switch and outlet combo.
- Flip the switch on the circuit breaker to the “Off” position to cut off the power supply.
- Confirm that the power is off by using a voltage tester to check the wires.
- Only proceed with the installation once you are certain that there is no power running to the switch and outlet combo.
Removing The Old Switch Or Outlet
Now that the power is off, you can safely remove the old switch or outlet. Follow these steps:
- Start by unscrewing the cover plate from the switch or outlet using a screwdriver.
- Next, unscrew and remove the screws that secure the switch or outlet to the electrical box.
- Gently pull the switch or outlet out of the electrical box, exposing the electrical wiring.
- Using a wire stripper, carefully strip the insulation off the wires, exposing a small section of bare wire.
- Disconnect the wires from the old switch or outlet, noting their respective positions and color codes.
- Once all the wires are disconnected, remove the old switch or outlet from the electrical box.
Installing The Combo Switch And Outlet
With the old switch or outlet removed, it’s time to install the combo switch and outlet. Follow these steps:
- Begin by attaching the combo switch and outlet to the electrical box using screws provided with the device.
- Connect the wires to the corresponding terminals on the combo switch and outlet, following the color codes.
- Tightly secure the wires by tightening the screws on the terminal connectors.
- Ensure that all connections are secure and no bare wire is exposed.
- Push the combo switch and outlet into the electrical box, making sure it sits flush against the wall.
- Screw the cover plate onto the combo switch and outlet using a screwdriver.
Final Testing And Adjustment
Once the combo switch and outlet are installed, it’s essential to test their functionality and make any necessary adjustments. Follow these steps:
- Turn the power back on at the circuit breaker to restore electricity to the switch and outlet combo.
- Use a voltage tester to ensure that there is power running to the device.
- Test the switch and outlet by plugging in a lamp or device and turning the switch on and off.
- If everything is working correctly, you have successfully installed the combo switch and outlet!
- If there are any issues, double-check the wiring connections and make any necessary adjustments.
Remember, if you are unsure about any step of the installation process or if you encounter any problems, it’s always best to consult a professional electrician for assistance. Safety should always be the utmost priority when working with electrical systems in your home.
Common Challenges And Solutions
Dealing With Different Wiring Configurations
When facing various wiring setups, ensure to carefully identify each wire’s function.
Refer to guides or professionals to understand the wiring configurations.
Addressing Compatibility Issues
To tackle compatibility issues, verify products are suitable for each other.
Check for manufacturer recommendations to ensure compatibility.

Credit: www.amazon.com
Tips For Maintenance And Troubleshooting
If you have recently installed a light switch and outlet combo in your home, it’s important to perform regular maintenance to ensure it functions properly. Additionally, being able to troubleshoot common issues can save you time and money in the long run. Follow these tips to keep your light switch and outlet combo in top condition.
Regular Maintenance Practices
- Regularly inspect the switch and outlet for any signs of wear or damage, such as cracks or discoloration.
- Test the functionality of the switch and outlet by plugging in a device and turning the switch on and off to ensure it operates smoothly.
- Clean the switch and outlet regularly with a soft cloth to remove dust and debris that can affect its performance.
- Check the wiring connections to ensure they are secure and there are no loose or exposed wires.
Troubleshooting Common Issues
- If the switch or outlet becomes hot to the touch, immediately turn off the power and consult a professional electrician to prevent a potential fire hazard.
- If the outlet stops working, check the circuit breaker to see if it has tripped, and reset it if necessary.
- If the switch is not functioning properly, inspect the wiring connections to ensure they are secure and properly connected.
- If the outlet is not providing power, test it with a different device to ensure the problem is not with the device itself.
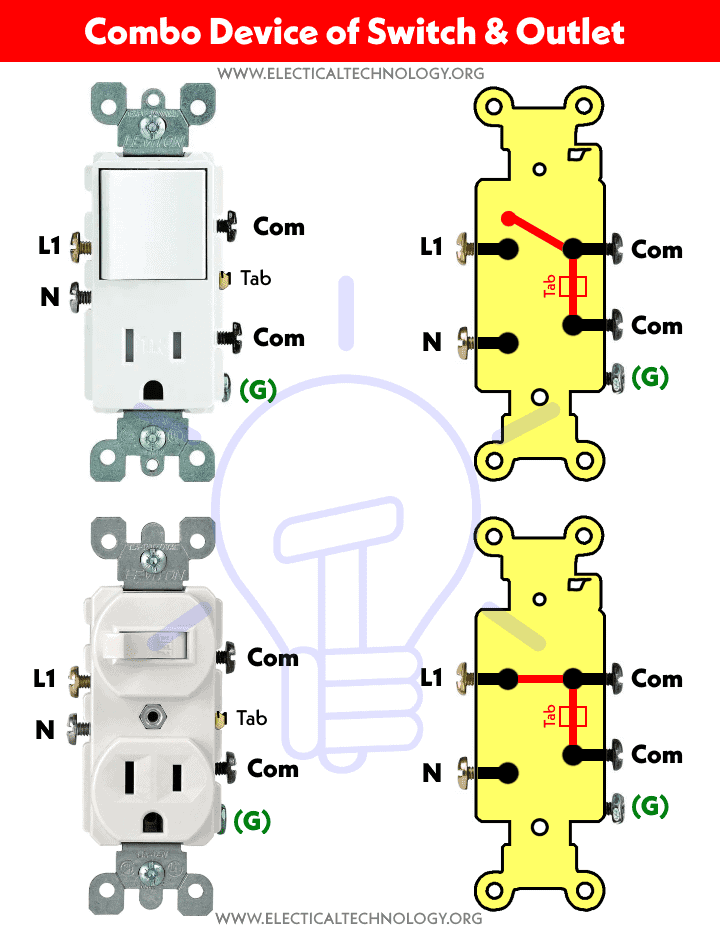
Credit: www.electricaltechnology.org
Frequently Asked Questions On How To Install A Light Switch And Outlet Combo
Can I Draw Power From A Wall Outlet To Add A Light And Light Switch?
You can draw power from a wall outlet for a light and light switch by wiring them correctly.
Can Lights And Receptacles Be On Same Circuit?
Yes, lights and receptacles can be on the same circuit. However, some local codes may require separate circuits. Installing a separate circuit helps prevent total darkness in case of power overload.
Can You Put An Outlet In Place Of A Light Switch?
Yes, you can replace a light switch with an electrical outlet. However, the wiring will be different, so it is recommended to hire a licensed electrician for the project.
How Do You Wire Two Plugs And A Switch?
To wire two plugs and a switch, connect the hot wire through all outlets to the switch using black wires. Connect the neutral wire through all outlets to the switch using white wires. Also, link the neutral to each outlet’s neutral side with white pigtails.
Cap off the white wire at the switch.
Conclusion
To wrap up, installing a light switch and outlet combo can enhance functionality in any space. Remember to follow safety precautions and consult a professional if needed. By incorporating this feature, you can streamline your electrical setup efficiently and effectively.
Elevate your space with this simple yet impactful upgrade.