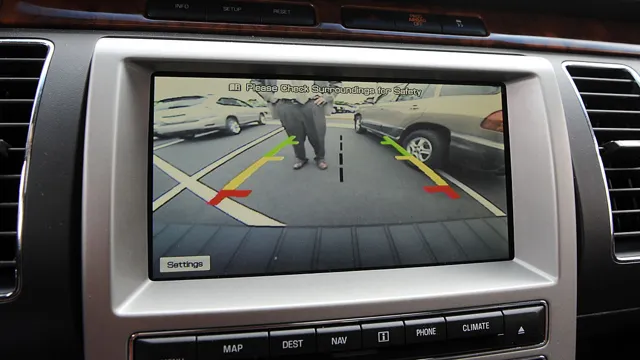
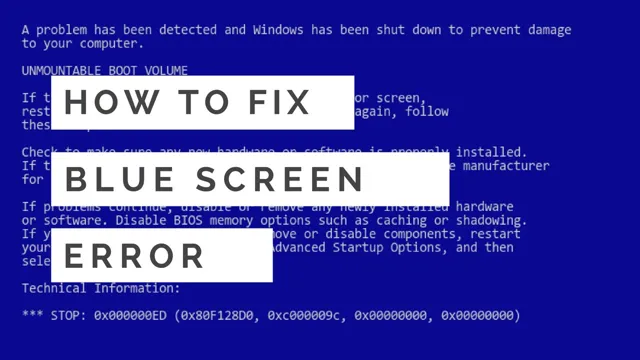
Your Ultimate Guide to Fixing the Blue Screen on Your Backup Camera – A Step-by-Step Solution
If you’re someone who experiences frequent blue screens on your backup camera, then you know how frustrating it can be. One minute you’re reversing your car with ease, and the next, you’re stuck staring at a blue screen. It’s important to address this issue as soon as possible because not only does it disrupt your driving routine, but it can also pose a significant safety risk.
In this blog, we’ll explore some simple yet effective solutions to fix the blue screen on your backup camera so you can drive safely and with confidence once again. So, buckle up and let’s dive in!
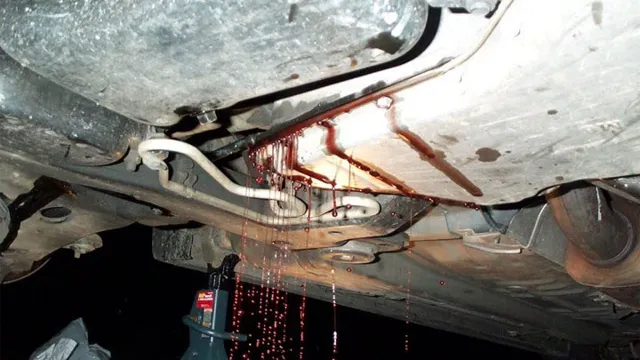
Check Camera Connections
If you’re experiencing a blue screen on your backup camera, one simple check is to ensure that all camera connections are secure. Sometimes, loose or faulty connections can disrupt the signal between the camera and monitor, causing the blue screen error. Begin by checking the connectors at both ends of the camera cable, making sure they are firmly attached and not frayed or damaged.
If everything looks okay, check the power source for the camera and make sure it’s properly connected as well. If the problem persists after checking the connections, it may be a sign of a more serious issue. However, in many cases, a simple check of the camera connections can rectify the blue screen error and have you back up and running in no time.
Ensure camera is correctly plugged in
camera connections When it comes to using a camera, there’s nothing more frustrating than realizing it’s not working correctly. One of the most common reasons for camera malfunctions is actually a simple fix: checking the connections. Before assuming there’s something wrong with your camera, ensure that it’s correctly plugged into the power source and connected to any necessary cables.
Double-check that all cables are firmly attached and properly inserted into their respective ports. If everything seems to be in order and the camera still isn’t working, try unplugging and then plugging it back in again. It’s amazing how often this quick and easy step can solve the problem! In conclusion, taking a moment to make sure your camera is correctly connected is a small but essential step in ensuring successful photography and videography.
Test with a different cable if possible
If you are experiencing connectivity issues with your camera, it’s essential to check the camera connections. A faulty cable could be the culprit behind the problem. You can start by unplugging the cable and examining it for signs of wear and tear.
Alternatively, if you have a different cable, try connecting it to your camera to see if it works. This process can help you determine whether the cable is the source of the problem or if there’s something wrong with the camera itself. If you find that the cable is faulty, you should acquire a new one as soon as possible to avoid further complications.
A cable that isn’t working correctly could cause problems ranging from data loss to damage to your equipment. Taking the time to troubleshoot your camera’s connections can save you headaches and expenses in the long run.
Reset the Camera
If you’re facing a blue screen on your backup camera, one effective solution is to reset the camera. This is a simple process and can be done in a few steps. Firstly, identify the reset button on your camera or the manual that came with it.
Next, press and hold down the reset button for a few seconds. This will reset the camera and erase any configurations that were previously saved. Finally, test out the camera to see if the blue screen has disappeared.
This method usually works for most cameras as it helps restore the camera’s default settings. Remember to consult the user manual if there are any additional steps to follow for resetting the camera. In conclusion, performing a camera reset is an easy and quick solution that can help alleviate the blue screen issue on your backup camera.
Disconnect battery for a few minutes to reset camera
If you are experiencing issues with your camera system, such as a blank screen or frozen display, it may be time to try resetting the camera. One easy way to do this is by disconnecting the battery for a few minutes. This will effectively reset the system and may solve any glitches or bugs that your camera has encountered.
Simply locate the battery in your camera system and remove it from the unit. Wait for a few minutes before reinserting the battery and turning the camera back on. This simple step can save you time and money and is definitely worth a try before seeking professional assistance.
So, next time you experience camera problems, don’t panic – try resetting the camera by disconnecting the battery and see if that solves your issue.
Check camera manual for any specific reset instructions
If you’re experiencing any issues with your camera, one of the best ways to troubleshoot the problem is to reset the camera. While each camera model is different, most cameras have a reset option in the settings menu. This option will reset the camera’s settings to their default values, which can often fix any issues you’re experiencing.
It’s important to note that resetting your camera will erase all custom settings you’ve created, so make sure to back up any important settings before resetting. Some cameras may have specific reset instructions outlined in the user manual, so it’s a good idea to check your manual for any specific reset instructions. Overall, resetting your camera is a quick and easy troubleshooting step that can often fix any issues you’re experiencing.
Update Firmware
If you’re experiencing a blue screen issue with your backup camera, it could be due to outdated firmware. To fix this issue, you will need to update the firmware of your camera. To start, go to the manufacturer’s website and download the latest firmware for your camera.
Then, connect your camera to your computer and follow the manufacturer’s instructions to update the firmware. Once the firmware is updated, disconnect the camera and see if the blue screen issue has been resolved. If the issue persists, it may be a hardware problem, and you should contact the manufacturer for assistance.
But with a simple firmware update, you might be able to fix the blue screen issue and get your backup camera functioning properly again. So don’t hesitate to try updating your camera’s firmware to solve the issue.
Visit manufacturer’s website for latest firmware updates
Keeping your devices up-to-date with the latest firmware can improve performance, fix bugs, and even enhance security. Visiting the manufacturer’s website is the best way to stay on top of all the firmware updates your device needs. Updating your firmware can be a quick and easy process that can greatly improve your device’s overall performance.
In some cases, manufacturers will release patches that fix known security vulnerabilities, making it especially important to stay up-to-date with firmware updates. Don’t let your devices fall behind the curve – take a proactive approach and visit your manufacturer’s website regularly to ensure you have the latest firmware updates installed. It’s a simple step that can make a big difference in your device’s performance.
Follow instructions to install updates on camera
If you’re looking to update the firmware on your camera, it’s important to follow the instructions carefully to ensure a successful installation. First, make sure you have the correct firmware version for your specific camera model. This can usually be found on the manufacturer’s website or by checking the camera’s software settings.
Next, download the firmware update onto your computer and then transfer it onto a compatible memory card. Insert the memory card into your camera and follow the on-screen prompts to begin the firmware update process. It’s important not to turn off your camera or remove the memory card during the installation, as this can cause permanent damage to your device.
Once the update is complete, confirm that the new firmware version is installed and functioning properly. By staying up-to-date with the latest firmware updates for your camera, you can ensure optimal performance and avoid potential issues.
Replace Camera
Are you having trouble with a blue screen on your backup camera? Don’t worry, it’s a common issue, and there’s a simple solution. In most cases, the problem comes from a faulty camera, so you’ll need to replace it. Luckily it’s an easy fix; you can purchase a new camera unit and replace the old one with little effort.
Just make sure to choose a compatible camera model with your car’s system. Install the new camera using the provided instructions, and you’re good to go. Keep in mind that if the issue persists after replacing the camera, the problem might be with the wiring or the car’s monitor, and you should consult a professional before attempting any repairs.
So, the solution to your blue screen backup camera problem is simple: replace the camera. It’s an easy fix that will have you reversing safely in no time.
As a last resort, replace camera with a new one
If you’ve exhausted all the troubleshooting options and your camera still isn’t working properly, it may be time to consider replacing it altogether. While this may seem like a daunting and expensive task, it’s important to remember that a faulty camera can hinder your ability to capture important memories or produce high-quality work. When considering a new camera, it’s essential to do your research and determine what features are most important to you, such as resolution, autofocus capabilities, and lens options.
Additionally, consider factors such as budget and intended use when making your decision. Though it may feel like a setback to replace your camera, investing in a new one can ultimately enhance your photography or videography experience, providing you with the tools you need to produce exceptional content.
Conclusion
In conclusion, fixing the blue screen on a backup camera can be a daunting task. However, fear not! The solution is simple: check the wiring, reset the camera, and make sure the camera lens is clean. If all else fails, try restarting the vehicle or consulting a professional.
Just remember, with a little troubleshooting and some good old-fashioned elbow grease, you can easily reverse the blue screen of death and get back to safely backing up your vehicle. Happy trails!”
FAQs
What causes the blue screen on a backup camera?
The blue screen on a backup camera can be caused by a faulty camera connection, a damaged camera, or a malfunction in the display unit.
How can I fix a blue screen on my backup camera?
First, check the camera connection and ensure it is properly plugged in. If that doesn’t work, try resetting the system or replacing the camera or display unit.
Can a blue screen on a backup camera be repaired?
In some cases, a blue screen on a backup camera can be repaired by replacing the camera or display unit. However, if the issue is with the wiring or connection, it may require professional repair.
How much does it cost to fix a blue screen on a backup camera?
The cost of fixing a blue screen on a backup camera can vary depending on the extent of the damage and whether it requires a replacement camera or display unit. It is recommended to get a quote from a professional repair service.
How often should I check my backup camera to avoid a blue screen?
It is recommended to check your backup camera regularly, especially before embarking on a long trip. Doing routine visual inspections and testing the camera functionality before each trip can help avoid any last-minute surprises and costly repairs.