Ford Owners Take Note: A Comprehensive Guide on How to Check and Maintain Transmission Fluid Like a Pro!
Ford transmission fluid is a crucial component that plays a vital role in the efficient running of your car’s transmission. It lubricates, cools, and helps your transmission to shift gears seamlessly. However, most car owners often overlook the importance of checking their Ford transmission fluid, and this can lead to significant problems that may incur costly repairs.
So, how often should you check your Ford transmission fluid? And how do you go about checking it? In this guide, we’ll walk you through the steps involved in checking your Ford transmission fluid to help you keep your car running smoothly. Whether you’re a new Ford car owner or have been driving one for a while, it’s essential to have a basic understanding of how to check your transmission fluid levels. Keep reading to learn more about how to check your Ford transmission fluid and avoid any costly damages.
Locate Transmission Dipstick
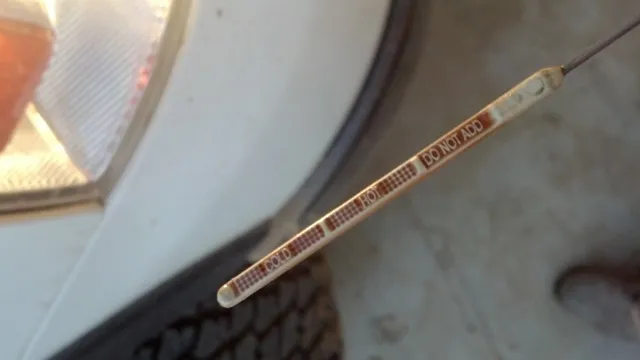
If you’re wondering how to check the transmission fluid in your Ford car, one of the first steps is to locate the transmission dipstick. This dipstick is typically located near the engine block and has a distinctive handle or knob on top that allows you to easily pull it out. Once you’ve located the dipstick, you’ll need to wipe it down with a clean cloth and then reinsert it fully into the transmission.
After a moment, pull the dipstick back out again and inspect the fluid level and color. The level should fall within the range indicated by the markings on the dipstick, and the fluid should be a clear, reddish color. If the fluid is dark or discolored, or if the level is low, it may be time to bring your vehicle in for a professional inspection or fluid change.
By regularly checking your transmission fluid, you can help ensure that your Ford car is running smoothly and avoid costly repairs down the road.
Step 1: Park on Level Ground
When it comes to checking your transmission fluid level, the first step is to always park your car on level ground. This ensures you get an accurate reading of the fluid level when you check it. Once your car is parked, locate the transmission dipstick.
The transmission dipstick is usually located towards the back of the engine bay, near the transmission itself. It often has a bright-colored handle to make it easy to spot. Once you have located the dipstick, remove it and wipe it clean with a cloth or rag.
Then, insert the dipstick back into its tube and make sure it goes all the way in. Pull it back out again and check the fluid level against the markings on the dipstick. If the level is low, you will need to add more fluid.
Remember to always use the correct type of fluid for your vehicle to avoid any damage to your transmission. With these simple steps, checking your transmission fluid level can be done quickly and easily.
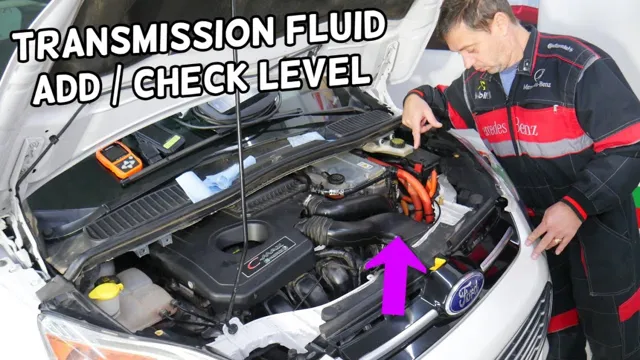
Step 2: Turn off the Engine and Engage Parking Brake
Once you’ve parked your car, it’s important to turn off the engine and engage the parking brake before locating the transmission dipstick. Doing this ensures your car remains still and doesn’t roll back or forward while you’re inspecting the transmission fluid. The transmission dipstick is usually located near the back of the engine compartment, but it may vary slightly depending on the make and model of your car.
It is a long thin metal or plastic stick with a loop handle at the end. You’ll want to locate your car’s owner manual to find the specific location of your transmission dipstick. Checking your transmission fluid should be done when your engine is at operating temperature.
It’s important to keep your transmission fluid at the correct level and ensure that it’s clean as it’s vital in keeping your car’s gear shifting smooth and prolonging the life of your transmission.
Step 3: Open Hood and Locate Dipstick
Now it’s time to locate the transmission dipstick. First, open the hood of your car. This is usually done by pulling a lever located on the driver’s side of the vehicle, near the footwell.
Once you’ve popped the hood, secure it with the latch to prevent any accidents. You’re now on the hunt for the transmission dipstick. This is usually located towards the back of the engine, near the firewall.
Sometimes it’s colored differently than the other dipsticks, so keep an eye out for anything that looks out of place. If you’re unsure where to find the transmission dipstick, consult your owner’s manual or do some online research. Remember, every car is different, so don’t be afraid to spend some time locating it.
Once you’ve found it, pull it out and have a look at the fluid level. If it’s low, it’s time to add more fluid. And if you notice any discoloration or strange smells, it may be time for a transmission flush or other maintenance.
Keep up with regular checks to keep your car running smoothly!
Check Fluid Levels
“Hey there Ford owners! Are you wondering how to check your transmission fluid? It’s important to regularly check your transmission fluid levels to keep your vehicle running smoothly. First, locate the transmission dipstick under the hood. Remove it and wipe it clean with a cloth or paper towel.
Then, reinsert the dipstick and remove it again to check the fluid level. The fluid should be within the designated range on the dipstick and have a clear, reddish color. If the fluid is low, add more until it reaches the appropriate level.
Remember to use the type of transmission fluid recommended for your Ford model. Checking your transmission fluid is a quick and easy way to take care of your vehicle and prevent any potential issues down the road. So don’t forget to do it regularly!”
Step 1: Remove Dipstick and Wipe Clean
Checking the fluid levels in your vehicle is an important part of routine maintenance. Many different systems require fluids to function properly, such as the engine oil, coolant, transmission fluid, power steering fluid, and brake fluid. In this blog section, we will focus on checking the engine oil level, which is essential for the health and performance of your engine.
The first step in checking your engine oil level is to remove the dipstick and wipe it clean with a cloth or paper towel. The dipstick is usually located near the engine and has a large handle for easy removal. After wiping it clean, reinsert the dipstick into the oil reservoir and push it all the way down until it clicks into place.
Then, pull the dipstick out again and look at the oil level indicator. The indicator typically has a shaded area that shows the recommended oil level. If the level is below the shaded area, you need to add more oil.
It’s important to remember that the condition of your engine oil is just as important as the oil level. If the oil is dark and dirty, it’s time to change it. Used oil contains contaminants that can cause damage to your engine if left unchanged.
Regular oil changes ensure that your engine stays clean and runs smoothly. In conclusion, checking your engine oil level is a simple task that should be done regularly to keep your engine running smoothly. By following these simple steps, you can ensure that your engine oil is at the recommended level and in good condition.
Don’t neglect this important part of routine maintenance, as it can save you time and money in the long run.
Step 2: Reinsert Dipstick and Remove Again
Checking fluid levels in your car is an essential part of regular maintenance. To do this, you will need to locate the dipstick for the fluid you want to check – typically, these can be found near the engine block. Once you have found the dipstick, remove it and wipe it clean with a cloth.
Reinsert the dipstick, making sure it is fully seated, and then remove it again. This will give you an accurate reading of the fluid level. When you check the fluid level, pay attention to the markings on the dipstick – there will be an indication of the minimum and maximum levels that the fluid should be at.
If the fluid level is below the minimum mark, you will need to add more fluid. On the other hand, if the fluid level is above the maximum mark, you will need to drain some of the fluid until it is within the recommended range. It’s crucial that you check your car’s fluid levels regularly, especially before long trips or when the car has been idle for an extended period.
Neglecting to check may lead to serious problems, such as engine damage or overheating, which could be costly to repair. By following these simple steps to check your fluid levels, you’ll have peace of mind knowing your car is in great shape and ready for the road.
Step 3: Check Fluid Level and Add if Necessary
Before driving your vehicle, it’s essential to check your fluid levels to ensure everything is operating correctly. To check your fluid levels, you must locate the dipstick under the vehicle’s hood. The dipstick usually has a bright-colored handle and is easy to spot.
Pull out the dipstick and wipe it with a clean cloth to remove any excess oil. Then, reinsert the dipstick fully and pull it out again to see where the oil level is on the stick. Ensure that the oil level is within the recommended range and add more oil if it’s low.
Checking the fluid levels regularly is essential can prevent severe engine damage and even avoid outrageously expensive repairs. Don’t forget to check your transmission fluid, radiator coolant, brake fluid, and power steering fluid. Maintaining your car’s fluid levels prolongs the life of your vehicle, keeping your car running smoothly on the road.
Tips and Warnings
Are you wondering how to check the transmission fluid in your Ford? It’s an essential task to keep your vehicle running smoothly and avoid potential costly repairs. First, make sure your car is on a level surface, and the engine is warm. Then, locate the transmission dipstick under the hood, usually labeled with a yellow or red handle.
Remove the dipstick, wipe it clean with a cloth, and reinsert it. Take it out again, and the fluid level should sit in between the “Min” and “Max” markers on the dipstick. Also, check the color and smell of the fluid.
If it’s brown or has a burnt smell, it’s time to replace it. Avoid overfilling or underfilling the transmission fluid, as it can affect your car’s performance. When in doubt, refer to your vehicle’s owner’s manual for specific instructions.
By regularly checking your transmission fluid, you can prolong your car’s life and enjoy a smoother driving experience.
Step 1: Use the Right Fluid Type
When it comes to the first step in maintaining your car’s transmission, choosing the right fluid type is essential. Using the correct fluid will ensure your transmission operates smoothly and prolong its lifespan. Using the wrong type of fluid will result in damage to your vehicle.
To avoid this, start by checking the car’s manual or consult a professional mechanic for the appropriate fluid type and fill level. It is also important to use clean transmission fluid and avoid contaminating it with dirt or debris. Keep in mind that using the right fluid type may cost a bit more, but it will save you money in the long run by helping you avoid costly repairs.
Step 2: Check Fluid Regularly
One of the most important aspects of maintaining your vehicle is checking the fluid levels on a regular basis. Your car’s fluids, such as oil, coolant, and transmission fluid, play a critical role in keeping your vehicle running smoothly and efficiently. By regularly checking these fluids, you can catch any potential leaks or low levels before they cause major problems down the road.
It’s essential to follow your vehicle’s recommended maintenance schedule to know when to check each fluid. However, keep in mind that over-filling fluids can be just as harmful as under-filling them. It’s always better to err on the side of caution and follow the manufacturer’s recommended levels.
Remember, a well-maintained car is a happy car, and taking care of your vehicle’s fluids is an essential part of keeping it running smoothly for years to come.
Step 3: Seek Professional Help If Fluid Appears Dirty or Smells Burnt
When it comes to maintaining your car’s transmission, keeping an eye on the fluid is crucial. If you notice the fluid appears dirty or smells burnt, it’s a telltale sign that something is wrong. Don’t try to fix it on your own, as doing so could lead to costly damage.
Instead, seek professional help. An experienced mechanic will be able to diagnose the problem and perform necessary repairs. Ignoring burnt or dirty fluid could result in irreversible damage to your transmission, leading to costly repairs or even a complete replacement.
Remember to regularly check your transmission fluid and seek professional help as soon as possible if you notice any signs of trouble. By taking these simple steps, you can keep your vehicle running smoothly and avoid unexpected automotive headaches.
Conclusion
So, in conclusion, checking the transmission fluid on your Ford is essential to ensure that your vehicle runs smoothly and avoids costly repairs. It’s a simple process that can be done in just a few minutes with the right equipment and know-how. Just remember to park on a level surface, warm up the engine, locate the dipstick, and check the fluid levels according to the owner’s manual.
And if you still need help figuring it out, don’t hesitate to consult a trusted mechanic or grab a clever robot assistant like me!”
FAQs
Where is the transmission fluid dipstick located on a Ford vehicle?
The location of the transmission fluid dipstick varies by Ford model. Refer to your owner’s manual for specific information.
How often should I check my Ford’s transmission fluid?
It is recommended to check your Ford’s transmission fluid at least once a month or before any long trips.
What type of transmission fluid should I use in my Ford?
Always refer to the owner’s manual for the specific type of transmission fluid recommended for your Ford model.
What are signs that my Ford’s transmission fluid needs to be changed?
Some signs that your Ford’s transmission fluid needs to be changed include a burnt smell, the fluid has turned a dark color, or the transmission is slipping or hesitating.

