Step-by-Step Guide: How to Easily Change Your Oil Pan Gasket in Few Simple Steps
Is your car leaking oil? The culprit could be a faulty oil pan gasket. While it may seem like a daunting task to change it yourself, it’s actually a doable job. Changing your oil pan gasket will not only save you money on mechanic labor costs, but it will also prevent further damage to your car’s engine.
Think of it like changing a tire – it may be intimidating at first, but with the right tools and a little know-how, you can do it. In this easy guide, we’ll walk you through the steps to changing your oil pan gasket, so you can get back on the road in no time.
Tools You’ll Need
Before diving in and attempting to change your oil pan gasket, it’s important to have all the necessary tools at your disposal. To start, you’ll need a new oil pan gasket and the appropriate sealant. A socket set and wrenches in various sizes will be necessary, as well as a torque wrench to precisely tighten bolts.
A jack and jack stands are necessary for getting your car elevated enough to safely work underneath it. A clean rag or towel will come in handy for wiping away excess oil or debris. It’s also important to have a container or pan to catch the old oil that will drain out when removing the oil pan.
And lastly, gloves and eye protection are highly recommended to keep your hands and eyes safe during the process of changing your oil pan gasket. With all the necessary tools in hand, you’ll be ready to tackle the challenge of changing your oil pan gasket with ease.
Drain the Old Oil
When it’s time to change your car’s engine oil, the first step is to drain the old oil. To do this, you’ll need a few tools on hand. Firstly, you’ll need a suitable oil pan large enough to hold all the old oil.
It’s best to use an oil draining pan that has a built-in spout or some other means of easily pouring out the oil without splashing it everywhere. Next, you’ll need an oil filter wrench to remove the oil filter. A socket wrench or a boxed wrench may also be necessary, depending on the location of the oil drain plug.
While we’re on the subject, be sure to purchase a new oil filter before you start the process. Once you have all the necessary tools and have located the oil drain plug, securely place the oil pan beneath it. With your oil filter wrench, remove the oil filter, and let as much oil as possible drain out.
Once it’s all drained, replace the oil filter and tighten everything back up. With that step complete, you’re ready to refill the engine with fresh oil for optimal engine performance. Happy oil changing!
Remove the Oil Pan and Clean the Surface
When it comes to removing the oil pan and cleaning the surface, you’ll need a few tools to get the job done right. First and foremost, a socket set is essential for removing the bolts that hold the oil pan in place. You’ll also need a scraper or wire brush to clean the surface where the oil pan sits.
A can of brake cleaner can be helpful to remove any residue or grime on the surface. Additionally, it’s a good idea to have a silicone gasket maker or a new gasket on hand for when you put the oil pan back in place. By having these tools on hand, you’ll be able to remove the oil pan and clean the surface with ease, ensuring a proper seal when you reassemble everything.
So grab your tools and get started, your car (and wallet) will thank you for it!
Removing the Old Gasket
Changing an oil pan gasket can be a daunting task that requires a bit of know-how and patience. One of the first steps in this process is removing the old gasket. This can be a bit tricky, but with a little elbow grease, it can easily be done.
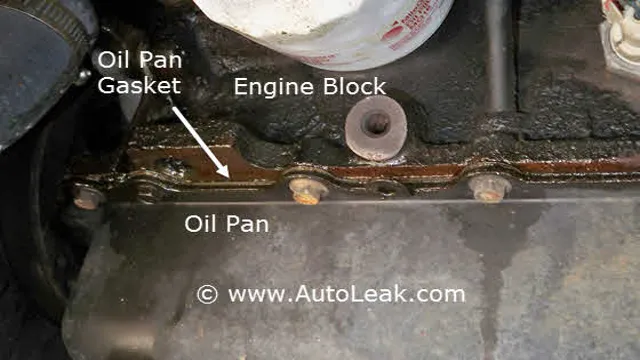
Firstly, make sure the vehicle is safely supported and that the oil has been drained. Next, locate the oil pan and using a scraper or putty knife, gently pry the old gasket away from the surface. Take care not to scratch the surface as this can lead to leaks later on.
Once the gasket is removed, clean off any remaining residue and thoroughly clean the surface of the oil pan as well as the engine block. This will ensure that the new gasket will sit flush and seal properly. With the old gasket removed and the surface clean, you’re ready to install the new gasket and move onto the next step in the oil pan gasket replacement process.
Scrape off the Old Gasket and Clean the Surface
When it comes to replacing a gasket on your engine, the first step is to remove the old one. This is important because leaving any remnants of the old gasket behind can lead to leaks and potentially cause damage to your engine. To scrape off the old gasket, you’ll need to use a scraper or razor blade.
Be careful not to scratch the surface of the engine as you’re scraping. Once you’ve removed the old gasket, it’s important to clean the surface thoroughly before installing the new one. Use a solvent and a clean cloth to wipe away any debris or particles that may have accumulated.
For best results, make sure the surface is completely dry and free of any residue before putting on the new gasket. By taking the time to remove the old gasket and clean the surface properly, you’ll ensure a tight seal and prevent any potential leaks.
Inspect for Damage and Replace if Necessary
When inspecting your gasket for damage, the first step is to remove the old one. This may seem daunting at first, but with the right tools and a little patience, it can be done. Begin by locating the old gasket.
It may be visible on the edges of the machine or hidden inside a compartment. Once you’ve located it, carefully use a flathead screwdriver or pliers to gently pry it off. Be sure to take your time as excessive force may damage the machine.
Once removed, inspect both the gasket and the surface it was attached to for any signs of wear and tear. Cracks, tears, and discoloration are all signs that a new gasket is needed. Don’t take any chances when it comes to gasket damage as it can lead to leaks and other issues that can cause damage to your machine.
Replace it promptly with a high-quality replacement gasket to ensure your machine runs smoothly and efficiently. Trust us, it’s worth the time and effort to properly inspect and replace your machine’s gasket.
Apply New Gasket Sealant
If you’re planning to replace the gasket on your engine, the first step is to remove the old one. This can be easier said than done, especially if the gasket has become baked and brittle over time. One way to make the process easier is to heat the engine slightly, which can help loosen the old gasket.
Once you’ve removed the old gasket, it’s time to apply the new gasket sealant. This may include a liquid or paste that you’ll apply directly to the engine surface before placing the new gasket on top. Be sure to follow the instructions carefully, as different sealants may have different application methods.
Once the sealant is applied and the gasket is in place, you’ll need to wait for the sealant to cure before running the engine. With the new gasket in place, your engine should be running smoothly once again.
Installing the New Gasket
Changing your oil pan gasket is a necessary and straightforward process. Following the removal of your old gasket, installing the new one is the next step. Begin by preparing your new gasket, ensuring its size and shape are right for your specific car make and model.
Lay the gasket in position, making sure it aligns correctly with all necessary bolt holes. Next, place the pan over the gasket, carefully inserting the bolts and tightening each one incrementally until they’re all securely in place. Be careful not to over-tighten, as this can cause damage to both the gasket and the pan.
Lastly, double-check every bolt’s tightness, and add a little oil to prevent leaks between the gasket and pan. With a new oil pan gasket, your vehicle will run smoothly and free of leaks, giving you peace of mind on the road.
Align the Gasket and Screw the Pan in Place
When it comes to installing a new gasket, it’s important to make sure it aligns properly before screwing the pan back in place. Misaligned gaskets can lead to leakage and other issues down the line, which is why taking the time to ensure it’s in the right place is key. First, make sure the pan and the gasket are both clean and free of debris.
Then, lay the new gasket on top of the pan, making sure it lines up with the bolt holes. Once you’ve aligned the gasket, gently place the pan back into place and hand-tighten all the bolts. Then, use a torque wrench to tighten the bolts to the manufacturer’s specifications.
Remember, a well-aligned gasket can save you from future headaches and costly repairs. Take your time and ensure it’s in the right place before screwing the pan back in place.
Tighten the Bolts Carefully and Refill with Oil
Installing the new gasket is a crucial step when completing an oil change. After draining the old oil, carefully remove the old gasket and clean the area around the surface. Ensure that there are no old gasket particles or debris on the surface before installing the new gasket.
The new gasket should be placed on the clean surface and centered correctly. Be sure to follow the manufacturer’s specifications, such as the torque requirements, when tightening the bolts. Over-tightening or under-tightening can cause leaking or damage to the engine.
Properly tighten the bolts in a criss-cross pattern to ensure even distribution of force. Once the bolts are tightened, refill the engine with the appropriate oil to the recommended level. Remember to check the oil level using the dipstick after running the engine for a few minutes.
Installing the new gasket may seem like a small step, but it is essential to ensure that the engine runs smoothly and prevents future issues.
Final Thoughts: Don’t Over-tighten the Bolts
If you’re planning to change your oil pan gasket, make sure you don’t over-tighten the bolts when you put everything back together. Over-tightening can lead to leakages and cause the gasket to fail prematurely, so it’s important to use a torque wrench to get the right level of pressure. When you’re working on your oil pan gasket, take your time and do it carefully to avoid making any mistakes.
Proper preparation is essential too, so make sure you have all the necessary tools and components before you start. Changing your oil pan gasket can be a challenging task, but if you follow the correct procedures and avoid over-tightening the bolts, you’ll have a successful repair that will last for a long time.
Conclusion
In conclusion, changing the oil pan gasket is a task that may sound daunting at first, but with a bit of patience and a willingness to get your hands dirty, it can be done quite easily. Just remember to gather all the necessary tools, drain the oil properly, and follow the step-by-step instructions carefully. And after you’re finished, you can sit back, relax, and enjoy the satisfaction of a job well done” (and an engine that doesn’t leave oil spots everywhere it goes).
FAQs
What are the signs of a faulty oil pan gasket?
The signs of a faulty oil pan gasket include leaking oil, reduced oil pressure, and smoking or burning oil smell.
How often should I change my oil pan gasket?
It is recommended to change the oil pan gasket every 100,000 miles or whenever you notice signs of leakage.
Can I replace the oil pan gasket myself?
Yes, replacing the oil pan gasket is a relatively simple task that can be done by DIY enthusiasts with basic mechanical knowledge and tools.
How much does it cost to replace an oil pan gasket?
The cost of replacing an oil pan gasket varies depending on the make and model of the vehicle, but typically ranges from $100 to $500.

