Mastering Your Ride: The Ultimate Guide to Adjusting Caltracs for Optimal Performance
If your ride is experiencing wheel hop or wandering under acceleration, then it might be time to adjust your Caltracs. While Caltracs are a popular upgrade for drag racing applications, tuning them for your specific setup and driving style is essential for getting the most out of your suspension. In this step-by-step guide, we’ll take a closer look at how to adjust Caltracs and optimize your ride’s traction.
Whether you’re a veteran racer or a newbie looking to improve your ride’s performance, this guide will help you get dialed in for your next run down the track. So buckle up and let’s get started!
What are Caltracs?
If you’re looking to enhance the performance of your vehicle, particularly on the dragstrip or race track, then you may have heard of caltracs. These suspension upgrades help to improve traction and prevent wheel hop during acceleration, resulting in a faster and smoother ride. However, adjusting caltracs can be a bit tricky and requires some precision.
To get the most out of your caltracs, they should be adjusted based on the weight distribution of your vehicle, as well as the track conditions and your driving style. It’s important to follow the manufacturer’s instructions and use the proper tools to make adjustments, as even small changes can have a significant impact on your vehicle’s performance. With proper adjustment and maintenance, caltracs can be a powerful addition to any performance vehicle.
So, if you want to improve your speed and control on the track, investing in caltracs may be worth considering.
Explanation of purpose and function
Caltracs are a type of suspension system for trucks and other heavy vehicles. They are designed to improve traction and prevent wheel hop, which can occur when the vehicle accelerates quickly. Wheel hop can cause damage to drivetrain components and cause the vehicle to lose control.
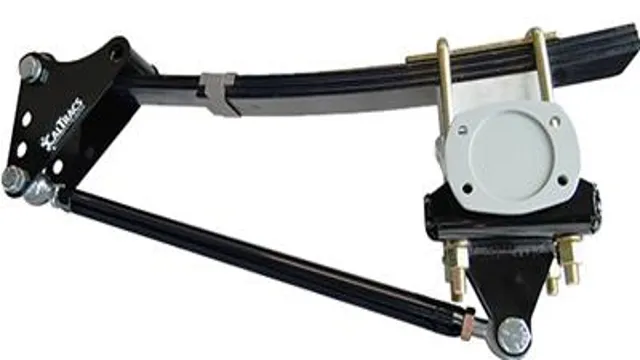
Caltracs work by using a set of adjustable bars that connect the axle to the frame of the vehicle. When the vehicle accelerates, the bars become compressed, which transfers weight to the rear wheels. This improves traction and helps to prevent wheel hop.
Caltracs are popular among truck enthusiasts, and they can be found on many high-performance trucks and drag racing vehicles. With Caltracs installed, drivers can achieve faster acceleration times, improved stability, and reduced wear and tear on their vehicles. Overall, Caltracs are an effective and reliable suspension system that can enhance the performance of any heavy vehicle.
Tools Needed
Adjusting Caltracs is a crucial task for any drag racer looking to improve their vehicle’s traction and acceleration. To successfully adjust Caltracs, there are a small number of essential tools you’ll need to have on hand. A socket and ratchet set, a torque wrench, a pry bar or small hammer, and a measuring tape are all essential for the job.
These tools help measure the distance between the frame and the rear axle, ensuring the correct amount of preload on the leaf springs. Additionally, these tools will help you determine the number of shims needed to achieve the ideal preload. Once you have these tools handy, you can easily adjust the Caltracs, ensuring your car’s suspension is correctly set up, and you’re ready to launch your vehicle down the dragstrip with confidence.
Remember, it’s always crucial to double-check your work and make sure everything is tight and secure before hitting the track.
Required tools and materials for adjustment
When it comes to adjusting your project, having the right tools is crucial. Basic tools that you should have on hand include a screwdriver, pliers, wrench, and a level. These tools can help you make minor adjustments to your project with ease.
Depending on the complexity of the job, you may also need more specific tools such as a saw or drill. It is important to have these tools readily available to prevent delays in your project and to ensure that your adjustments are done correctly. Using the correct tools for the job will also prevent any damage to your project or the tools themselves.
Keep in mind, safety should always come first when working with tools. It is important to wear safety glasses and use caution when operating power tools. In summary, having the necessary tools on hand will allow you to make adjustments to your project quickly and efficiently, while also ensuring a safe work environment.
Prep Work
Adjusting the CalTracs is a vital part of a successful performance suspension setup. Before making any adjustments, it’s important to do some prep work. First, ensure that your CalTracs components are all in good condition.
Check for any damage or wear and tear, as this can affect the suspension’s performance. Next, gather all the necessary tools, including a torque wrench, socket set, and pliers. You’ll also need a measuring tape to check the ride height before and after the adjustment.
Once you have everything ready, jack up the vehicle, and place it on jack stands. It’s important to keep the CalTracs level during the adjustment process, so use a spirit level to ensure accuracy. With all the prep work done, you can now begin adjusting the CalTracs to ensure your vehicle’s maximum performance on the road or track.
Preparing your vehicle for adjustments
When it comes to making adjustments to your vehicle, there are a few things you should do to prepare. First and foremost, you should give your car a thorough cleaning, both inside and out. This will make it easier to see any areas that need attention and will ensure that the adjustments you make have the best chance of lasting.
Additionally, you should check all of the fluids in your car, including oil, transmission fluid, brake fluid, and coolant. If any of these fluids are low or dirty, you should top them off or replace them before making any adjustments to your vehicle. Finally, you should take note of any unusual sounds or vibrations that your car might be making.
This will help you identify any areas that may need attention, such as worn-out belts or loose connections. By taking these steps, you can be sure that your vehicle is in the best possible shape before making any adjustments.
Adjustment Process
Adjusting Caltracs can be a bit tricky, but it’s necessary to achieve the perfect balance between a smooth ride and maximum traction. The adjustment process mainly involves changing the length of the lower traction bar to adjust the preload on the suspension. To do this, you’ll need to loosen the jam nut on the frame bracket and rotate the adjuster nut to make the necessary changes.
However, it’s essential to ensure that both sides are adjusted equally to maintain a level and stable ride. One way to ensure symmetry is to count the threads on each side as you make changes. Another method is to measure the distance between the bottom of the frame bracket and the bottom of the adjuster nut.
It’s best to start with a neutral adjustment and make small tweaks until you achieve the desired result. Adjusting Caltracs requires patience and attention to detail, but once you’ve got it just right, you’ll enjoy a smoother, safer, and more confident ride.
Step-by-step instructions for Caltrac adjustment
Caltrac adjustment process If you own a vehicle equipped with a Caltrac system, it’s important to ensure it’s properly adjusted to optimize performance and prevent damage. Fortunately, adjusting the Caltrac system is a relatively straightforward process that can be performed with basic tools and a little know-how. Here’s a step-by-step guide to help you dial in your Caltrac system.
Firstly, park your vehicle on a level surface and measure the distance from the ground to the bottom of the frame on both sides. If there’s a difference, adjust the Caltrac bars to level the vehicle. Next, adjust the preload on the springs to achieve the desired ride height.
Always make adjustments evenly on both sides to prevent any unnecessary wear and tear on your drivetrain components. Finally, perform a test drive to see if additional adjustments need to be made. With a little patience and attention to detail, you can have your Caltrac system working at peak performance in no time.
Testing and Troubleshooting
Adjusting your Caltracs suspension system can make a huge difference in your vehicle’s performance. This process requires a bit of patience and know-how; however, if done right, it can significantly enhance your vehicle’s handling and traction. Before starting, ensure that your vehicle is level and that the weight is evenly distributed.
The first step is to adjust the rear shocks and preload your Caltracs bars. This is done by tightening or loosening the adjustable spring perches on the shocks to achieve the desired ride height. Once you have adjusted the shocks, you can preload your Caltracs bars, which will help improve traction and eliminate wheel hop.
Finally, adjust the Caltracs bars’ length until you achieve the desired amount of weight transfer when launching the vehicle. If your vehicle is experiencing issues such as excessive squat or wheel hop, adjusting your Caltracs can help fix those issues and provide a more pleasant driving experience.
How to test and resolve potential issues
Testing and resolving potential issues is an essential step in any development process. To ensure that your product meets high standards, you must test it thoroughly, and troubleshoot any problems that arise. The first step is to identify the potential sources of issues, such as compatibility problems, performance issues, or security concerns.
Next, you should create a test plan that covers all of these areas and includes steps for testing and verifying both positive and negative scenarios. It’s important to gather feedback from your users throughout the process, so you can catch any issues early on and resolve them before they become more serious. Finally, you should document any issues you find and create a plan to fix them.
This may involve re-engineering parts of your product or simply making minor tweaks to improve performance or security. By taking a focused and thorough approach to testing and troubleshooting, you can ensure that your product is reliable and meets all of your users’ needs.
Conclusion and Next Steps
In conclusion, adjusting Caltracs is like finding the perfect balance between your ex’s crazy personality and your therapist’s advice- it requires finesse and precision. With a little patience and knowledge of your vehicle’s specific needs, you can make the necessary adjustments to your Caltracs to achieve optimal performance. So, go forth and conquer the drag strip or just your morning commute, armed with the power of Caltracs adjustment and the confidence of a well-adjusted teddy bear.
“
FAQs
What are CalTracs and how do they work?
CalTracs are a traction bar system designed to improve traction and control in high-performance vehicles. They work by transferring weight from the rear wheels to the front wheels, reducing wheel hop and improving acceleration.
How do I adjust the preload on my CalTracs?
To adjust the preload on your CalTracs, first loosen the lock nut on the adjustment bolt. Then turn the adjustment bolt to increase or decrease preload as desired. Finally, tighten the lock nut to secure the adjustment in place.
How can I tell if my CalTracs are installed correctly?
Properly installed CalTracs will have a slight bend in the traction bars when the vehicle is at rest, indicating proper preload. Additionally, the bars should be square to the rear axle and perpendicular to the ground.
Can CalTracs be used on both street and strip applications?
Yes, CalTracs can be used on both street and strip applications. However, it’s important to adjust the preload appropriately for your specific use case. In general, street applications will require less preload than strip applications.