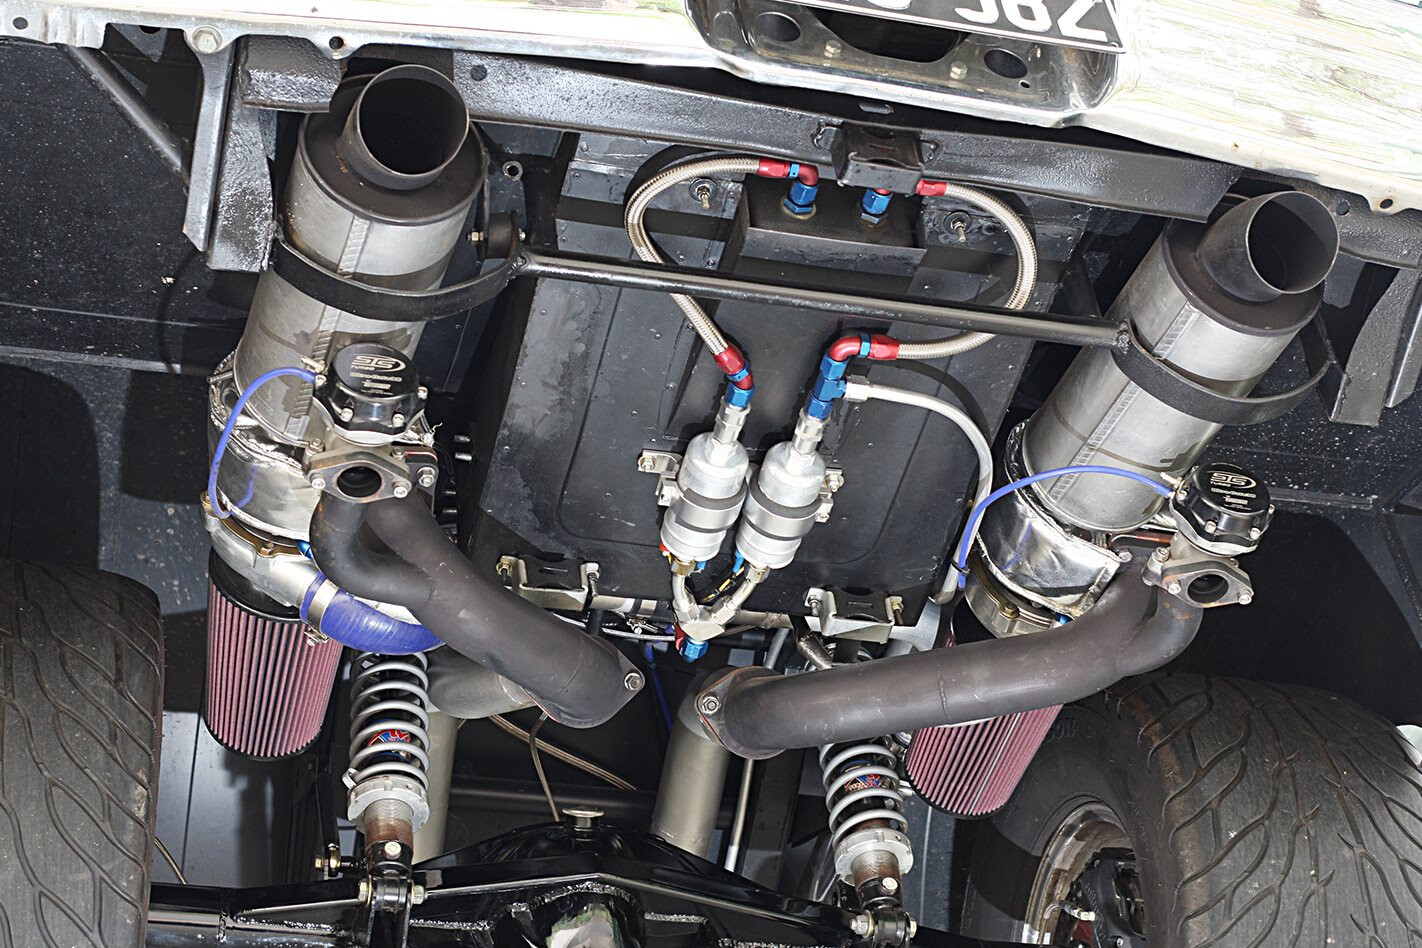
Homemade Rear Mount Turbo: DIY Power Boost.
Are you looking to give your car a serious power boost without breaking the bank? If so, a homemade rear mount turbo may be the perfect solution. By installing a rear mount turbo (RMT), you can significantly increase your car’s horsepower and torque, all while staying within a reasonable budget. In this comprehensive guide, we’ll walk you through everything you need to know about installing a homemade rear mount turbo on your vehicle.
Understanding Rear Mount Turbo Systems
Before we delve into the installation process, let’s first understand what a rear mount turbo system is and how it works. Unlike traditional front mount turbo setups, RMT systems position the turbocharger at the rear of the vehicle. This configuration offers several advantages, including reduced under-hood temperatures, equalized exhaust flow, and improved weight distribution.
One of the main benefits of a rear mount turbo is that it allows for longer exhaust tubing, which can result in better turbo spooling and increased power. Additionally, RMT systems are known for their distinctive sound and aesthetic appeal. With the turbo positioned at the rear, the exhaust gases travel a longer distance, creating a unique and aggressive exhaust note.
Benefits of a Homemade Rear Mount Turbo
While there are many aftermarket rear mount turbo kits available, opting for a homemade setup offers several advantages. Firstly, building your own RMT system can be significantly more cost-effective compared to purchasing a pre-fabricated kit. This allows you to allocate more of your budget towards high-quality components, such as the turbocharger itself, intercooler, and piping.
Furthermore, a homemade rear mount turbo setup provides the flexibility to customize the installation to suit your specific vehicle and performance goals. You can choose the optimal placement for the turbo and intercooler, ensuring efficient airflow and minimal turbo lag. Additionally, DIY installations offer a great opportunity to learn and understand the intricacies of turbocharging, empowering you to troubleshoot and maintain the system with confidence.
Components Needed for a Homemade Rear Mount Turbo
Before diving into the installation process, it’s crucial to gather all the necessary components for your homemade rear mount turbo setup. Here’s a basic list of components you’ll need:
| Component | Function |
|---|---|
| Turbocharger | For compressing intake air and increasing air density |
| Intercooler | To cool the compressed air before it enters the engine |
| Exhaust Piping | For directing exhaust gases to the rear-mounted turbo |
| Oil Supply and Return Lines | To provide lubrication to the turbo and return oil to the engine |
| Wastegate | To regulate the boost pressure and prevent overboosting |
| Blow-Off Valve | To release built-up pressure when the throttle is closed |
| Boost Controller | To adjust and control the boost level |
| Piping and Couplers | For connecting the turbo, intercooler, and intake components |
| Mounting Brackets and Hardware | For securing the turbo, intercooler, and associated components |
Installation Process
Now that you have all the necessary components, it’s time to begin the installation process. Keep in mind that the specific steps may vary depending on your vehicle make and model, so be sure to consult the appropriate service manual and seek professional advice if needed.
Step 1: Turbo And Intercooler Placement
Start by determining the optimal placement for the turbo and intercooler. Consider factors such as airflow, heat dissipation, and accessibility for maintenance. Once you’ve identified the placement, fabricate or purchase mounting brackets to securely affix the turbo and intercooler to the vehicle.
Step 2: Exhaust Piping Routing
Next, plan the routing of the exhaust piping from the engine to the rear-mounted turbo. Ensure that the piping is free from obstructions and does not interfere with other vehicle components. It’s crucial to create a clear and efficient path for the exhaust gases to reach the turbocharger.
Step 3: Oil And Cooling Lines
Install the oil supply and return lines to ensure proper lubrication of the turbocharger. Additionally, set up the intercooler’s cooling system to maintain optimal intake air temperatures. Proper oil and coolant line routing is essential for the longevity and performance of the turbo system.
Step 4: Wastegate And Boost Control
Integrate the wastegate and a boost controller into the system to regulate the turbo’s boost pressure. Proper adjustment of the wastegate and boost controller allows you to dial in the desired boost level for your vehicle’s specific power output and engine capabilities.
Step 5: Tuning And Testing
Upon completing the installation, it’s crucial to tune the engine and perform thorough testing to ensure the turbo system operates within safe parameters. Work with a reputable tuner or use a dyno to fine-tune the engine’s fuel and ignition parameters for optimal performance and reliability.

Credit: m.youtube.com
Maintaining Your Homemade Rear Mount Turbo
Once your homemade rear mount turbo is up and running, proper maintenance is essential to ensure longevity and performance. Regularly inspect the turbo and intercooler for leaks, damage, and proper mounting. It’s also important to change the turbo’s oil at recommended intervals and monitor the system for any signs of boost leaks or irregularities.
Frequently Asked Questions Of Homemade Rear Mount Turbo: Diy Power Boost.
What Are The Benefits Of A Rear Mount Turbo?
Rear mount turbo offers improved weight distribution and reduced turbo lag for enhanced performance.
How Does A Rear Mount Turbo Differ From A Front Mount?
A rear mount turbo is positioned at the rear of the vehicle, aiding in improved weight balance and minimizing heat soak issues.
Is A Homemade Rear Mount Turbo Installation Feasible?
Yes, with proper knowledge and expertise, installing a homemade rear mount turbo can be a feasible project.
What Equipment Is Needed For A Homemade Rear Mount Turbo?
You will need a turbocharger, piping, intercooler, oil and coolant lines, and fabrication tools for the installation.
Conclusion
By opting for a homemade rear mount turbo installation, you have the opportunity to significantly boost your car’s performance while gaining valuable knowledge and experience. With careful planning, quality components, and precise installation, a homemade RMT system can deliver impressive power gains without the hefty price tag of a pre-fabricated kit.
Remember, safety and attention to detail are paramount throughout the installation process. If you’re unsure about any aspect of the installation, don’t hesitate to seek professional guidance. With the right approach, a homemade rear mount turbo can take your car to new levels of exhilarating performance and driving enjoyment.


