Stop Engine Leaks with Ease: A Step-by-Step Guide on How to Install Freeze Plugs
Are you experiencing engine leaks, overheating, or coolant loss? These issues could be caused by damaged freeze plugs. Freeze plugs, also known as expansion plugs, are essential components that seal the openings in the engine block after it is cast. Over time, they can corrode or deteriorate, leading to problems with your engine.
However, installing freeze plugs is a simple process that can be done at home with the right tools and steps. In this step-by-step guide, we’ll take you through the process of replacing freeze plugs and getting your engine back to running smoothly.
Gather Your Materials
If you’re planning to change the freeze plugs in your engine, you need to gather the right materials first. Here are some of the things you’ll need for the job: new freeze plugs (of course), a sealant (such as RTV or a high-quality engine block sealer), a wire brush or sandpaper to clean up the areas where the new plugs will go, and a hammer and punch to install the plugs. Make sure you choose the right size and type of freeze plugs for your engine, and check that you have all the necessary tools before starting the job.
It’s best to do this job when the engine is cool, as the plugs can pop out more easily when the engine is hot. With the right materials and tools on hand, you’ll be ready to get started on installing your new freeze plugs and keeping your engine running smoothly.
What You’ll Need
Before you get started on your project, it’s important to gather all the necessary materials. Depending on the task at hand, you may need a range of tools and supplies. For example, if you’re planning on building a shelf, you’ll likely need a measuring tape, level, drill, screws, and lumber.
Painting a room requires paint, brushes, rollers, and tape to protect surfaces. It’s essential to read up on what supplies you’ll need beforehand to prevent any unexpected trips to the hardware store. Make a list of everything you’ll require and double-check it to ensure you have everything before you begin.
This planning will save you time and keep the project running smoothly.
Locate the Freeze Plug
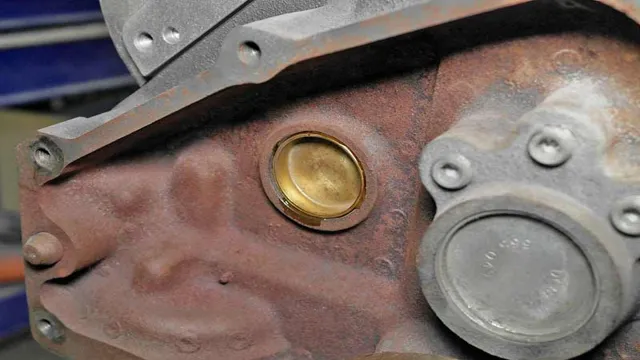
If you’re installing a new freeze plug, locating the old one can be tricky. Freeze plugs are small, circular plugs that are pressed into the engine block to protect it from cracking in cold temperatures. The first step in replacing a freeze plug is to locate it on your engine.
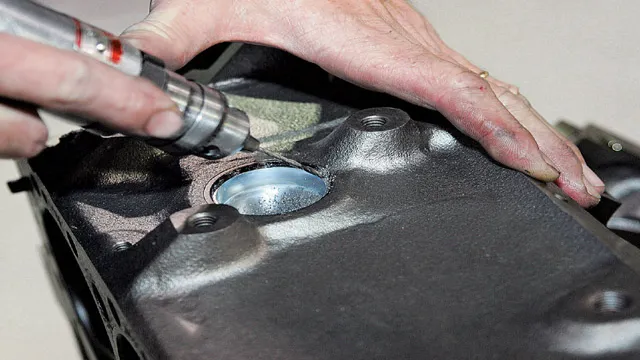
These plugs are typically located on the sides of the engine block, above the oil pan. Once you’ve located the freeze plug, use a small hammer and a punch to tap it out of the engine block. Make sure to clean the area around the freeze plug before installing the new one to prevent any debris from getting inside the engine.
When installing the new freeze plug, be sure to use a sealant or gasket to prevent any leaks. With a little time and effort, installing a freeze plug can be a simple process that will help keep your engine running smoothly.
Where to Look
If you suspect a freeze plug issue, the first step is to locate the problem area. You can start by looking near the engine block, cylinder head or the intake manifold. Keep in mind that freeze plugs are typically located on the sides of the engine block where coolant flows.
Look for a round metal disc that sits flush to the surface of the engine block. Freeze plugs are designed to “pop out” if the coolant in the engine freezes, which can cause the engine block to crack. They are easy to spot and typically measure about
5 to 2 inches in diameter. If you are having trouble locating the freeze plug, be sure to consult your vehicle’s owner’s manual or take your vehicle to a trusted mechanic for further assistance.
Remove the Damaged Plug
If you are looking to install a freeze plug, the first step is to remove the damaged plug. This can be done by carefully using a pry bar or a flathead screwdriver to remove any clips or bolts holding the plug in place. Once these have been removed, gently tap the damaged plug out with a hammer and punch tool.
It’s important to be delicate when doing this, as the engine block can be damaged if too much force is applied. Once the plug has been removed, make sure to clean the area thoroughly to prepare it for the new freeze plug installation. By taking care during this step of the process, you can ensure that your freeze plug replacement will go smoothly and provide reliable protection against engine damage.
Techniques for Removal
To remove a damaged plug, you will need some basic tools like pliers or wire strippers, a screwdriver, and gloves to protect your hands. First, turn off the power supply to the affected area before unplugging the device. Use the pliers to grip the plug tightly and pull it out gently.
If the plug is stuck, use a screwdriver to carefully pry it loose without damaging the socket. Be cautious not to touch any exposed wires as they could be live and give you an electrical shock. If the plug won’t come out, consult an electrician to avoid further damages.
Remember to replace the damaged plug with a new one to prevent any electrical hazards. Following these simple procedures will ensure a safe and successful removal of the damaged plug.
Prep the Area
Before installing a freeze plug, it’s essential to prep the area properly. You want to start by ensuring that your engine is completely cool to the touch. Next, clear any debris or oil from the area around the freeze plug.
Check for any signs of damage in the surrounding area and address them as needed. You also want to make sure that you have all the necessary tools and replacement parts handy. This includes a hammer, a punch tool, and a new freeze plug.
Taking the time to prep the area before installing the freeze plug can help ensure a proper and successful installation process. Remember to always prioritize safety and caution when working on your engine.
Clean and Inspect the Hole
When it comes to preparing the area for drilling, cleaning and inspecting the hole is a critical step. Before drilling, it’s important to make sure the hole is free of any dirt, debris, or obstructions that could affect the outcome. You should start by sweeping away any loose dirt and debris around the drill area.
Once the area is clear, use a stiff brush to remove any remaining debris from the hole. If the hole is particularly dirty, you may need to flush it out with water or compressed air. Once the hole is clean, it’s important to inspect it for any cracks, gaps, or other damage that could affect the drill bit or cause issues later on.
Taking the time to carefully prepare the area can greatly improve the success of your drilling project.
Install the New Freeze Plug
Installing a freeze plug may sound like a daunting task, but it’s actually quite simple with the right tools and know-how. First, locate the freeze plug that needs replacement and clean the area thoroughly. Ensure that the new freeze plug is the correct size and type for your engine.
Gently tap the new freeze plug into place with a rubber mallet or hammer, being careful not to damage the plug or the surrounding area. Use a sealant around the edges of the plug to prevent any leaks. Once the sealant has dried, you’re good to go! With just a few easy steps, you can have your engine up and running smoothly again in no time.
Don’t let a faulty freeze plug keep you from enjoying your vehicle – tackle the problem head-on by learning how to install a new one today.
How to Position and Press In
When it comes to installing a new freeze plug, positioning and pressing it in properly are crucial steps in ensuring a successful installation. To position the freeze plug, start by cleaning the bore thoroughly and inspecting it for any damage. Then, take the freeze plug and place it into the bore, making sure it is centered and level.
Next, use a freeze plug installation tool and press the plug firmly into place, ensuring it is fully seated and flush with the block surface. It’s important to be gentle during this process and avoid using excessive force, as this can damage the plug or the block itself. By following these simple steps and taking care during the installation process, you can ensure a smooth and trouble-free installation of your new freeze plug.
So, take your time and do it right the first time!
Test Your Work
Installing a freeze plug can be a daunting task for a beginner, but with a little patience and some necessary tools, you can do it easily. Before you begin, make sure you have a freeze plug that matches your engine’s specs. To start, drain the coolant from the engine block, and then locate the freeze plug that needs to be replaced.
You may need to remove some other parts to gain access to the plug. Once you have exposed the freeze plug, use a hammer and a punch to pry it out. Be careful not to damage the surrounding area.
After removing the old freeze plug, clean the hole with a wire brush or sandpaper to remove any debris or rust. Next, insert the new freeze plug into the hole, and use the same method to tap it into place using a hammer and a punch. Finally, refill the engine with coolant, and make sure there are no leaks.
With these steps, you will have successfully installed a new freeze plug and prevented any future engine damage. Don’t forget to double-check your work before starting the engine to ensure everything is secure.
How to Check for Leaks
When it comes to plumbing, leaks can be a major headache. They not only waste water and drive up your bills but can also cause serious damage to your home. To avoid these problems, it’s important to test your work and check for leaks before you consider the job done.
One way to do this is to turn off the main water supply valve and check the water meter to see if it is still running. If it is, that means there is water still flowing somewhere in your pipes. Another method is to inspect the pipes for any signs of moisture or discoloration, which could indicate a leak.
You can also use a piece of tissue or toilet paper to wipe along the pipes and see if it becomes wet. If you do find a leak, it’s important to fix it as soon as possible to prevent any further damage. By taking these steps, you can ensure that your plumbing work is leak-free and save yourself some headaches down the road.
In Conclusion
In conclusion, installing a freeze plug is not rocket science, but it does require patience and some mechanical know-how. It’s essentially like administering a vaccine to your car – a preventive measure that will help keep your engine healthy. So grab your trusty socket wrench, take a deep breath, and get ready to plug the freeze! Or, if all else fails, just call your friendly neighborhood mechanic and hope they can bail you out.
“
FAQs
What are freeze plugs and why are they important in an engine?
Freeze plugs, also known as expansion plugs, are metal discs that are pressed into engine block openings to seal off the casting process. They are important because they help prevent the engine block from cracking due to cold weather or overheating.
How do I know if my freeze plugs need to be replaced?
Signs of a bad freeze plug include engine coolant leaks, low coolant levels, overheating engine, or a hissing sound coming from the engine. If you notice any of these symptoms, it is advisable to get your freeze plugs inspected and replaced if necessary.
Can I replace the freeze plugs myself?
Yes, you can replace the freeze plugs yourself, but it requires a lot of work and expertise. You need to have the right tools and knowledge of the engine to do the job correctly. It is always advisable to get the job done by a professional mechanic.
What is the typical cost to replace a freeze plug?
The cost to replace a freeze plug depends on several factors, such as the make and model of the vehicle, the location of the freeze plug, and the cost of labor in your area. On average, you can expect to pay between $100 and $400 for this service.

