Mastering the Art of Adjusting Electric Trailer Brakes: A Comprehensive Guide
Have you ever experienced a less responsive braking system on your trailer? Perhaps it’s high time to adjust your electric brakes! Electric brakes can be an excellent upgrade for any trailer, but once installed, they require maintenance and occasional adjustments to ensure efficient braking. Neglecting this crucial aspect can hamper your travel and put you in grave danger. Worry not; adjusting electric brakes is a relatively simple process, and we’ve got you covered with helpful tips and tricks to ensure your brakes are in top condition.
So, buckle up, read on, and learn how to keep your braking system functioning flawlessly for every journey!
Safety Precautions
Adjusting the electric brakes on your trailer is an important aspect of ensuring the safety of yourself and others on the road. To begin the process, you will need to determine the type of brake controller you have installed. Once this has been established, you can adjust the brake gain, which controls how much pressure is applied to the system.
Gradually increase the brake gain until the trailer comes to a smooth stop. It is important to remember that brake gain settings will need to be adjusted based on the weight of your load and road conditions. Additionally, it is crucial to regularly check the condition of your brakes and replace any worn or damaged components immediately.
Overall, taking the time to properly adjust and maintain your electric brakes can prevent accidents on the road and ensure a safe journey for all.
checking brakes for wear and damage
When it comes to checking brakes for wear and damage, safety should always be the top priority. Before inspecting your brakes, make sure your vehicle is parked on a level surface and the emergency brake is engaged. Additionally, wear protective gloves and eyewear to prevent any injury.
Start by inspecting the brake rotors for any deep grooves, cracks, or warping. Then, check the brake pads for wear and tear. If they are less than ¼ inch thick, it’s time to replace them.
Don’t forget to check the brake fluid level, too. Low brake fluid can cause brake failure, which can be dangerous while driving. Finally, if you notice any concerning issues or irregularities, seek out the help of a professional mechanic.
By taking these safety precautions, you can ensure your brakes are in good working condition and that you’re driving safely on the road.

checking brake controller settings
When it comes to checking the brake controller settings on your vehicle, safety should always be your top priority. Before you begin, make sure that your vehicle is parked in a secure spot and the emergency brake is engaged. It’s also a good idea to disconnect the negativity of your battery to avoid any electrical mishaps.
Checking the brake controller settings involves adjusting the gain control and observing how the trailer responds. It’s important to start with a low gain setting and gradually increase it until your trailer brakes engage smoothly without locking up. Remember that different trailer weights require different brake controller settings, so adjust accordingly.
Always take the time to check your brake controller settings before hitting the road and ensure that your trailer is stopping safely and efficiently.
Tools Required
Adjusting the electric brakes on your trailer can be a bit tricky if you’re not prepared with the right tools. First and foremost, you will need to have a brake controller that is compatible with your trailer’s electric brakes. This device allows you to adjust the amount of braking force that is applied to the trailer’s wheels when you step on the brake pedal in your tow vehicle.
You’ll also need a good socket set, a brake adjustment tool, and a jack and jack stands to lift and support the trailer while you work on it. It’s always a good idea to have a clean, dry workspace and some rags or disposable wipes on hand to keep your hands and tools clean while you work. With the right tools in your arsenal, adjusting your trailer’s electric brakes should be a breeze!
socket wrench
A socket wrench is an essential tool for any DIY enthusiast or mechanic. This versatile tool is used to tighten or loosen nuts and bolts efficiently. To use it, you will need a few other tools as well.
First, you’ll need a set of socket wrenches of different sizes. This set typically contains a ratchet wrench and several sockets that attach to the end of the ratchet. You will also need an extension bar to reach nuts and bolts that are difficult to access.
A torque wrench is another essential tool that helps you adjust the tightening force of the socket wrench and prevent over-tightening, which can damage the bolt or nut. It’s also essential to have a reliable set of pliers, wire cutters, and a hammer nearby to assist with tasks that require a little extra force. In short, having the right tools on hand is crucial when working with a socket wrench.
With the right tools, you’ll be able to tackle any job with confidence and efficiency, ensuring a job well done.
adjustment wrench
When it comes to making adjustments to machinery and equipment, having the right tools is crucial for success. One important tool that should be in every technician’s toolbox is an adjustment wrench. This unique wrench is specifically designed to make precise adjustments to machinery that require tight or loose fittings.
The adjustment wrench is made with an adjustable head that allows the user to easily adjust the size of the wrench to fit the fittings they are working with. This tool is incredibly versatile and can be used on a wide range of machinery, including cars, motorcycles, and industrial equipment. Not only is an adjustment wrench essential for making quick, accurate adjustments, but it can also help prevent damage to the machinery and ensure proper operation.
Overall, an adjustment wrench is an incredibly useful tool that any technician should have on hand to ensure their work is top-notch.
screwdriver
When it comes to home repairs or DIY projects, having the right tools can make all the difference. And one tool that you’ll definitely need in your toolbox is a screwdriver. This handy tool is essential for driving screws into wood, metal, or other materials.
But what type of screwdriver should you have? There are several different types available, including Phillips, slotted, and torx. Phillips screwdrivers are designed for screws with cross-shaped heads, while slotted screwdrivers are used for screws with a single slot. Torx screwdrivers have a star-shaped head and are commonly used in electronics or automotive repair.
Depending on the job you’re tackling, you may need one or more types of screwdrivers. Regardless of which type you choose, make sure you have a few different sizes so you can handle a variety of screw sizes. With the right screwdriver in your hand, completing your home improvement project or DIY repair will be a breeze.
Adjusting the Brakes
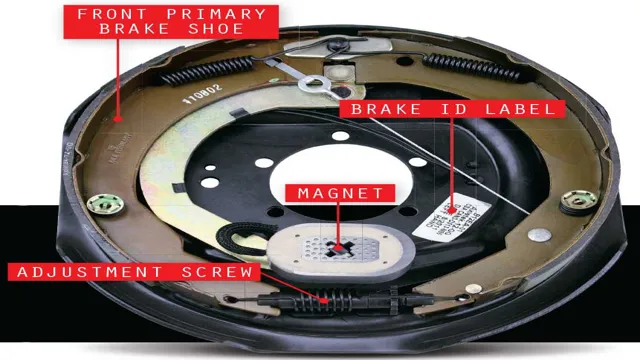
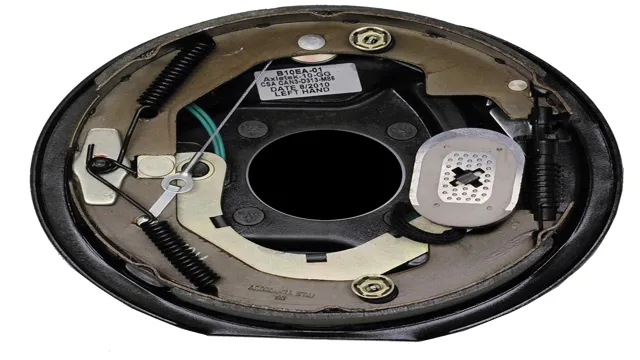
If your trailer’s electric brakes are not working properly, it could be due to incorrect adjustments. Adjusting the brakes is not a difficult task, but it does require some patience and attention to detail. Begin by chocking the wheels and disconnecting the trailer from your vehicle.
Use a jack to lift one wheel off the ground and spin it to check for resistance. If the wheel spins too freely, tighten the adjustment bolt until it becomes more difficult to turn. Repeat this process for each wheel until they all have the same level of resistance.
Keep in mind that over-adjusting the brakes can cause them to lock up and create a safety hazard. It’s important to test both the trailer brakes and the vehicle’s controller to ensure they are working together properly. Be sure to consult your trailer’s owner manual for specific instructions on adjusting the brakes.
Loosening the Adjustment
Adjusting the brakes on a bicycle can seem like a daunting task, but it’s an essential part of maintaining a safe and functional bike. One crucial step in this process is loosening the adjustment. This allows for more room to make necessary changes to the brake system.
To do this, start by identifying the brake adjustment knob or screw on the brake caliper. Turn it counterclockwise to loosen the adjustment. This should create some slack in the brake cable, allowing for more flexibility in making adjustments to the brake pads.
It’s important to note that this step should only be done in small increments and carefully so as not to create too much slack in the cable. Once adjustments have been made, be sure to test the brakes thoroughly to ensure they are functioning correctly. Adjusting the brakes can seem daunting, but with some attention and care, it can ensure a safer and smoother ride.
Testing Brake Sensitivity
When it comes to testing brake sensitivity, one of the most important steps is adjusting your brakes. This is essential for ensuring that your brakes are providing the necessary pressure needed to stop your vehicle safely and efficiently. It’s not uncommon for brakes to become worn or loose over time, which can reduce their effectiveness and increase the risk of accidents.
Thankfully, adjusting your brakes is a relatively simple process that can be done with just a few basic tools. Firstly, you’ll need to identify which type of brakes your vehicle has (disc or drum), and then follow the appropriate steps for adjusting them. Make sure to take your time and follow the manufacturer’s guidelines carefully, as improper adjustment can lead to further damage and increased safety risks down the road.
By making brake adjustment a regular part of your vehicle maintenance routine, you can help ensure that your brakes are always working at their best and keeping you safe on the road.
Final Adjustments
Adjusting the brakes is the final step in getting your bike ready for a ride. It’s important to have properly adjusted brakes to ensure safe and effective stopping power. Begin by loosening the pinch bolt on the brake cable and then use an Allen wrench to adjust the brake caliper’s position.
Align the brake pads so that they make contact with the rim parallelly. You should also check that the brake lever has the right tension and that the pads aren’t rubbing against the wheel. Finally, test the brakes by riding your bike slowly and squeezing the brake levers.
If the brakes aren’t working correctly, make further adjustments until they are. Don’t forget to do a final check on all bolts and screws to ensure they are tightened correctly. With your brakes adjusted correctly, you can enjoy your bike ride more safely and worry-free.
Conclusion
Adjusting electric brakes on a trailer may seem daunting, but with a little bit of know-how and the right tools, you’ll be braking like a pro in no time. Remember to always follow the manufacturer’s instructions and consult a professional if you’re unsure. And like any good relationship, communication is key – keep the lines of communication between your brake controller and your trailer’s brakes clear and properly adjusted for a smooth and safe journey.
Happy braking!”
FAQs
What is an electric brake on a trailer?
An electric brake on a trailer is a system that uses a brake controller in the tow vehicle to send electrical signals to the brakes on the trailer, allowing for smoother stops and better control.
Why do I need to adjust my electric brakes on my trailer?
Over time, the brake pads on electric brakes can wear down, causing the brakes to become less effective. Adjusting them ensures that they are set up correctly for maximum braking power.
How often should I adjust my electric brakes?
It is recommended to adjust your electric brakes on a seasonal basis or every 3000 to 5000 miles.
How do I know if my electric brakes need adjusting?
Signs that your electric brakes might need adjusting include the trailer feeling like it is pushing the tow vehicle when you brake, longer stopping distances, or the brake controller showing a low voltage reading.


