Stop the Screech: A Guide on How to Adjust Your E-Brake Cable Like a Pro!
If you drive a car regularly, you know the importance of properly functioning brakes. While most people focus on their brake pads and rotors, it’s vital not to overlook your car’s emergency brake, or E brake. Not only does it keep your car from rolling on inclines or hills, but it can also serve as a backup in the event of brake failure.
So, what do you do when it seems like your E brake isn’t working correctly? It is likely time to adjust the E brake cable. In this step-by-step guide, we will take a closer look at the E brake cable adjustment process, a DIY task that is incredibly easy to do and crucial for maintaining the overall safety and efficiency of your vehicle. So grab your tools and let’s get started!
Gather Your Tools
If you’re looking to adjust your e-brake cable, the first step is gathering all the necessary tools. You’ll need a socket wrench, a screwdriver, and a set of pliers. It’s important to ensure that the socket wrench fits the bolts on your e-brake system before you begin.
You might also want to have a flashlight on hand to help you see what you’re doing under the car. Once you have all the tools ready, it’s time to get started with the adjustment process. By tightening or loosening the cable, you’ll be able to adjust the tension on your e-brake and ensure that it’s working properly.
With a little bit of patience and the right tools, this is a task that even beginners can handle.
Ratchet/socket set, pliers, adjusting wrench, jack stands
When it comes to maintaining and repairing your car, having the right tools is essential. One of the most basic tool kits to have is a ratchet/socket set, pliers, an adjusting wrench, and jack stands. These tools will help you tackle basic repairs, such as changing spark plugs, tightening bolts, and adjusting the tension on belts.
The ratchet/socket set is particularly handy because it comes with a variety of socket sizes, making it possible to remove different sized nuts and bolts. Pliers are useful for gripping and twisting, and an adjusting wrench allows you to apply precise amounts of torque. Of course, never work under a car without using jack stands to ensure your safety.
Investing in these basic tools can save you money in the long run and give you confidence in tackling minor car repairs. So, when it comes to working on your car, be prepared with the right tools for the job!
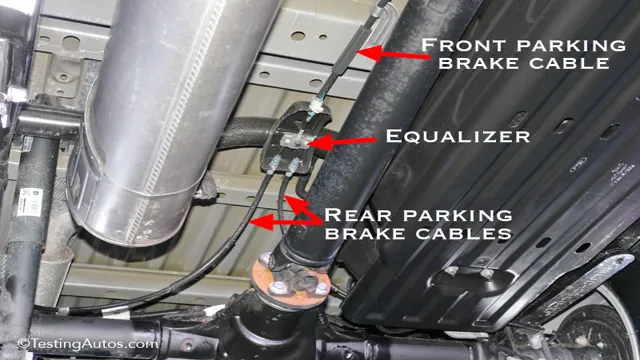
Locate the E-Brake Adjuster
If you’re wondering how to adjust your e brake cable, the first step is to locate the e-brake adjuster. This can usually be found located near the e-brake handle, hidden under a cover. The adjuster will look like a threaded bolt with a lock nut.
Once you’ve located the adjuster, you can start the adjustment process. First, remove the cover, then loosen the lock nut. Next, tighten the adjuster bolt until there is a slight drag on the brake shoes or pads.
Once you’ve achieved the desired level of tension, lock the adjuster bolt in place with the lock nut. It’s essential to test your e-brake after any adjustments to ensure it’s functioning correctly. Keep in mind that e-brake cables can stretch over time, so it’s always a good idea to periodically check and adjust them as needed.
By following these simple steps, you can guarantee your e-brake is always working at peak performance, keeping you and your vehicle safe on the road.
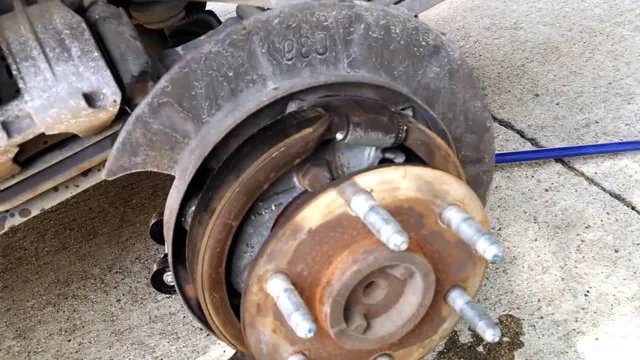
Under the center console or by the rear brake drum
If you’re having trouble finding the E-brake adjuster in your car, don’t worry, you’re not alone! It can be tucked away in some pretty tricky spots. You might find it under the center console or by the rear brake drum. The E-brake adjuster is responsible for ensuring that your emergency brake cable is properly tightened and adjusted.
A loose emergency brake can be dangerous, so it’s important to locate the adjuster and make sure everything is tightened up properly. Once you locate the adjuster, it’s usually just a matter of turning a bolt to make the necessary adjustments. So don’t stress too much.
With a little bit of patience and some elbow grease, you’ll be able to locate and fix your E-brake in no time!
Loosen the Adjuster Nut
When it comes to adjusting your e-brake cable, a common step in the process is loosening the adjuster nut. This nut is typically located near the base of the handbrake lever and can be turned to either tighten or loosen the cable. Before you begin, make sure your vehicle is in park or neutral and the emergency brake is engaged.
Use a wrench to turn the adjuster nut counterclockwise, which will loosen the cable and allow you to make the necessary adjustments. It’s important to only make small adjustments at a time and to regularly check the tension of the cable as you go. Properly adjusted e-brakes are crucial for the safety of your vehicle, so it’s important to take the time to do it correctly.
With a bit of patience and attention to detail, you can easily adjust your e-brake cable and ensure your car is driving as safely as possible.
Loosen until wheels spin freely, then retighten until there’s slight drag
When it comes to maintaining your car’s brakes, adjusting the adjuster nut is a crucial step to ensure the proper functioning of your brakes. Loosening the adjuster nut allows the wheels to spin freely, making it easier to work on them. However, it’s important to retighten the nut until there’s slight drag to ensure that the brakes will work correctly.
Failing to do so may result in reduced braking power and ultimately put your safety at risk. It’s essential to remember that brakes need regular maintenance, and adjusting the adjuster nut is only one part of the process. Regularly checking and replacing brake pads, ensuring the hydraulic system is working correctly, and checking for leaks should also be a part of your brake maintenance routine.
Maintaining your brakes regularly will give you peace of mind and ensure that your car is safe to drive on the road. So, next time you’re checking your brakes, remember to loosen the adjuster nut, but don’t forget to retighten it until you feel slight drag.
Lift and Secure Vehicle
If you’re wondering how to adjust your e-brake cable, it’s important to first lift and secure your vehicle to ensure safety. Once you’ve done that, you can begin the process of adjusting the cable itself. First, locate the cable underneath your vehicle.
You’ll notice a threaded nut on the cable that can be loosened with a wrench. After loosening the nut, you’ll need to readjust the cable by sliding it until it’s taut. Once you’ve done that, tighten the nut to lock the cable in place.
But don’t forget to test the brake to make sure it’s working properly! Adjusting your e-brake cable can make all the difference in terms of safety and peace of mind while driving – just make sure to do it properly.
Use jack stands and chock the other wheels
When working on any vehicle, it is crucial to lift and secure it properly. Using jack stands and chocking the other wheels can help ensure safety. First, find a level surface to work on and place the jack stands under the vehicle’s designated jack points.
Make sure the stands are positioned securely and the weight of the vehicle is evenly distributed. It’s important to chock the other wheels to prevent the vehicle from rolling while it’s lifted. This step is often overlooked but is just as important as using the jack stands.
Once the vehicle is lifted and secured, it’s safer to work underneath or around it. Remember to always follow the manufacturer’s instructions and use appropriate equipment for lifting and securing the vehicle. By taking these precautions, you can avoid accidents and injuries while working on your vehicle.
Adjust the Cable
Adjusting the e-brake cable is something any car owner can do with just a little bit of knowledge and some basic tools. First, locate the adjustment nut on the cable, which is typically located under the car, near the handle. Then, loosen the nut and make small adjustments until the cable is tightened to the desired level.
It’s important to test the brakes after each adjustment to ensure they are working properly and not too tight or too loose. Additionally, make sure to check the manufacturer’s recommendation for how often the e-brake cable should be adjusted and follow that schedule to maintain optimal performance. With this simple process, you can quickly and easily adjust your e-brake cable to keep your vehicle safe and running smoothly.
Turn the cable adjusting nut until there’s slight resistance on the rear brakes
To ensure your bike’s rear brakes are working smoothly, it’s important to adjust the cable correctly. This can be done easily by turning the cable adjusting nut until you feel slight resistance on the brakes. By doing this, you’ll find that your rear brake lever will feel firmer and more responsive.
This adjustment can be made using a wrench or pliers and requires no special tools or expertise. However, it’s always important to refer to your bike’s user manual to ensure you’re making the correct adjustments for your model. Remember, making the right adjustments to your bike’s brakes is essential for your safety while cycling.
If you’re unsure about any part of this process, it’s always best to have a professional mechanic take a look. Ride safely!
Test and Adjust as Needed
Adjusting the e-brake cable is an important safety measure for any vehicle. The first step in adjusting the e-brake cable is to test the brakes on a level surface. If the car rolls, then the tension on the cable needs to be increased.
To do this, locate the adjusting nut on the cable and turn it clockwise using pliers to tighten it. After each turn, test the brakes again to see if the car rolls. If the car still rolls, repeat the process until the brakes hold the car in place.
It’s important to not overtighten the cable as this can cause the brakes to drag, leading to uneven wear and a shorter lifespan. If, on the other hand, the brakes do not fully release, then the cable needs to be loosened. Locate the adjusting nut on the cable and turn it counterclockwise using pliers to loosen the cable.
After each turn, test the brakes again to see if they release. If they do not release, repeat the process until the brakes fully release. Once the brakes are adjusted, take your car for a test drive to ensure that they are functioning properly.
Remember, a properly adjusted e-brake can mean the difference between a safe stop and a dangerous accident.
Make sure the vehicle won’t move when the parking brake is applied
When it comes to parking your car, one of the most crucial steps is making sure that the vehicle won’t move when you engage the parking brake. This is especially important if you’re parking on a slope, as a moving car can cause serious accidents. The good news is that testing and adjusting your parking brake is a simple process that you can do yourself.
First, find a safe, flat surface to do the test. Engage the parking brake and try to move the car. If it doesn’t budge, you’re good to go.
However, if the vehicle moves, you’ll need to adjust the brake. This can typically be done by tightening the cable or adjusting the brake shoes. It’s important to refer to your car’s owner manual to find the specific instructions for your make and model.
By taking the time to test and adjust your parking brake, you’ll ensure that your vehicle stays put, keeping you and others safe on the road.
Conclusion
In summary, adjusting your e brake cable is like tuning a guitar: you want to find that sweet spot where it’s tight enough to hold your vehicle in place, but not so tight that your brake pads are constantly engaged and wearing down. Just like a perfectly tuned guitar, a properly adjusted e brake cable will give you peace of mind and ensure your ride is smooth and steady. So take the time to make those tweaks and strums, err, adjustments, and enjoy the sweet sounds of a well-functioning e brake system.
“
FAQs
Why is it important to adjust the e brake cable?
It is important to adjust the e brake cable to ensure proper functioning of the brake system and prevent potential accidents or damage to the vehicle.
How can I tell if my e brake cable needs adjusting?
Signs that your e brake cable needs adjusting may include a loose or shaky handbrake lever, difficulty or lack of engagement when attempting to engage the brake, or abnormal noises while braking.
Can I adjust my e brake cable myself or should I take it to a professional mechanic?
Adjusting the e brake cable can be done by a confident DIYer, although it is recommended to have a professional mechanic perform the task if you are unsure or inexperienced with brake systems.
How do I adjust my e brake cable?
To adjust the e brake cable, locate the cable adjustment mechanism located near the handbrake lever and use the appropriate tools to adjust the cable tension until the desired results are achieved.

