Step-by-Step Guide: Installing a Neutral Safety Switch for Your Car
Installing a neutral safety switch on your vehicle is an essential task that is often overlooked by car owners. This switch ensures that your car only starts in park or neutral, preventing any accidents that may arise from starting your car in gear. While intimidating for a novice, installing a neutral safety switch is a relatively simple task with the right tools and instructions.
In this blog post, we will guide you through the steps on how to install a neutral safety switch on your vehicle, allowing you to drive with peace of mind. So, grab your toolbox and let’s get started!
Gather Necessary Tools
When it comes to installing a neutral safety switch, there are a few necessary tools you’ll need to have on hand. The most important tool is a wrench or socket set, as you’ll need to remove bolts and connections to access the switch. You may also need a multimeter to test the switch and ensure it’s working properly before installing it.
Additionally, having a wiring diagram specific to your vehicle can be helpful in understanding how to properly connect the switch to the electrical system. It’s also a good idea to have safety glasses on hand to protect your eyes from any debris or sparks that may occur during the installation process. With these tools in hand, along with a bit of patience and attention to detail, you’ll be well on your way to properly installing your vehicle’s neutral safety switch.
Socket wrench
If you’re looking to use a socket wrench, there are a few necessary tools that you’ll need to gather first. Obviously, you’ll need a socket wrench itself, but you’ll also need sockets to attach to the wrench. These sockets come in different sizes, so you’ll need to make sure you have the right size for the job you’re doing.
Additionally, you’ll want to have an extension bar, which allows you to reach bolts or nuts that might be hidden or hard to reach. A ratchet handle can also be useful to increase torque and make the job easier. Lastly, a breaker bar can be helpful for loosening particularly tight bolts.
By having all of these tools on hand, you should be able to tackle any job that requires a socket wrench. Remember, proper preparation is key to getting the job done quickly and efficiently!
Screwdriver
When it comes to using a screwdriver, it’s essential to ensure you have the right tools for the job. Before getting started on any DIY project that involves a screwdriver, take a moment to gather all the necessary supplies. You will need a screwdriver (of course), screws that match the size of your project, and perhaps a level to ensure that everything lines up correctly.
Make sure to choose a screwdriver with a comfortable grip, as you may be using it for an extended period. Additionally, different types of screwdrivers are better suited for different types of screws, so double-check that you have the correct one for your project. Finally, ensure that your screwdriver is in good condition.
A damaged or worn-out driver can round out screw heads, making it difficult to remove or tighten screws. By taking the time to gather all the necessary tools, you set yourself up for success and a hassle-free DIY experience.
Pliers
Pliers Before beginning any project that requires the use of pliers, it’s important to gather all the necessary tools. Along with your pliers, you’ll also need a variety of other supplies such as screws, nails, wire, and bolts. Depending on the project, you may also need a drill, measuring tape, or other types of power tools.
It’s always best to make a list of the tools you’ll need beforehand to ensure that you have everything you need to complete your project from start to finish. If you don’t have all the necessary tools, it’s important to invest in them so that you can tackle any project that comes your way. By having the right tools at your disposal, you can enjoy a smoother, more efficient, and more successful DIY experience.
So, gather your tools, double-check your list, and get ready to start your next project with confidence!
Locate and Access the Switch
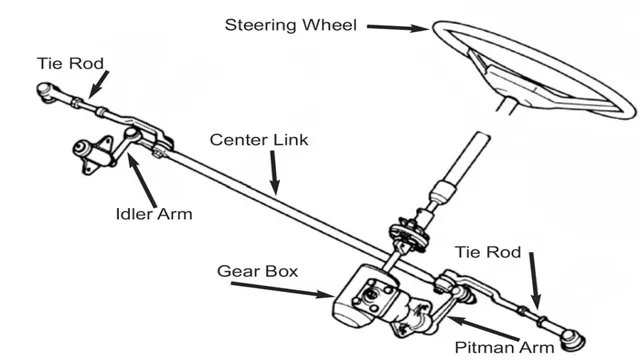
Installing a neutral safety switch is a crucial step in ensuring your vehicle is safe and functional. The first thing you’ll need to do is locate and access the switch. The switch is usually located near the base of the steering column, around the shifter area, or on the transmission itself.
Once you have located it, take a look at its mounting brackets to see if it is bolted or clipped in place. If it’s bolted, you’ll need a socket or a wrench to remove it, but if it’s clipped in place, you can simply unclip it using a screwdriver or a pair of pliers. Be sure to disconnect the battery before you start the process to avoid any electrical issues.
It’s always best to refer to the manufacturer’s instructions for specific details on accessing and installing the neutral safety switch.
Check the manual
When it comes to locating and accessing the switch, sometimes it’s best to check the manual. Many switches may look similar on the surface, but each has its own unique features and functionality. Check the manual for the switch you’re working with to ensure you’re familiar with its specific functions, as well as any recommendations or safety precautions.
Additionally, the manual will often have diagrams and illustrations that can aid in locating the switch on the device itself. Reading the manual may take a few extra minutes, but it’s a small investment that can save you time, prevent damage or injury, and ultimately lead to a more efficient and effective use of the switch. So always remember to check the manual first before attempting to locate and access the switch.
Follow wiring under the hood
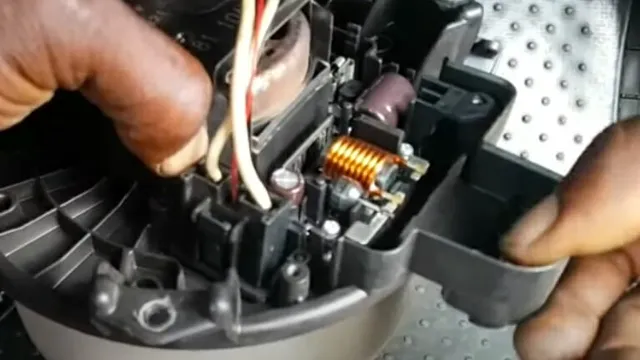
When it comes to locating and accessing the switch under the hood, the first step is to follow the wiring. The wiring will lead you to the switch’s location, allowing you to access it with ease. Before you begin, make sure to wear protective gear such as gloves and safety glasses.
Once you’ve located the switch, inspect it thoroughly to see if there are any visible signs of damage or wear. If the switch appears to be in good condition, you can try turning it on and off to see if it works properly. However, if you notice any issues with the switch, it’s important to replace it right away to prevent any further damage.
Remember to follow all safety guidelines when working under the hood of your car to avoid any potential accidents or injuries. By taking the necessary precautions and following the wiring, you can quickly and easily locate and access the switch when needed.
Remove Old Switch
If you’re experiencing problems with your vehicle’s neutral safety switch, it may be time to remove the old one and replace it. Before you start the process, make sure your vehicle’s ignition is in the off position and that the battery is disconnected. Find the location of the switch, which is usually on the side of the transmission.
Detach any electrical connections or mounting bolts that are holding the old switch in place. Be careful not to break any wires or connectors during this process. Once everything is detached, remove the old switch and set it aside.
Make sure to clean the area where the old switch was mounted before installing the new one. Taking the time to do this will help to ensure that the new switch functions properly. Always follow the manufacturer’s instructions when installing the new switch, and make sure to test the switch after installation to confirm it’s working correctly.
By taking the necessary steps, you can install a new neutral safety switch and keep your vehicle safe on the road.
Disconnect wires
When it comes to replacing an old switch, the first step is to disconnect the wires. This may seem daunting for those who are not familiar with electrical work, but it is relatively straightforward. The main keyword – disconnect wires – refers to the process of safely disconnecting the wires from the old switch.
To begin with, one should always turn off the power at the circuit breaker before proceeding. This will prevent any accidents or injuries from occurring. Once the power is off, you can use a screwdriver to remove the faceplate covering the switch.
You will then need to use a voltage tester to ensure that there is no electricity flowing through the wires. If the tester confirms that the wires are not live, you can safely remove the wires from the old switch. It is crucial to take note of which wire goes where, to make it easier to connect the new switch later on.
By disconnecting the wires properly, you can ensure a smooth and safe switch replacement process.
Unscrew switch from bracket
If you’re looking to remove an old switch, the first step is to unscrew it from the bracket. This may seem like a daunting task, but it’s actually quite simple. Start by turning off the power to the switch to prevent any electrical shocks.
Next, locate the screw or screws holding the switch to the wall bracket. Use a screwdriver to carefully remove these screws, being sure to keep track of them so you don’t lose them. Once the screws are removed, gently pull the switch away from the bracket.
Depending on the type of switch you’re working with, there may be wires connected to the back of the switch that will need to be disconnected before it can be fully removed. Always consult an electrician if you’re unsure about working with electrical wiring. By taking these steps, you’ll be able to remove your old switch and prepare for the installation of a new one in no time.
Install New Switch
Installing a neutral safety switch is an important part of maintaining any vehicle, as it helps prevent accidents by ensuring the engine won’t start unless the transmission is in neutral or park. To install a new switch, first locate the old one and disconnect any wires attached to it. Next, remove the mounting bolts and carefully remove the switch.
Once you have the new switch, attach it carefully to the mount and connect any wires that were removed previously. Be sure to test the switch thoroughly before attempting to start the engine. With this simple process, you can ensure your car is safer and running efficiently on the road.
Don’t forget to take extra precautions when working with electrical systems, such as wearing gloves and disconnecting the battery before starting. Overall, knowing how to install a neutral safety switch is an essential skill for any car owner or mechanic looking to keep a vehicle in top condition.
Attach new switch to bracket
To install a new switch, you’ll need to first attach it to the bracket. This may seem like a simple task, but it’s important to make sure it’s done correctly to ensure the switch functions properly. Start by identifying where the new switch will go and make sure the bracket is securely in place.
Then, carefully line up the switch with the bracket and use the provided screws to attach it. Be sure to tighten the screws enough so that the switch won’t wobble or come loose. Once the switch is attached, you can move on to connecting the wires and testing it out.
Taking the time to properly attach the switch to the bracket will save you headaches down the road and ensure your electrical system operates smoothly. Keyword: install new switch.
Connect wires correctly
Installing a new switch can be an easy task if you know how to connect the wires correctly. Before you begin, make sure to turn off the power supply to the switch to avoid any accidents. Start by removing the cover plate and testing to make sure the power is off.
Then, use a screwdriver to loosen the screws on the switch and remove the wires from the old switch. Be sure to mark which wire is which to avoid confusion when connecting them to the new switch. Next, attach the wires to the new switch, ensuring that they are tightly secured with no loose ends.
Once the wires are properly connected, screw the new switch in place and replace the cover plate. Finally, turn the power back on and test the switch to make sure it is functioning properly. With these steps in mind, installing a new switch can be a breeze!
Test the Switch
When installing a neutral safety switch, it’s essential to test it to ensure it’s functioning correctly. Once you’ve installed the sensor, reattach the battery cable and turn the key to the “On” position. Don’t start the vehicle, but instead try moving the shifter through each gear, keeping your foot on the brake pedal.
If the switch is wired correctly, the starter should not engage in any gear other than “Park” or “Neutral.” If the car starts in any other gear despite having the brake depressed, the switch is not working correctly and may need to be adjusted or replaced. Testing the switch is a crucial step to make sure that your car won’t start in gear and lead to dangerous accidents.
Remember to prioritize safety when dealing with any automotive electrical system.
Turn on ignition
Are you having trouble starting your vehicle? One of the first things you should check is the ignition switch. The ignition switch is responsible for sending power to the starter and ignition system, which allows your engine to turn over and start. To test the switch, turn on the ignition and listen for any clicks or grinding noises.
If you don’t hear anything, the switch may be faulty and in need of replacement. You can also check the switch with a multimeter to ensure that it’s transmitting the correct voltage to the starter and ignition system. A faulty ignition switch can cause a wide range of issues, from a dead battery to stalling while driving.
So, if you’re experiencing any of these problems, be sure to test your ignition switch as soon as possible. By taking care of this small but crucial component, you can avoid costly repairs down the line and keep your vehicle running smoothly.
Put gear in reverse and observe
When it comes to testing the switch in your car, a simple method is to put your gear in reverse and observe the backup lights. If they do not turn on, it could indicate a problem with the switch. However, before assuming that the switch is the issue, it’s important to rule out any other possibilities, such as a blown fuse or faulty wiring.
Double-checking these components can save you time and frustration in the long run. If everything else checks out and the backup lights still do not turn on, it’s best to take your car to a trusted mechanic for further inspection. Remember, safety should always be a top priority, so don’t take any chances when it comes to the functionality of your car.
Wrap Up and Troubleshooting
In conclusion, installing a neutral safety switch is an essential task for every vehicle owner. It ensures your safety and protects your car from accidental damage caused by starting the engine in gear. If you encounter any issues during the installation process, it’s important to troubleshoot before proceeding.
Double-check all the connections and ensure that the wires are properly connected to the right terminals. If the problem persists, consult a professional mechanic or refer to the manufacturer’s instructions. By following these simple steps, you can ensure that your neutral safety switch is installed correctly, giving you peace of mind on the road.
Always remember, safety first!
Tighten all screws
When wrapping up your DIY project, it’s crucial to tighten all screws to ensure that all the parts are securely fastened together. Loose screws can lead to wobbling, instability, and even potential safety hazards. Before finishing up, go over each screw with a screwdriver and make sure they’re snug but not overly tight.
Pay special attention to any areas that will be under added stress or pressure, such as weight-bearing joints or moving parts. Tightening the screws not only ensures a sturdier final product but also prevents any frustration in the future, should any parts loosen over time. Don’t forget to troubleshoot any issues before calling it a day.
If you notice any loose screws or connections that won’t tighten, you may need to double check your instructions or get a replacement part. Remember to take your time and enjoy the rewarding process of completing your DIY project.
Check for any issues
Before you wrap up your work, it’s always important to check for any issues. This step can save you from headaches in the future. Take a moment to check for spelling errors, grammatical mistakes, and typos.
It can be helpful to have a colleague or friend review your work, as sometimes we can miss our own errors. Additionally, make sure that all of your links are working properly and that any images or videos appear correctly. If you notice any issues, take the time to fix them before publishing or submitting your work.
This attention to detail shows that you take pride in your work and can help you stand out in a positive way. Remember, it’s better to catch mistakes now than to face consequences later.
Conclusion
Installing a neutral safety switch may seem daunting at first, but with a little patience and know-how, you can ensure your vehicle starts safely and reliably. Think of the switch as your car’s guardian angel, preventing any mishaps or accidents before they happen. So, remember to take your time, follow the instructions carefully, and let the switch do its job – your engine will thank you for it.
“
FAQs
What is a neutral safety switch and why is it important?
A neutral safety switch is a safety device that prevents a vehicle from starting when it is not in neutral or park. It is important because it helps prevent accidents caused by the vehicle starting unintentionally.
How do I know if my neutral safety switch is faulty?
If your vehicle does not start or struggles to start when in neutral or park, or if it starts in gear, it is possible that the neutral safety switch is faulty.
Can I install a neutral safety switch myself?
It is recommended that you have a professional mechanic install a neutral safety switch, as it involves working with electrical components and proper calibration is necessary.
How much does it usually cost to replace a neutral safety switch?
The cost of replacing a neutral safety switch can vary depending on the make and model of your vehicle, but it typically ranges from $150 to $400.