Step-by-Step Guide: Installing Freeze Plugs like a Pro
Installing freeze plugs can be a daunting task, especially for those who are new to car maintenance. However, with the right tools and some patience, anyone can do it successfully. Freeze plugs, also known as expansion plugs, are essential components of the engine block that prevent damage caused by freezing temperatures.
In this step-by-step guide, we will walk you through the process of installing freeze plugs in your car. We’ll cover everything from identifying the location of the freeze plugs to the actual installation process. By the end of this guide, you’ll have the confidence and knowledge to tackle this task on your own.
So, let’s get started!
Tools Needed
When it comes to installing a freeze plug, there are a few tools you will need to do the job successfully. Firstly, you will need to have a hammer and a sturdy metal punch, as these will be used to remove the old freeze plug. You will also need a new freeze plug to replace the old one, and it is important to ensure that it is the correct size for the hole in your engine block.
A sealant or adhesive, such as RTV silicone, will also be necessary to secure the new freeze plug firmly in place. A scraper or wire brush will also be useful for cleaning the area around the freeze plug, removing any debris or rust that may affect the seal. Lastly, safety glasses and gloves should always be worn when working on an engine, as metal fragments and engine fluids can be hazardous.
By having all of these tools at hand, you can ensure that the installation of your new freeze plug is a success and that your engine is protected from any potential damage.
Socket wrench, freeze plug installer tool, sealant
When it comes to fixing a vehicle, having the right tools is essential. If you’re planning to replace a freeze plug on your car’s engine block, there are a few tools you’ll need to get the job done efficiently. First up is a socket wrench, which will allow you to remove any bolts holding the freeze plug in place.
Depending on your vehicle, you may also need a freeze plug installer tool to properly install the new freeze plug. This tool will help you apply pressure to the plug, ensuring a tight fit. Finally, you’ll want to have some sealant on hand to create a watertight seal and prevent any leaks.
When choosing sealant, be sure to select one that is appropriate for engine use. With these tools and a bit of know-how, you’ll be able to replace your vehicle’s freeze plug in no time.
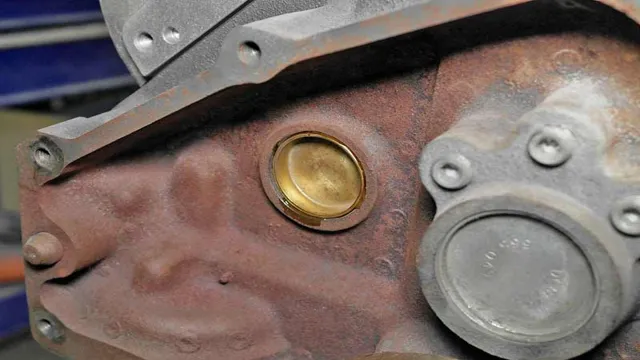
Preparing the Engine
Installing a freeze plug can be a daunting task, but it’s necessary to properly prepare your engine for use. The first step is to identify the location of the freeze plug. Normally located on the side of the engine block, it may be difficult to access due to the components surrounding it.
Once you’ve found it, you’ll need a suitable tool to remove it, which can vary depending on the size and shape of the plug. A common method is to use a punch or chisel to create a hole in the plug that can be leveraged out. Once removed, you’ll need to thoroughly clean the area around the freeze plug, making sure there is no debris or old gasket material that could cause leaks later on.
Finally, you can insert the new freeze plug using a flat tool to gently tap it into place. Make sure to use a sealant around the edges of the plug to ensure a tight seal. With a properly installed freeze plug, your engine will be well-prepared for whatever you throw at it.
Drain coolant, remove damaged freeze plug
To prepare an engine for replacing a damaged freeze plug, the first step is to drain the coolant from the system. This is done by locating the drain valve, which is typically located on the bottom of the radiator, and opening it up to let the coolant flow out into a container. Once all of the coolant has been drained, the next step is to locate the damaged freeze plug.
This can be a bit tricky, as freeze plugs are often located deep within the engine block and may require some disassembly to access. Once the damaged freeze plug is located, it can be removed using a specialized tool. It’s important to replace the freeze plug with a new one that is the same size and shape as the original, to ensure that it fits properly and can effectively do its job of preventing engine coolant from leaking out.
With the new freeze plug in place, the engine can be reassembled and the coolant can be refilled to the appropriate level. By taking these steps to properly prepare the engine, the replacement freeze plug can function effectively and keep the engine running smoothly.
Choosing the Right Freeze Plug
When it comes to installing a freeze plug, choosing the right one is crucial. Freeze plugs, also known as expansion plugs, are used to seal the openings in an engine block. They are designed to pop out in the event of an overheating engine to prevent permanent damage.
So, it’s important to choose a freeze plug that is sturdy and durable enough to withstand high temperatures and pressure. When selecting a freeze plug, you should consider the size and material of your engine block. For example, cast iron and brass are popular materials for freeze plugs, but brass should not be used in aluminum engine blocks.
Additionally, it’s important to install the freeze plug correctly to ensure a proper seal. This involves cleaning the opening and using a sealant before hammering the plug in place. By selecting the right freeze plug and properly installing it, you can prevent engine damage and ensure better performance for your vehicle.
Measuring, selecting appropriate size and material
When it comes to choosing the right freeze plug, there are a few things to consider. First and foremost, it’s important to measure the hole thoroughly to ensure that the freeze plug you select is the appropriate size. Choosing the wrong size can lead to leaks and cause damage to your engine.
Additionally, it’s crucial to consider the material of the freeze plug. Different materials have different strengths and resistances to corrosion, so it’s important to choose a material that’s compatible with the type of liquid cooling agent you use. Ultimately, selecting the right freeze plug means taking the time to do your research and asking for help if you need it.
Don’t be afraid to reach out to a professional mechanic or retailer for guidance. Remember that the safety and performance of your engine depend on having the right freeze plug installed.
Installing the Freeze Plug
Installing a freeze plug can be a challenging task, but with the right tools and techniques, you can get it done easily. First, you need to locate the freeze plug on your engine block. Once you have found it, use a pry bar to remove the old freeze plug carefully.
Make sure you do not damage the engine block as it can lead to leakage and other issues. Next, clean the area around the freeze plug hole thoroughly, including the surface where the new freeze plug will go. Using a sealant, place the new freeze plug into the hole and ensure it is adequately seated.
Allow the sealant to dry for some time before refilling the engine coolant. Remember that the installation of a freeze plug is crucial in preventing the engine block from cracking due to freezing temperatures. Hence, it is best to have it done correctly to keep your engine running smoothly.
Coat with sealant, use installer tool, tighten
Installing the freeze plug can seem daunting at first, but with the right tools and technique, it can be an easy task. The first step is to coat the freeze plug with a sealant to ensure a tight seal. Then, use an installer tool to insert the plug into the opening.
The installer tool will fit snugly around the plug and use pressure to ensure it is flush with the engine block. Finally, use a wrench to tighten the plug securely in place. Remember to be careful not to over-tighten, as this could damage the plug or engine block.
By following these simple steps, you can successfully install a freeze plug without any issues. So, why wait? Get to work and start enjoying a properly functioning engine today!
Refill Coolant and Test
Are you wondering how to install a freeze plug and refill your coolant? It may seem like a daunting task, but with the right tools and some step-by-step instructions, you can do it yourself. First, identify the location of the freeze plug that needs to be replaced and remove any obstacles that may be in the way. Next, use a pry bar or screwdriver to carefully remove the old freeze plug.
Make sure to clean the area around the freeze plug hole thoroughly before installing the new one. To install the new freeze plug, use a socket that is slightly larger than the freeze plug and gently tap it in place. It’s important to ensure that the freeze plug is flush with the engine block to prevent any leaks.
Once the freeze plug is installed, it’s time to refill the coolant. Make sure to use the correct coolant type for your vehicle and follow the manufacturer’s instructions for proper mixing ratios. After the coolant is filled, run the engine and monitor the temperature gauge to ensure that the engine doesn’t overheat.
In conclusion, installing a freeze plug and refilling your coolant can be done with a little bit of effort and patience. By following these steps, you can avoid the cost of taking it to a mechanic and have the satisfaction of completing the task yourself.
Fill with correct amount, check for leaks, monitor engine temperature
When it comes to maintaining your vehicle’s engine, ensuring that the coolant levels are filled correctly should be a top priority. Start by checking the coolant reservoir and adding the appropriate amount of coolant to reach the fill line. It’s essential to use the type of coolant recommended by the manufacturer for your vehicle.
Once filled, it’s crucial to check for any leaks and repair them as needed to prevent any potential engine damage. Keep an eye on your engine temperature gauge, and if it starts to rise quickly, it could be a sign of a leak or a more severe issue. Regularly monitoring your vehicle’s coolant levels and engine temperature can help detect issues early and prevent costly repairs down the road.
Keeping your engine cool is vital for optimal performance and longevity, and refilling the coolant and testing for leaks should be a routine part of your vehicle maintenance. So next time you’re taking care of your car, be sure to give your coolant system some attention.
Conclusion
Congratulations on making it this far in the exhilarating journey of freeze plug installation! With these steps, you’ll be able to ensure a well-protected engine that can weather the toughest of conditions. And let’s be real, if you’ve made it this far in the installation process, you’re definitely a true DIY enthusiast! So grab your tools, follow these steps, and bask in the glory of a job well done. May the force of your freeze plugs be with you!”
FAQs
What is a freeze plug?
A freeze plug, also known as an expansion plug or core plug, is a small, round disk-shaped device that is inserted into the engine block’s coolant passages.
Why do freeze plugs need to be replaced?
Freeze plugs can corrode over time, causing leaks in the engine block. They may also become dislodged due to engine vibrations. It’s important to replace them if they are damaged or leaking.
What are the steps to replace a freeze plug?
To replace a freeze plug, drain the coolant from the engine block, remove any components that are obstructing access to the freeze plug, use a punch to knock out the old freeze plug, clean the area around the freeze plug, install a new freeze plug, and refill the coolant.
How can I prevent freeze plugs from corroding?
To prevent corrosion of freeze plugs, make sure to change the engine coolant according to the manufacturer’s recommended schedule. Use a high-quality coolant that includes corrosion inhibitors. Also, keep the engine block clean to prevent dirt and debris from entering it.


