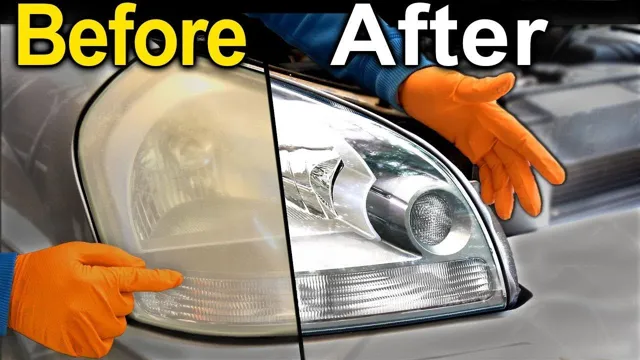
Clear Vision Ahead: The Ultimate Guide on How to Get Paint off Headlights
Have you ever noticed a cloudy, hazy film on your headlights that makes it difficult to see at night? Chances are, it’s not your windshield or your eyes playing tricks on you, but rather a build-up of paint. Paint overspray can wind up on your car’s headlights when spray painting nearby surfaces, leaving an unsightly and unsafe mess. It’s important to remove this paint to keep your headlights functioning properly.
But the question is how to do it effectively and safely? In this blog post, we’ve got you covered with some easy and effective methods for removing paint from your headlights. Say goodbye to cloudy lenses and hello to clear visibility!
Supplies Needed
To remove paint from your headlights, you’ll need a few supplies. First and foremost, you should wear protective gloves to avoid any chemical reactions or skin irritations. Then, gather up some microfiber towels, a bucket of warm water, a car wash soap, rubbing alcohol, and a fine-grit sandpaper.
You may also need a detailing clay bar, a polishing compound, and a buffing pad for stubborn stains or scratches. It’s important to proceed with caution and follow the manufacturer’s instructions when using these products. Remember to always test a small area first to make sure it doesn’t cause any damage to your headlights.
With these supplies, you’ll be able to get rid of any unsightly paint on your headlights in no time!
Rubbing Alcohol
When it comes to cleaning and disinfecting, rubbing alcohol is a versatile and effective solution that can help you get the job done quickly. To use rubbing alcohol for cleaning, you’ll need a few supplies, including a bottle of rubbing alcohol, a clean cloth or sponge, and protective gloves if you’re using a high concentration of alcohol. You’ll also want to make sure you’re cleaning in a well-ventilated area to avoid inhaling too many fumes.
While rubbing alcohol can be an effective disinfectant and cleaner for many surfaces, it’s important to follow the instructions carefully and avoid using it on certain materials, such as leather or finished wood. With the proper supplies and precautions, rubbing alcohol can be a valuable part of your cleaning toolkit. So the next time you need to tackle a tough mess, consider reaching for the trusty bottle of rubbing alcohol.
Microfiber Towel
If you’re looking for an effective way to clean your car, then a microfiber towel should be on your list of supplies. These towels are made of thin, densely packed fibers that are extremely absorbent and gentle on surfaces. To use a microfiber towel, you’ll need to have a few materials on hand.
First, you’ll need a clean microfiber towel. Make sure to wash it before use, as any debris on the towel can scratch the surface of your car. You’ll also need a solution of water and a cleaning agent, like car soap or all-purpose cleaner.
Finally, you’ll need a bucket and a hose to rinse off the solution. With these supplies, you’ll be able to clean and dry your car quickly and effectively. Incorporating the use of microfiber towels into your cleaning routine can keep your car looking its best while also prolonging its lifespan.
Fine Grit Sandpaper
Fine grit sandpaper is an essential tool for DIY projects and furniture refinishing. It’s used to smooth and polish surfaces, and it can be used on a variety of materials like wood, metal, and plastic. Before starting any project that requires sanding, it’s important to gather the necessary supplies.
Along with fine grit sandpaper, you’ll also need safety glasses, a dust mask or respirator, a sanding block or sponge, and a clean workspace. When selecting fine grit sandpaper, it’s important to choose the right grade for the job at hand. The grit refers to the number of abrasive particles per square inch of sandpaper.
The higher the grit number, the finer the abrasive particles will be. For a smooth finish, it’s best to start with a lower grit, such as 120 or 150, and gradually work your way up to a higher grit, such as 220 or 320. It’s important to keep in mind that sanding can create a lot of dust and debris, so it’s crucial to wear protective gear and work in a well-ventilated area.
A sanding block or sponge can help to evenly distribute pressure and prevent uneven sanding. And, when you’re finished sanding, be sure to clean up any dust and debris for a smooth and polished finish. In conclusion, fine grit sandpaper is an essential tool for any DIY enthusiast or professional woodworker.
By selecting the right grade and following proper safety precautions, you can achieve a smooth and polished finish on a variety of surfaces. So, why not give it a try on your next project?
Steps to Remove Paint
Are you struggling to figure out how to get paint off headlights? It can be a tricky thing to do, but with the right steps, you can safely remove the paint without damaging your headlights. The first step is to wash your headlights thoroughly with soap and water. You can also use a clay bar or polishing compound to remove any grime or buildup from the surface.
Next, apply a solvent-based cleaner or paint remover to the affected area and let it sit for a few minutes. Use a soft-bristled brush to scrub away the paint, being careful not to scratch the surface of your headlights. Once the paint is removed, rinse the area with water and dry it off with a clean cloth.
Finally, apply a protective wax or sealant to the surface of your headlights to prevent any future damage. By following these steps, you can easily remove paint from your headlights and keep them looking clean and clear.
Step 1: Clean the Headlights
If you’re wondering how to remove paint from your car’s headlights, there are several steps you can take to ensure a successful outcome. First and foremost, you’ll want to clean the headlights thoroughly before attempting anything else. Start by washing them with soap and water, then use a specialized headlight cleaner to remove any dirt or grime that may have accumulated over time.
Once they’re clean and dry, you can move on to removing the paint itself. One effective method involves using an abrasive compound or rubbing alcohol to gently buff away the paint layer by layer. You may also want to consider using a heat gun or precision knife to carefully heat or scrape away any stubborn paint spots.
With a bit of patience and attention to detail, you can have your headlights looking as good as new in no time!
Step 2: Test the Rubbing Alcohol
Now that you’ve gathered all the necessary tools to remove paint from your surfaces, let’s move on to step 2 – testing the rubbing alcohol. This step is crucial, as it ensures that the rubbing alcohol won’t damage your surface or cause discoloration. To test the rubbing alcohol, simply apply a small amount on a hidden or inconspicuous area of the surface.
Wait for a few minutes, and check if there are any adverse reactions. If the surface remains intact and there are no visible damages, then the rubbing alcohol is safe to use. However, if there are any signs of discoloration or damage, then it’s best to switch to another paint removal solution.
Make sure to also read the manufacturer’s instructions before proceeding with the rubbing alcohol application. By following this step, you can ensure a successful paint removal process without risking any damage to your surface. Remember, safety always comes first!
Step 3: Use Rubbing Alcohol
Rubbing alcohol is an effective solution when it comes to removing paint from surfaces. It is a common household item that can be used for a variety of purposes, and it is especially useful when it comes to removing stubborn paint stains. To use rubbing alcohol for paint removal, simply apply a small amount of the liquid onto a clean cloth or cotton swab and gently rub the affected area.
Rubbing alcohol works to break down the paint molecules, making it easier to wipe away. However, it is important to be cautious when using rubbing alcohol on certain surfaces, as it can damage some materials such as plastics and certain types of fabrics. Additionally, it is important to properly ventilate the area when using rubbing alcohol, as the fumes can be harmful if inhaled.
With the proper precautions, rubbing alcohol can be a great solution for removing paint stains from a variety of surfaces.
Step 4: Sand the Headlights
Removing paint from your headlights may seem like a daunting task, but it’s actually quite simple with the right steps. After gathering your materials, such as a microfiber towel and rubbing alcohol, you’ll need to begin sanding the headlights. This step is crucial in ensuring that all of the paint is removed completely.
Using a sanding block with a fine grit sandpaper, gently sand the surface of the headlights in a circular motion. Make sure to apply light pressure and avoid sanding the edges of the headlights. Once you’ve sanded the surface, wipe away any debris with a microfiber towel and repeat the process until all paint has been removed.
This step may take some time, but it’s important to be patient and thorough. By taking the time to properly sand your headlights, you’ll ensure that they look brand new once the paint is removed. Don’t forget to wear protective gloves and eyewear during this process to avoid any injury.
Step 5: Repeat if Necessary
After following the previous steps, you may find that there are still some stubborn spots of paint left on the surface of your item. Don’t panic! Simply repeat the process until all of the paint is removed. It’s important to remember that some paint may require multiple attempts to fully remove, especially if it’s been on the surface for a long time.
Be patient and persistent, and continue to use the appropriate cleaning solution and tools for your specific surface. Don’t forget to take breaks as needed and wear protective gear if necessary. By repeating the steps, you’ll be able to effectively remove the paint without damaging the surface of your item.
With a bit of effort and determination, you’ll have a paint-free item in no time!
Preventing Future Paint Transfer
If you’ve ever experienced paint transfer on your headlights, you know how frustrating it can be. Fortunately, there are a few steps you can take to prevent it from happening in the future. Firstly, waxing your car regularly can create a barrier between the paint and the headlights.
Secondly, avoid parking too close to other vehicles or objects, especially those with freshly painted surfaces. If you do find yourself with paint transfer on your headlights, it’s important to act quickly to remove it to prevent further damage. Using a gentle and effective solution, such as a mixture of water and vinegar, can help remove the paint without causing harm to your headlights.
By taking these preventative measures, you can protect your headlights and avoid the headache of having to remove paint transfer in the future.
Use a Sealant
One effective way to prevent future paint transfer on your car is by using a sealant. A sealant creates a protective layer over the car’s clear coat, which helps to prevent it from coming into contact with other surfaces and causing paint transfer. It’s essential to use the right type of sealant, as not all products are created equal.
Look for one that’s specifically designed for automotive use and offers long-lasting protection. Applying a sealant is a relatively easy DIY task that doesn’t take long to complete, but the benefits last for months. Think of it as a shield for your car’s paintwork that helps keep it looking as good as new.
Wash Your Car Regularly
Preventing Future Paint Transfer through Regular Washing of Your Car If you’re like many car owners, you’ve likely noticed a few scratches and swirl marks on your paintwork from time to time. These marks can be unsightly and can lead to deeper damage if left untreated. Luckily, there is a simple solution that can prevent future damage to your car’s paint: regular washing.
By washing your car regularly, you can eliminate dirt and debris that could cause scratches and marks, and prevent the buildup of contaminants that could lead to paint transfer. Paint transfer occurs when small particles of paint from another car or object stick to your own paintwork, leaving behind unsightly marks and damage. Regular washing helps to remove these particles from your car’s surface, preventing them from causing damage over time.
Additionally, washing your car with high-quality microfiber towels and car detailing products can help to minimize the risk of creating additional scratches while cleaning your car. Incorporating a regular car-washing routine into your life can be a great way to keep your car’s paint looking great and prevent future damage. Consider washing your car at least once a week, or more often if you live in an area with lots of dust, dirt, or other contaminants.
By taking care of your car’s paintwork today, you can help to ensure that it looks great for years to come.
Park in a Garage or Under a Cover
If you’re looking to prevent future paint transfer on your car, parking it in a garage or under a cover can go a long way in helping. When your car is left outside, it’s exposed to various elements such as pollen, bird droppings, and even hail. All of these elements can chip away at your car’s paint, leading to damage and eventual paint transfer.
However, when you park your car in a garage or under a cover, it’s shielded from these harmful elements, reducing the chances of paint transfer occurring. Not only that, but it may also provide additional security for your vehicle, protecting it from potential theft or damage from nearby objects. Overall, parking your car in a garage or under a cover can be a great way to protect it from paint transfer and maintain its appearance for years to come.
Conclusion
Getting paint off your headlights can be a daunting task, but with a few simple steps, you’ll be seeing clearly in no time. It’s all about finding the right tools, having the right attitude, and never losing sight of your ultimate goal – a crystal-clear view of the road ahead. So grab your toothpaste, baking soda, or rubbing alcohol, roll up your sleeves, and get to work.
With a little elbow grease and some creative thinking, those pesky paint splatters won’t stand a chance. After all, nothing can dull your shine when you’re committed to seeing things clearly.”
FAQs
What is the best way to remove paint from headlights?
The best way to remove paint from headlights is by using rubbing alcohol or nail polish remover and a microfiber cloth. Apply the rubbing alcohol or nail polish remover on the cloth and gently rub on the painted surface until the paint comes off.
Can toothpaste remove paint from headlights?
Yes, toothpaste can remove paint from headlights as it acts as a mild abrasive. Apply a small amount of toothpaste on the headlight and gently rub in a circular motion with a microfiber cloth until the paint comes off.
Is it safe to use a razor blade to remove paint from headlights?
No, using a razor blade is not recommended as it can scratch the surface of the headlight. It is best to use a rubbing alcohol or nail polish remover with a microfiber cloth to remove the paint.
What precautions should be taken while removing paint from headlights?
It is important to wear gloves and eye protection while removing paint from headlights. Make sure to avoid using harsh chemicals that can damage the headlight surface. It’s also important to test any cleaning solution on a small, inconspicuous area before applying it to the entire headlight.