Mastering the Art of Flaring Fuel Lines: A Complete Guide on Flaring Rubber Hose like a Pro
If you’re in need of replacing or repairing a fuel line for your vehicle, you may come across the term “flaring” in reference to rubber hoses. What does it mean, and is it necessary? Essentially, flaring is the process of shaping the end of a fuel line to fit securely onto the corresponding fitting. This can be done with various tools, and ensures a tight seal that won’t leak or come loose.
Flaring is often used in conjunction with rubber hoses, which provide flexibility and ease of installation. So if you’re wondering whether or not to flare your fuel line for a rubber hose, the answer is likely yes – but read on for more details.
Tools needed:
When it comes to repairing or replacing fuel lines, flaring the ends of the lines is an important step to ensure a tight connection between the rubber hose and the metal line. To flare a fuel line for a rubber hose, you will need a few specific tools. Firstly, a tubing cutter will be necessary to cut the metal fuel line to the appropriate length.
A flaring tool, such as a double flaring kit or bubble flaring kit, will then be used to form the flared end of the line. It’s important to make sure that the flaring tool matches the size of the fuel line to create a secure fit. Finally, an adjustable wrench and a vice may be necessary to hold the fuel line in place during the flaring process.
With these tools in hand, you can successfully flare your fuel line for a secure connection with your rubber hose.
Flaring tool, ruler, cutter, marker
When it comes to working with pipes, certain tools can make a big difference in the ease and accuracy of your work. In particular, having a flaring tool, ruler, cutter, and marker on hand can ensure that you get professional-grade results. A flaring tool is critical for creating flares in the ends of pipes so that they can connect securely with other pipes or fittings.
A ruler is useful for measuring the length of pipes and making precise cuts. A cutter enables you to cut pipes easily and quickly, without the risk of damaging them. Lastly, a marker is essential for marking out where you need to cut or bend pipes, ensuring that your work is precise and aligned.
Overall, investing in the right tools can help you achieve professional-grade work while also saving you time and hassle. So, don’t skimp on the tools you need to do your job right!
Preparing the fuel line:
Flaring a fuel line for rubber hose is an important step in preparing your vehicle for maintenance or repairs. To begin, you’ll need a flare tool that matches the size of your fuel line. Place the fuel line into the tool and tighten it to hold the line in place.
Next, use a tubing cutter to cut the end of the fuel line at a 90-degree angle. This will ensure that the flare is formed properly. Utilize the cone-shaped flaring tool to create the flare.
Tighten the flare nut on the rubber hose onto the flare, and you’re ready to go. Make sure everything is secured properly before starting your vehicle. Keep in mind, flaring a fuel line for rubber hose requires precision and patience.
A job done properly will prevent leaks while driving.
Measure and mark the line where you want to flare it
When it comes to flaring a fuel line, the first step is to measure and mark the area where you want to flare it. This will ensure that the flare is the correct size and fits properly. To prepare the fuel line, you will need to clean it thoroughly using a degreaser and a clean rag.
This will remove any dirt, oil or debris that may have collected on the line. Once it is clean, you can use a tubing cutter to cut the end of the fuel line to the desired length. Make sure to use a sawing motion to avoid crushing the line.
After cutting the line, you will need to use a deburring tool to remove any burrs or sharp edges left behind from the cutting process. This will ensure that the flare will fit properly and create a tight seal. With your fuel line prepared and ready to flare, you can move onto the next step in the process.
Overall, it’s important to be careful and take your time during this process to ensure that everything is done correctly and safely. By following these steps, you will be able to successfully flare your fuel line and keep your system running smoothly.
Cut the line at the marked point with a cutter
When it comes to preparing the fuel line, one of the key steps is to cut it at the marked point with a cutter. This can seem daunting, especially if you’re not used to working with hoses or lines, but it’s actually a fairly straightforward process. First, make sure you have the appropriate tools on hand.
You’ll need a cutter designed specifically for this type of line, as well as some protective gear like gloves and safety goggles. Next, determine where the line needs to be cut based on the diagram or instructions for your particular fuel system. Use a marker or tape to mark the line at this point so you know where to cut.
Then, carefully use the cutter to make the cut, making sure to follow the line as closely as possible. Once you’ve cut through the line, smooth the edge with sandpaper or a file to ensure a clean cut. This will help prevent leaks and ensure the line fits securely into the rest of the system.
With this step completed, you’re well on your way to preparing your fuel line for use in your vehicle or other equipment.
Flaring the fuel line:
If you’re planning to use a rubber hose to connect sections of your fuel line, you’ll need to learn how to flare the ends of the line. Flaring involves using a special tool that shapes the end of the fuel line into a wider shape, allowing it to securely attach to the rubber hose. To start flaring, you’ll need to cut the fuel line to the desired length and insert it into the flaring tool.
Make sure the line is secure and won’t move around as you flare it. Then, slowly turn the tool handle to shape the end of the line. Once the flaring is complete, you can remove the line from the tool and attach the rubber hose to the flared end.
Flaring your fuel line is an important step in using a rubber hose to connect sections of your fuel system, so take the time to do it carefully and correctly.
Insert the line into the flaring tool
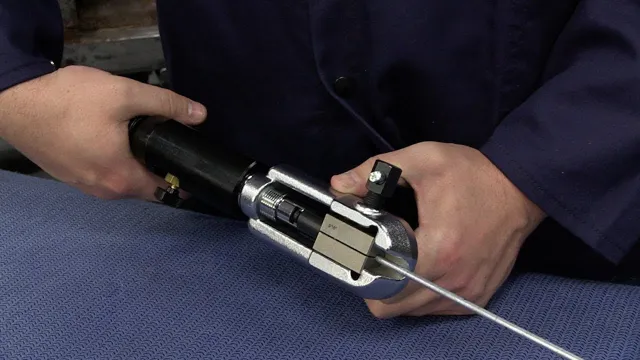
“Flaring Tool” Flaring the fuel line is a tedious and delicate process that requires precision and accuracy. It involves creating a funnel-shaped end on a metal pipe to connect with another pipe or fitting. The first step in flaring the fuel line is to insert the line into the flaring tool.
You must ensure that the line is firmly held in place and centered in the tool before you start the flaring process. The flaring tool consists of a clamp that holds the pipe in place, a cone-shaped piece that swages the end of the pipe, and a handle that turns the cone. The next step is to lubricate the cone with oil to prevent it from getting stuck during the flaring process.
You can then adjust the cone to the desired angle and insert the flaring tool into the pipe. Apply pressure to the handle to start the flaring process. It is crucial to be gentle with the tool as applying too much force can deform the pipe.
Once the flaring process is complete, remove the flaring tool from the pipe and inspect the flare for any imperfections or cracks. If done correctly, the flare should be smooth and evenly shaped. The flaring tool is a vital tool for any mechanic or DIY enthusiast looking to create a reliable fuel line.
Secure the line in place with a clamp or vise
When it comes to flaring the fuel line, it’s important to ensure that the line is held firmly in place. Using a clamp or vise is a great way to secure the line and ensure that it doesn’t move around during the flaring process. This helps to prevent mistakes and ensure that the flare is strong and secure.
Without a clamp or vise, the line may be subject to movement, leading to a weak or unstable flare. So, be sure to take the time to secure the line in place before beginning the flaring process to ensure a safe and effective result. By doing this, you can rest assured that your fuel system will be reliable and safe for years to come.
Turn the flaring tool to create the flare on the end of the line
When it comes to working on vehicles, one of the important skills every mechanic should have is the ability to flare fuel lines. Flaring the fuel line is essential before installing any fuel-related components, such as a fuel pump or fuel filter. To flare the fuel line, you will need a flaring tool, which is readily available at any auto parts store.
Once you have the tool, start by cutting the fuel line to the required length, ensuring that the cut is clean and straight. Next, insert the end of the fuel line into the flaring tool, making sure it goes all the way in. Turn the tool handle to create the flare on the end of the line.
Ensure that the flare is not too broad or too narrow, as this can cause leaks. A properly flared fuel line will ensure the safe and efficient operation of your vehicle’s fuel system. So, always take your time and make sure the flare is done correctly.
Attaching the rubber hose:
If you’re wondering how to flare a fuel line for a rubber hose, the first step is to ensure that your flaring tool is the right size for the job. Once you have the appropriate tool, insert the end of the fuel line into the clamp and tighten it securely. Then, use the flaring tool to create a flared end on the fuel line that matches the size of the rubber hose you’ll be using.
Once the line is flared, slide the rubber hose over the flared end and secure it in place with a hose clamp or other approved connector. Be sure to always double-check your work and ensure that all connections are tight and leak-free before operating your vehicle. With a little patience and attention to detail, you can successfully attach a rubber hose to your fuel line and help keep your car’s engine running smoothly.
Slide the rubber hose over the flared end of the fuel line
Attaching the rubber hose is a crucial step in connecting the fuel line. To start, slide the rubber hose over the flared end of the fuel line. This might seem like a simple task, but it’s important to ensure that the hose is tightly fitted and securely in place.
A loose connection may result in fuel leakage or other problems. You could try lubricating the edges of the fuel line to make the sliding process smoother. However, be cautious with the lubricant you use and avoid any that might damage the hose or fuel line.
Once the hose is in place, double-check and tug gently to make sure it’s securely fastened. With the rubber hose successfully attached, you can now move to the next step in the fuel line installation.
Secure the hose with clamps
When it comes to securing the rubber hose, clamps are your best friend. These nifty accessories ensure that the hose stays in place and doesn’t come loose, which can lead to leaks and other problems down the line. Attaching the rubber hose to your system is a simple process that just requires a few steps.
First, make sure that the hose is clean and free from any debris. Next, slide the clamp onto the hose, ensuring that it is positioned correctly. Then, slide the hose onto the fitting and tighten the clamp with a screwdriver until it is snugly in place.
It’s important to make sure that the clamp is tightened properly, but not so much that it damages the hose. With a little care and attention, you can rest assured that your hose is securely attached and won’t cause any issues.
Test for leaks and durability
When it comes to flaring a fuel line for rubber hose, there are a few things to keep in mind to ensure that the connection is leak-free and durable. The first step is to properly clean and prepare the ends of both the fuel line and the hose. Make sure to remove any dirt, debris, or old adhesive from the surfaces with alcohol or a similar cleaning solution.
Then, use a tubing cutter to cut the fuel line evenly and smoothly. Place the flaring tool onto the fuel line and tighten it securely before flaring it to create a mushroom-shaped end. Finally, slide the rubber hose over the flared end and secure it with a clamp.
Once all these steps are completed, thoroughly test the connection for leaks and check durability to ensure that it will hold up under the pressure of the fuel system.
Conclusion
So there you have it, folks – the art of flaring fuel lines for rubber hose. It may seem daunting at first, but with the right tools and a little bit of practice, you’ll be able to create flares that would even make a master plumber proud. And if all else fails, just remember – duct tape and zip ties can fix just about anything.
“
FAQs
What tools do I need to flare a fuel line for a rubber hose?
You will need a flaring tool kit, a tubing cutter, and a deburring tool.
Can I use regular tubing instead of a rubber hose for my fuel line?
It is not recommended, as rubber hoses have greater flexibility and resistance to vibrations and heat.
What is the purpose of flaring a fuel line for a rubber hose?
Flaring is done to ensure a secure and leak-proof connection between the fuel line and the rubber hose.
Can I flare a fuel line without a flaring tool kit?
It is not recommended as flaring without proper tools can result in leaks and a dangerous fuel system.