Crack in Coolant Reservoir? Here’s Your Ultimate Guide to Fix it Quickly!
If you own a car, you understand how frustrating it can be when something goes wrong. One common issue that drivers encounter is a crack in their coolant reservoir. Not only is it an eyesore, but it can also be dangerous to ignore as it can lead to engine overheating and potential damage.
So, what can you do to fix it? Fear not, as we have got your back! In this blog, we will discuss everything you need to know about fixing a crack in your coolant reservoir so that you can get your car back on the road. Whether you’re a DIY enthusiast or a first-time car owner, this guide is here to help you. So, let’s dive in!
Assess the damage
If you are dealing with a cracked coolant reservoir, the first step would be to assess the damage. This will help you determine whether the reservoir needs to be repaired or replaced entirely. Inspect the reservoir for any visible cracks or signs of wear and tear.
If the crack is minor, you may be able to repair it with a plastic repair kit. However, if the crack is too large or the reservoir is damaged in multiple places, it may be best to replace the entire unit. A damaged coolant reservoir can lead to overheating and other engine problems, so it’s important to address the issue as soon as possible.
Remember, the longer you wait to fix the crack, the worse the damage will become. So be proactive and take care of your vehicle’s coolant reservoir to avoid any major engine trouble in the future.
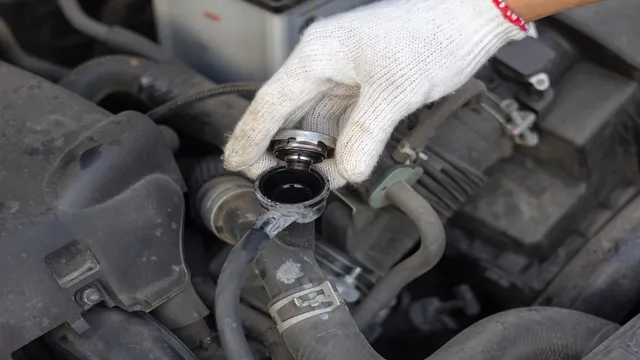
Inspect the Reservoir
When inspecting the reservoir, it’s essential to assess the damage thoroughly. You need to take the time to look closely at the walls and the floor of the reservoir and identify any signs of cracks, leaks, or other damage. One of the most common causes of reservoir damage is the formation of rust or corrosion, which can weaken the structure of the tank and cause leaks or breaks.
It’s also important to check the surrounding area for any signs of erosion or damage that could affect the reservoir’s stability, such as uneven ground or shifting soil. By taking the time to assess the damage thoroughly, you can identify any potential problems early on and take steps to prevent further damage before it becomes a more significant issue. With routine inspections, you can help ensure that your reservoir is repaired and maintained well for years to come.
Check for leaks
When it comes to checking for leaks, it’s important to assess the damage and act fast. Leaks can cause serious harm to your property, and even small leaks can quickly turn into big problems. Start by checking for visible signs of damage, such as wet spots or water stains on walls and ceilings.
If you suspect a leak, turn off the water main and call a professional plumber to inspect the area. They will be able to locate the source of the leak and recommend the best course of action. Remember, prevention is key, so it’s important to regularly inspect your plumbing and address any issues before they become major problems.
By taking proactive measures and staying vigilant, you can keep your property safe and prevent costly water damage.
Repair the crack
If you discover a crack in your coolant reservoir, it’s important to repair it immediately, as neglecting it can lead to serious engine problems. Thankfully, repairing a crack is relatively straightforward, and you can do it yourself with just a few tools. The first step is to drain the coolant from the reservoir, which you can do by following the manufacturer’s instructions.
Then, use sandpaper to rough up the area around the crack, which will help the epoxy adhere better. After that, apply a high-quality epoxy to the crack and let it dry completely. Once the epoxy has dried, refill the coolant reservoir to the recommended level, and you’re good to go.
It’s important to keep an eye on the reservoir for a few days to ensure that the repair is holding up, but with a well-done repair job, your coolant reservoir should be as good as new. Don’t wait to repair a crack in your coolant reservoir, as it can lead to engine damage and expensive repairs in the future.
Prep surface
If you have a crack in your prep surface, the first step is to repair it. Otherwise, food particles and liquids can seep into the crack and lead to bacteria growth. Start by cleaning the surrounding area with warm water and mild soap, then dry thoroughly.
Next, use a food-safe epoxy or silicone to fill the crack, following the manufacturer’s instructions. Make sure to choose a product that can withstand high heat, as well as regular wear and tear. Allow the surface to dry completely before using it again.
Remember, maintaining a clean and crack-free prep surface is essential for food safety and hygiene.
Apply epoxy or sealant
If you’ve noticed a crack in your walls or floors, it’s essential to make repairs as soon as possible. Applying epoxy or sealant can help to repair the crack and prevent further damage to your property. To get started, you’ll first need to clean the affected area thoroughly.
This will ensure that there is no dirt or debris that could impede the effectiveness of the epoxy or sealant. Once the area is clean, mix the epoxy or sealant according to the manufacturer’s instructions. Next, apply the mixture to the crack with a putty knife, making sure to fill the entire crack.
Smooth out any excess and allow the epoxy or sealant to dry completely. After it’s dry, sand the surface smooth, and you’re done! Repairs like these can be simple and cost-effective, and by addressing the issue early, you can prevent further damage to your property and save yourself a headache down the road.
Use clamps or tape to hold
If you’ve discovered a crack in your belongings, don’t panic! You can quickly repair it using clamps or tape. First, assess the severity of the damage. If you see a small crack, it won’t take much to fix it.
Clean the area around the break to remove any debris or dirt; otherwise, the adhesive won’t properly stick. Next, apply the adhesive or epoxy depending on the material. Cover the break with tape, and use a clamp to hold it in place if needed.
This way, the adhesive can thoroughly dry and settle into the cracks. Once it’s dry, remove the tape and clamp, and viola! Your belongings are as good as new. By fixing the crack using this method, you’ll be able to prevent further damage from occurring and extend the lifespan of your possessions.
Replace the reservoir
If you’re wondering how to fix a crack in your coolant reservoir, the best solution is usually to replace the reservoir altogether. Trying to patch a crack or hole will only provide a temporary fix and may not hold up in the long term. Luckily, replacing the reservoir is a relatively simple process that can be done at home with basic tools.
First, make sure the engine is cooled down and the car is turned off. Locate the coolant reservoir and remove any attachments or hoses that are connected to it. Then, remove the reservoir itself by unscrewing any bolts or clamps holding it in place.
Once the old reservoir is removed, replace it with a new one and reattach any hoses or attachments. Finally, fill the new reservoir with coolant to the recommended level and check for any leaks. By replacing the reservoir, you can ensure that your car’s engine stays cool and safe from any potential damage caused by a cracked reservoir.
Order the correct part
Ordering the correct part is crucial when it comes to replacing the reservoir in your vehicle. The first step is to ensure that you have identified the correct reservoir for your make and model. You can do this by looking up the part number in your vehicle manual or by checking online using your Vehicle Identification Number (VIN).
Ordering the exact part is essential to ensure that it fits your vehicle and operates efficiently. Once you have identified the correct part, ensure that you order it from a reliable supplier to avoid any issues. Ordering from a reputable supplier like the manufacturer or certified dealerships can ensure the quality and performance of the reservoir.
By being diligent and ordering the correct part, you can save yourself from further hassle and expenses in the future.
Drain and remove old reservoir
When it comes to replacing a hydraulic reservoir, the first step is to drain the old one and remove it from the system entirely. This involves disconnecting all hoses and fittings that are attached to the reservoir, and carefully lifting it out of its mounting position. Once the old reservoir is out, it’s time to install the new one.
This is a simple process that involves mounting the new reservoir in place and attaching all necessary hoses and fittings. It’s important to ensure that all connections are tight and secure, to prevent leaks and maintain proper hydraulic function. By replacing the old reservoir with a new one, you can ensure that your hydraulic system functions optimally and efficiently, reducing the risk of downtime or malfunction.
Install new reservoir
If you notice that your car is leaking brake fluid or the level is just mysteriously lower than it should be, you might need to replace your brake reservoir. This component holds the brake fluid and helps to provide a steady supply of fluid to the braking system while also keeping air out of the lines. Replacing the reservoir typically involves draining and refilling the brake fluid and removing the old reservoir before installing a new one.
To ensure that you properly install your new brake reservoir, be sure to refer to your car’s manual and consult with a professional mechanic if necessary. By replacing the reservoir, you can help ensure that your brakes are working properly and safely, and avoid potential unsafe driving situations.
Conclusion
In summary, fixing a crack in your coolant reservoir may seem daunting, but it’s a problem you can handle with ease. All you need is a clear understanding of the damage, some elbow grease, and the right tools. So, don’t let a crack in your coolant reservoir put a wrench in your engine’s plans; follow our tips and get back on the road in no time.
After all, as they say, where there’s a will, there’s a way – and where there’s a crack, there’s a fix!”
FAQs
What causes a crack in a coolant reservoir?
A crack in a coolant reservoir can be caused by various factors, including age, improper maintenance, manufacturing defects, and exposure to extreme temperatures.
Can I drive my car with a cracked coolant reservoir?
It is not recommended to drive your car with a cracked coolant reservoir as it can cause leakage, which can lead to engine damage and overheating.
How do I know if my coolant reservoir is cracked?
You can visually inspect your coolant reservoir for any signs of cracks or damage. If you notice any cracks or leaks, it is advisable to have it repaired or replaced.
How do I fix a crack in my coolant reservoir?
Depending on the severity of the crack, you can fix it by using a plastic epoxy or by replacing the entire reservoir. It is recommended to consult a professional mechanic for the best solution.
How much does it cost to repair or replace a cracked coolant reservoir?
The cost of repairing or replacing a cracked coolant reservoir may vary depending on the make and model of your car and the severity of the damage. It is best to get a quote from a professional mechanic.