Step-by-Step Guide on How to Fill a Transfer Case with Ease
Looking to fill your transfer case but feeling confused about where to start? Look no further! Filling a transfer case can seem daunting, but with the right knowledge and tools, it can be done in no time. In this post, we’ll go over the step-by-step process of how to fill a transfer case, from selecting the appropriate fluid to ensuring the correct amount is added. By the end, you’ll be equipped with everything you need to tackle this task with confidence.
So, let’s get started!
Introduction
Filling the transfer case of your vehicle is an important task that you should not overlook. It ensures that the power from the engine is properly transferred to all four wheels of the vehicle, giving you the traction and stability needed for safe driving. So, how do you fill a transfer case? Firstly, locate the drain plug on the transfer case and remove it to let the old oil drain out.
Once it has fully drained, replace the drain plug and locate the fill plug. Use a funnel to add the recommended amount of transfer case oil until it reaches the fill hole level. Make sure to use the right type of oil as specified by your vehicle manufacturer.
After filling, replace the fill plug, and that’s it! Checking your owner’s manual or consulting a mechanic can help in case of confusion or to avoid damages caused due to improper filling. Regular maintenance of your transfer case can extend the lifespan of your vehicle and avoid costly repairs, so it’s time to give it the attention it deserves.
What is a Transfer Case?
A transfer case is an essential component of four-wheel-drive systems, as it distributes power between the front and rear axles. It is commonly found in SUVs, trucks, and other multi-axle vehicles. To put it simply, it’s a gearbox that controls power delivery to the front and rear axles.
It allows the driver to shift between two-wheel drive, four-wheel drive high, and four-wheel drive low gears depending on the terrain. The transfer case works by distributing power from the transmission to the front and rear axles, making it possible to drive on rough terrain, climb steep slopes, and tackle obstacles. In essence, it acts like a mediator, transferring power from the engine to the wheels that need it the most, providing maximum traction and control in any driving condition.
It’s important to maintain regular service checks to ensure that the transfer case is free of damage or issues.
Why is it Important to Fill a Transfer Case Properly?
As car owners, we often take for granted the different components that make up our vehicles, particularly the transfer case. It is easy to overlook the importance of properly filling the transfer case with transmission fluid until something goes wrong. But why is this important? Well, the transfer case is responsible for transmitting power from the transmission to the front and rear axles, enabling your car’s four-wheel drive or all-wheel drive system to function properly.
Filling the transfer case properly with the correct type and amount of fluid helps to ensure that the transfer of power is smooth and efficient, preventing unnecessary wear and tear on the system. So, next time you check your vehicle’s fluids, make sure not to neglect the transfer case!
Step-by-Step Instructions
Learning how to fill a transfer case is important for maintaining your vehicle’s performance. Follow these step-by-step instructions for an easy and stress-free process. First, locate the fill plug and drain plug on your transfer case.
Use a wrench to remove the fill plug and set it aside. Then, remove the drain plug, draining the old fluid into a pan. Clean the drain plug and reinstall it.
Once emptied, use a funnel to add new fluid to the transfer case through the fill plug hole until it reaches the correct level. Insert the fill plug and tighten it securely. Start the engine and let your vehicle idle for a few minutes before shifting through each gear to ensure that the transfer case is properly lubricated.
Regularly check the fluid level and top off when necessary to keep your transfer case running smoothly. By following these simple instructions, you can ensure the longevity of your vehicle and prevent costly repairs down the line.
Step 1: Gather Your Tools and Materials
When it comes to starting a new DIY project, gathering the necessary tools and materials is essential. This step may seem obvious, but it’s always good to double-check that you have everything you need before diving in. First and foremost, make sure you have the right tools for the job.
This may include a hammer, screwdriver, drill, saw, or any other items that you’ll need for the project. It’s also important to consider safety tools, such as gloves or goggles, if necessary. Once you have your tools in order, gather all the necessary materials for the project.
This may include lumber, screws, nails, paint, brushes, and other supplies specific to the task at hand. By being prepared with all the necessary tools and materials, you’ll be able to tackle your project with confidence and success.
Step 2: Locate the Filling Port and Drain Plug
Now that you’ve got your oil drain pan and filter wrench at the ready, it’s time to move on to the next step in changing your car’s oil: locating the filling port and drain plug. These components are crucial to the oil change process, as they allow you to both drain the old oil from your car and refill it with new oil. Generally, the filling port can be found on top of the engine, while the drain plug is located beneath the engine, near the oil pan.
However, it’s always a good idea to consult your car’s owner manual for exact locations and to double-check before you start taking things apart. Once you’ve found both components, you’re ready to start draining the old oil and replacing it with fresh, clean oil. As you tackle this process, just remember to take your time and be careful not to strip any screws or gaskets.
With a little patience and attention to detail, you’ll have your car running smoothly in no time.
Step 3: Drain Old Fluid and Clean the Area
Once you have found the transmission fluid drain plug, it’s time to drain the old fluid and clean the area. This step is crucial to achieving a successful fluid change. Start by placing a catch pan underneath the drain plug to prevent spills and leaks.
Then use a socket wrench to remove the plug. Once you have removed the plug, you should let the old fluid drain completely. You can speed up the process by gently tapping on the transmission pan.
After draining the fluid, remove the old gasket and clean the pan thoroughly. Make sure to remove any debris or metal shavings that may have accumulated. Use a lint-free rag to wipe down the mating surface of the transmission pan and the transmission itself.
Then install a new gasket and replace the drain plug. Remember to tighten the plug to the recommended torque specification. Cleaning the area is imperative because it prevents any contaminants from entering into your transmission system and causes damage.
It’s advisable to check if the drain plug has a magnet and if so, clean it before re-installing it. By draining the old fluid and cleaning the area, you have now prepared your vehicle for a fresh batch of transmission fluid that will keep it running smoothly.
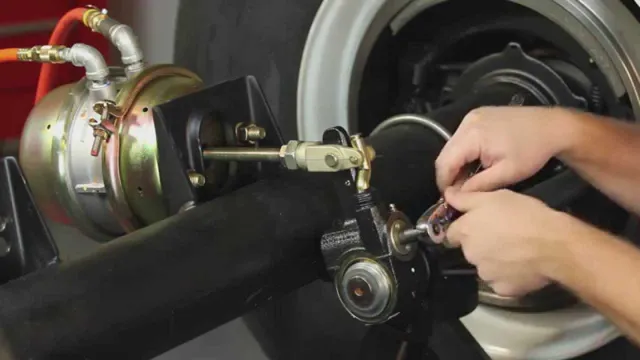
Step 4: Fill the Transfer Case with New Fluid
After draining the old fluid and replacing the drain plug, it’s time to fill the transfer case with new fluid. Refer to your owner’s manual to find the specific type of fluid to use for your vehicle. You can either fill it from the top of the transfer case or through the fill plug on the side.
If it’s on the side, be sure to use a funnel to prevent any spills. Slowly pour the new fluid into the transfer case until it reaches the fill hole. Keep in mind that transfer cases require different amounts of fluid, so double-check your manual to make sure you’ve added the correct amount.
Once you’ve finished filling it up, replace the fill plug and start your vehicle. Let it run for a few minutes to distribute the fluid throughout the system, then check for any leaks. Don’t forget to clean up any spills or drips before hitting the road! By following these steps, you can ensure that your transfer case is properly maintained and will continue to function smoothly.
Tips and Tricks
Filling a transfer case is an important task that needs to be done correctly to avoid any potential damage. To start, ensure that the transfer case is clean and free of debris. Then, locate the fill plug on the case and remove it.
Using a funnel, slowly pour the recommended amount of transfer case fluid into the opening. It’s important to use the correct fluid specified in the owner’s manual, as using the wrong one can cause serious damage. Once the fluid has reached the fill hole, re-insert and tighten the plug.
Make sure to check the fluid level after the vehicle has been driven, as it may need to be topped off. By following these tips, you can ensure that your transfer case is filled properly and running smoothly.
Use the Recommended Fluid Type
When it comes to maintaining your vehicle, using the recommended fluid type is a crucial step in prolonging its lifespan. Using the wrong fluid can cause damage to the engine, transmission, and other vital components. It’s a mistake that can be costly and inconvenient in the long run.
To avoid this, always check your owner’s manual or consult a trusted mechanic to ensure you are using the correct fluid. Whether it’s motor oil, transmission fluid, or brake fluid, using the right type is essential. Think of it like using the proper ingredients when cooking a recipe.
Just as using the wrong ingredient can ruin a dish, using the wrong fluid can have a similar effect on your car. So, be mindful and make it a habit to use the recommended fluid type. Your car and your wallet will thank you in the end!
Check the Fluid Level Regularly
Regularly checking the fluid levels of your vehicle is a smart way to ensure its longevity and avoid costly repairs. Oil, transmission, power steering, and brake fluid are just some of the fluids that require regular inspection and re-filling. Low fluid levels can cause severe damage and even lead to a complete breakdown of your car.
Moreover, neglecting to take care of fluids can highlight underlying problems that require immediate attention. Therefore, it is imperative to check the fluid levels at least once a month, or even more frequently, if you notice any signs of leakage or insufficient performance. Don’t wait for warning lights to appear on your dashboard before acting; proactive maintenance is the key to avoiding unnecessary repairs and expenses.
So grab that dipstick and take a few minutes to ensure your vehicle is running smoothly!
Conclusion
In conclusion, filling a transfer case is like preparing the perfect cup of coffee – it takes precision, attention to detail, and just the right amount of fluid. But with a little patience and practice, even the clumsiest of mechanics can master this task with ease. So, next time you’re faced with the challenge of filling a transfer case, remember to take it one step at a time, follow the manufacturer’s instructions, and don’t spill the beans (or fluid, as the case may be).
Happy transferring!”
FAQs
What is a transfer case and what does it do?
A transfer case is a component in four-wheel drive vehicles that distributes power evenly to the front and rear wheels. It allows the driver to shift from 2-wheel drive to 4-wheel drive as needed.
How do you know if your transfer case needs to be filled?
If you hear strange noises coming from your transfer case or your four-wheel drive is not engaging properly, it may be a sign that your transfer case needs to be filled.
What type of fluid should be used to fill a transfer case?
The type of fluid required will vary based on the make and model of the vehicle. Consult the owner’s manual or a trusted mechanic for the recommended type of fluid.
How do you properly fill a transfer case?
First, locate the fill plug on the transfer case. Then, remove the plug and add the recommended fluid until it reaches the proper level. It is important to use a funnel to avoid spills and to ensure the fluid goes into the correct location. Finally, replace the fill plug and wipe away any excess fluid.