Revamp Your Ride: A Comprehensive Guide to Changing Instrument Cluster Light Color
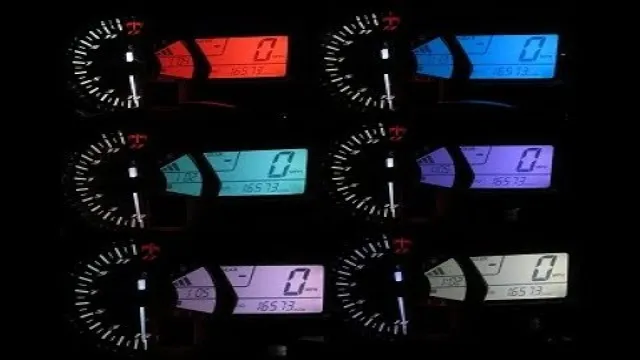
Have you ever felt like your car’s instrument cluster light color isn’t quite fitting your style? Maybe you bought a new car and the color doesn’t match the rest of the interior, or maybe you just want a change. Whatever the reason, there’s good news – changing the color of your instrument cluster lights is not only possible, but relatively easy to do yourself with the right tools and a little patience. Think of your car’s instrument cluster lights like the mood lighting in your bedroom.
Depending on the color, they can evoke different emotions or create a specific ambiance. For example, blue lights tend to create a calming, serene atmosphere while red lights can evoke feelings of passion or urgency. By changing the color of your instrument cluster lights, you can create a whole new driving experience and make your car feel like your own.
If you’re anything like me, you love a good DIY project. The idea of being able to customize your car without spending a fortune at a mechanic is pretty appealing. And the best part? It’s not as difficult as you might think.
With a little research and the right tools, you can change the light color of your instrument cluster in no time. Plus, you’ll have the satisfaction of knowing you did it yourself. In this blog, we’ll walk you through the steps of changing your instrument cluster light color.
We’ll cover everything from the different types of bulbs to the tools you’ll need, and even give you some tips for troubleshooting common issues. So buckle up and get ready to transform your car’s interior in just a few easy steps!
Gather Necessary Tools and Materials
Before you begin to change your instrument cluster light color, you’ll need to gather some necessary tools and materials. First, you should determine which type of bulb or LED you’ll need based on the color you want to achieve. Then, you’ll need to purchase the appropriate bulbs or LEDs as well as the necessary tools for removal and installation.
In addition, you might want to consider purchasing a trim removal tool to make the process easier and to avoid damaging the bezel or dashboard. It’s also important to have a clean and organized workspace with plenty of lighting to visually inspect the changes as you make them. Once you have all the necessary tools and materials, you’ll be ready to begin the process of changing your instrument cluster light color and enjoying a new custom look for your vehicle.
Check Your Vehicle’s Manual for Specific Instructions
When it comes to maintaining your vehicle, it’s essential to refer to your vehicle’s manual for specific instructions before beginning any work. This manual will provide you with crucial information and ensure that you’re using the right tools and materials for the job. Before starting on any DIY car maintenance or repair, gather all the necessary tools and materials to avoid any frustration or unexpected issues that may arise.
It’s important to ensure that you have everything you need so that you don’t have to stop working halfway through the job to run to the store. With the right tools and materials, you can work with confidence, knowing that you’re equipped with everything you need to get the job done right the first time. Keeping an eye out for keywords such as “vehicle’s manual,” “necessary tools,” and “materials” will help you better search for relevant articles or solutions for your car.
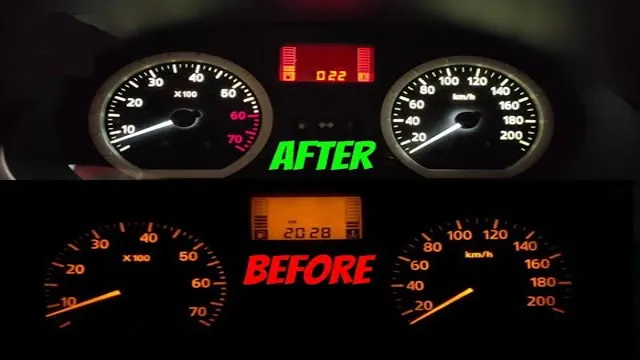
Purchase Replacement LED Lights in Desired Color
If you want to replace your LED lights with ones in a different color, there are a few things you’ll need. First, you’ll want to find replacement LED lights in the color you desire. You can search online or at a home improvement store for a wide variety of color options.
Once you have the lights, you’ll need some tools and materials to complete the replacement process. You’ll need a ladder, wire strippers, electrical tape, and a screwdriver. It’s important to have these tools on hand to ensure that the replacement process goes smoothly and safely.
With the right tools and materials, you’ll be able to change out your old lights for new ones in no time. So, why not add a pop of color to your space with some replacement LED lights that match your style?
Removing the Instrument Cluster
Changing the color of your instrument cluster lights can give your vehicle a personalized touch. However, before you can do that, you need to know how to remove the instrument cluster. The process differs depending on the make and model of your car.
Typically, you will need to remove a few screws around the cluster, as well as some plastic clips. Be sure to consult your car’s manual or an online resource for specific instructions. Once you have removed the instrument cluster, you can change the light bulbs to your desired color.
It’s important to make sure you use the correct bulbs, as different vehicles require different types. Additionally, be sure to handle the bulbs carefully to avoid damaging them. Finally, reassemble the instrument cluster and enjoy your custom color scheme!
Disconnect Battery and Remove Dash Cover
When removing the instrument cluster of your vehicle, the first step is to disconnect the battery and remove the dash cover. This is essential to ensure your safety and prevent electrical damage. Removing the battery negative terminal will prevent any accidental discharge of electricity and protect you from potential harm.
Once the battery is disconnected, take off the dashboard cover by using a trim removal tool to pry off any clips or screws holding it in place. It’s important to be gentle when removing the cover to avoid any damage to the dashboard. With the cover off, you can now access the instrument cluster.
Remember, every vehicle is different, so it’s essential to consult your owner’s manual for specific instructions on how to remove the cluster. By following this process, you’ll be able to remove the instrument cluster safely and efficiently to perform any necessary repairs or upgrades.
Unscrew and Remove Cluster from Dashboard
Removing the instrument cluster from your car’s dashboard may sound like a daunting task, but it’s actually quite simple if you know what you’re doing. To start, you’ll need to locate the screws that are holding the cluster in place. Depending on the make and model of your car, these screws may be located on the top or bottom of the cluster, or on the sides.
Once you have located the screws, use a screwdriver to unscrew them and set them aside in a safe place. Next, gently pry the cluster away from the dashboard, being careful not to damage any surrounding components. You may need to use a pry tool or your fingers to remove any clips or connectors that are holding the cluster in place.
Once the cluster is free from the dashboard, disconnect any wires or cables by pulling them gently out of their sockets. With the wires disconnected, you can now remove the cluster from the dashboard and set it aside. By following these simple steps, you can easily remove and replace your car’s instrument cluster without any hassle.
Replacing the Light Bulbs
Are you looking to spruce up your vehicle’s interior? One easy and affordable way is to change the color of the light bulbs in your instrument cluster. First, locate the screws or clips that hold the cluster in place and remove them. Be sure to disconnect any wiring harnesses before fully removing the cluster.
Next, identify the type of bulbs used and purchase new ones in your desired color. Gently twist and remove the old bulbs from their sockets, being careful not to damage them or the socket. Then, insert the new bulbs by aligning the pins and twisting them into place.
Reconnect the wiring harnesses and secure the cluster back into its original position with the screws or clips. Voila! You now have a customized interior that reflects your personal style. Remember to always double-check that your new bulbs are compatible with your vehicle’s electrical system to avoid any potential hazards.
Remove Cluster Lens Cover
Replacing the light bulbs in your vehicle can seem like a daunting task, but one component that can make it easier is removing the cluster lens cover. The cluster lens cover is the plastic cover that houses the gauges and warning lights on your dashboard. To remove it, you’ll need to locate the screws or clips holding it in place and gently pry it off using a flathead screwdriver or plastic pry tool.
Once the cover is removed, accessing the light bulbs becomes much simpler. When replacing the bulbs, be sure to choose the correct size and type for your vehicle, and handle them with care to avoid damaging them or the surrounding components. With a little care and patience, replacing the light bulbs in your vehicle can be a simple and rewarding DIY task.
Remove and Replace Bulbs with LEDs
LED bulbs If you’re looking for a way to save energy and money on your electricity bill, consider replacing your traditional light bulbs with LED bulbs. LED bulbs use up to 85% less energy than traditional bulbs and can last up to 25 times longer. This means you’ll save money on your energy bill over time and also have to change your light bulbs less often.
Additionally, LED bulbs are available in a range of color temperatures from warm to cool, allowing you to choose the perfect ambiance for your home. Plus, they are much safer than traditional bulbs, as they don’t emit as much heat and are less likely to break. To make the switch, simply remove your old bulbs and screw in the new LED bulbs.
It’s a quick and easy way to make your home more energy-efficient while improving your lighting quality.
Testing and Reinstalling Cluster
Changing the color of your instrument cluster lights can transform the look of your vehicle’s interior and give it a more personalized feel. However, before you start tinkering with your cluster, it’s important to test and reinstall it correctly to avoid any potential issues. One way to test your cluster is by using a diagnostic tool, such as an OBD2 scanner, to ensure that all the sensors and gauges are working correctly.
Once you have tested your cluster, you can start the process of changing its color. If your cluster has replaceable bulbs, you can simply replace them with ones in your desired color. However, if it doesn’t, you may need to purchase an overlay kit, which is a colored film that you can apply on top of your cluster.
Remember to follow instructions carefully and handle all components with care during the installation process. By following these steps, you can customize your instrument cluster lights to showcase your personal style.
Test Cluster Lights Before Reinstallation
Before reinstalling your cluster lights, it’s important to test them first. This will ensure that everything is working as it should be before you go through the laborious process of reinstallation. To test your cluster lights, start by disconnecting the battery and removing the cluster from your vehicle.
Then, connect the power and ground wires to a 12V power source, and use a multimeter to check for continuity or any other possible issues. Once you’ve confirmed that everything is working correctly, you can proceed with the reinstallation process. However, don’t forget to double-check that all wires and connections are secure before reconnecting your battery.
Taking the time to test and troubleshoot your cluster lights before reinstalling them can save you a lot of time and frustration in the long run. So, always remember to test before you install!
Reinstall Cluster and Dash Cover
If you’re reinstalling your car’s cluster and dash cover, it’s important to perform some tests before putting everything back together. Begin by checking all the connections and wiring to ensure everything is properly seated and there are no loose or damaged parts. Turn on your vehicle’s ignition and test all the gauges, lights, and other components on the cluster.
Testing these elements will help you verify that the installation has been successful and save you from having to take it all apart again if something is missing. Once everything has been checked out, reinstall the cluster and dash cover using the appropriate screws and clips and ensure that everything is secure. A good analogy for this process is like putting together a puzzle – all the pieces must fit together properly for everything to work correctly.
By taking the time to test and reinstall your cluster and dash cover correctly, you can enjoy a safer and more reliable car driving experience.
Enjoy Your New Customized Instrument Cluster!
Have you ever wanted to change the color of your instrument cluster but didn’t know how? Well, it’s easier than you might think! First, you need to gather the supplies: a set of screwdrivers, needle-nose pliers, and replacement LED bulbs. Start by disconnecting the battery to avoid any electrical hazards. Then, remove the dashboard cover and the instrument cluster to access the bulbs.
Use the needle-nose pliers to remove the old bulbs and replace them with the new LED ones, making sure they are securely in place. Once all the bulbs have been replaced, reconnect the battery and turn on the ignition to admire your newly customized instrument cluster! By following these simple steps, you can change the lighting color of your instrument cluster to fit your style and preferences.
Conclusion
In just a few simple steps, you can easily give your car’s instrument cluster a brand new look with a custom light color. Trust us, your passengers will be impressed and think you have some serious car modification skills. But don’t worry, we’ll keep your secret that it was actually a DIY project you did with easy-to-follow instructions.
So go ahead and switch it up – it’s time to show off your personality and style on the road!”
FAQs
How do I remove the instrument cluster from my car?
To remove the instrument cluster, first disconnect the battery. Then, remove any screws or bolts holding the cluster in place and gently pull it out. Be careful not to damage any electrical connections.
Can I change the color of my instrument cluster lights?
Yes, you can change the color of your instrument cluster lights by installing colored filters over the existing bulbs or by replacing the bulbs with colored LED lights.
What tools do I need to change the instrument cluster light color?
You will need a screwdriver set, pliers, and a set of colored filters or LED lights. Additionally, you may want to have a soldering iron and electrical tape on hand to make any necessary connections.
Is it difficult to change the color of the instrument cluster lights?
It can be somewhat challenging to change the color of the instrument cluster lights, especially if you are not experienced with electrical work. However, with the right tools and some patience, it is a manageable DIY project for many car enthusiasts. It is important to follow all safety precautions and instructions carefully to avoid damaging your vehicle.

