Maximize Your Engine’s Performance: A Step-by-Step Guide to Installing an Aftermarket Oil Pressure Gauge
Have you ever found yourself wondering about the health of your engine while driving down the road? Is the factory oil pressure gauge not providing you with the information you need? Installing an aftermarket oil pressure gauge can be a great solution. Not only will it give you a more precise reading than the factory gauge, but it will also allow you to closely monitor your engine’s oil system and prevent potential problems from occurring. In this blog post, we will walk you through the steps of installing an aftermarket oil pressure gauge so that you can keep your engine running smoothly and with confidence.
Gather necessary tools
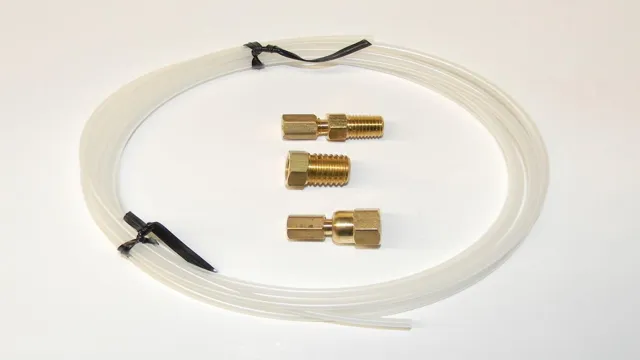
If you’re planning on installing an aftermarket oil pressure gauge, the first step is to gather all the necessary tools. These include the gauge kit, a wrench, socket set, drill, wire strippers, and electrical tape. Make sure the gauge kit you choose is compatible with your vehicle’s make and model, and provides accurate readings that match the factory gauge.
Once you have all the tools, you can begin the installation process. It’s important to follow the manufacturer’s instructions carefully to ensure proper installation and avoid damaging any components. Don’t forget to test your new oil pressure gauge once you’ve completed the installation to make sure it’s working properly.
With the right tools and a bit of patience, you’ll have a functional aftermarket oil pressure gauge in no time!
Oil pressure gauge, mounting kit, wrench set, Teflon tape, wiring
Before installing an oil pressure gauge, it’s important to gather all the necessary tools. You’ll need a mounting kit, wrench set, Teflon tape, and wiring kit. Without the proper tools, your installation process may become difficult and time-consuming.
A mounting kit will secure your gauge in place, while a wrench set ensures you can tighten and loosen components easily. Teflon tape is essential to prevent leaks and seal off any threaded connections. Lastly, a wiring kit will help you connect your gauge to a power source so you can get accurate readings while driving.
It’s important to choose high-quality tools to ensure a successful installation and to maintain your gauge properly over time. By using these tools, you’ll be able to install your gauge with ease and have it working in no time!
Choose the location for the gauge
If you’re looking to install an aftermarket oil pressure gauge, it’s crucial to choose the right location for it. The gauge should be placed where it’s both visible and easily accessible while driving. A popular location is on the A-pillar, where it won’t obstruct the driver’s view but can be easily glanced at.
Another option is in the center console, where it can be integrated into the car’s interior design. However, it’s important to consider whether the chosen location is in an area that can withstand the heat and vibration of the engine. Overall, taking the time to carefully choose the location for your aftermarket oil pressure gauge will ensure that it’s both practical and aesthetically pleasing.
Driver side or A-pillar are popular options
When it comes to installing gauges in your car, one of the first decisions you need to make is where to put them. Two popular options are on the driver side or on the A-pillar. Putting gauges on the driver side allows you to easily monitor them while driving and can be a good option for gauges that you need to check frequently.
However, it can also be distracting if you have too many gauges or if they are in an inconvenient location. On the other hand, the A-pillar can be a great location for gauges that provide important information but don’t need to be checked as often. It can also be a good option if you want to keep your dashboard clean and uncluttered.
Ultimately, the location you choose will depend on your personal preference and the type of gauges you want to install. Whether you go with the driver side or A-pillar, just make sure you choose a location that is easily visible and won’t interfere with your driving.
Mount the gauge
After you have determined the location of your aftermarket oil pressure gauge, the next step is to mount the gauge itself. This can be done using the mounting bracket that may have come with the gauge or by creating a custom bracket to fit your specific installation needs. Mount the bracket securely to the dashboard or another sturdy surface using screws or adhesive tape.
Once the bracket is securely in place, attach the gauge to the bracket using the provided hardware and make sure it is level and facing in the correct direction for easy reading. Be sure to double-check that all wiring and tubing is properly connected and secured before moving on to the next step. By following these steps, you will have successfully installed your aftermarket oil pressure gauge and be well on your way to monitoring your engine’s health with confidence.
Attach mounting kit to gauge and secure to chosen location
Mounting the gauge is a crucial step in installing any type of measurement device. Once you have carefully selected the spot where you want to attach the gauge, the next step is to attach the mounting kit to the gauge itself. You should follow the instructions specific to your gauge to ensure that you do it correctly.
There are many types of gauges available on the market, each with its own set of mounting instructions. Once the mounting kit is attached to the gauge, you can proceed to secure it to the chosen location. You can use brackets, screws, or adhesive tapes to fix the gauge to the surface.
It’s crucial that you choose the right tools required for the job. This way, you’ll avoid the gauge from falling off or shifting around. The best location for your gauge is one that’s easily visible and accessible.
Make sure that you’ve chosen a sturdy spot, and your gauge is firmly fixed in place before proceeding to the next step. With proper mounting, your gauge will accurately measure whatever parameter you’d like to monitor, providing you with precise readings every time.
Attach the oil pressure sensor
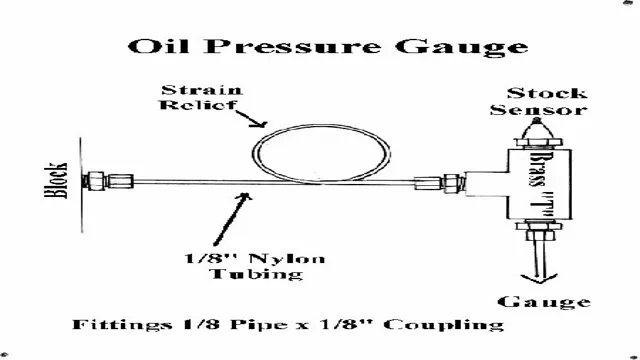
If you’re looking to install an aftermarket oil pressure gauge, the first step is to attach the oil pressure sensor. This sensor will measure the pressure of oil in your engine and send that information to the gauge, allowing you to monitor your engine’s health. To attach the sensor, locate where the oil pressure switch is on your engine block.
This is typically near the oil filter. Remove the switch and install the sensor in its place. Be sure to use teflon tape to prevent any leaks.
Once the sensor is securely attached, connect the wires to the sensor and route them to where you plan to install the gauge. With the sensor attached, you’re one step closer to having a reliable aftermarket oil pressure gauge.
Locate the oil filter and replace with oil pressure sensor using wrench set and Teflon tape as needed
Replacing the oil pressure sensor is a necessary task to ensure that your engine is running smoothly and that you are aware of any potential issues before they become major problems. One of the first steps in this process is locating the oil filter. Most oil filters are located near the bottom of the engine.
Once you have located it, use your wrench set to remove the old oil filter and replace it with the new oil pressure sensor. Make sure to use Teflon tape as needed to prevent any oil leaks. This will ensure that the sensor is securely in place and that there are no gaps that could cause issues down the line.
With the new oil pressure sensor attached, you can be confident that your engine is getting the proper oil pressure it needs to run efficiently. Don’t forget to regularly check the oil pressure gauge and keep up with routine maintenance to ensure a long and healthy life for your engine.
Wiring the gauge
If you’ve ever wondered how to install an aftermarket oil pressure gauge, you’re in luck. Wiring your gauge isn’t as complicated as it may seem. First and foremost, you’ll need to locate an oil pressure sending unit to connect your gauge to.
Once you’ve done that, you’ll want to carefully connect the wires from your gauge to the sending unit. It’s important to make sure the wires are secure before turning on your vehicle. If you’re unsure about how to connect your gauge, don’t hesitate to consult a professional mechanic.
With the right tools and a bit of patience, you can easily install an aftermarket oil pressure gauge that will give you more control over your vehicle’s performance and help prevent potential engine problems in the future.
Connect gauge wiring to 12V power source and the sensor’s signal wire
When it comes to wiring your gauge, the first step is to connect the gauge wiring to a 12V power source. You can use the power source from your vehicle’s battery, a fuse box, or any other 12V power source available. It’s important to ensure that the power source has the appropriate amperage for your gauge.
Once you have connected your gauge to the power source, the next step is to connect the sensor’s signal wire. This wire is responsible for collecting the readings from your sensor and transmitting it to the gauge for display. It’s important to ensure that the signal wire is connected to the correct pin on the gauge to avoid any errors in readings.
With these connections made, your gauge should be up and running, ready to display accurate readings of your vehicle’s vitals. Remember to always follow the manufacturer’s instructions to ensure proper installation and avoid any damage to your vehicle or equipment.
Test the gauge
Now that you have successfully installed your aftermarket oil pressure gauge, it’s essential to test it out to ensure it’s working correctly. First, start your engine and let it warm up for a few minutes. Then, turn off the engine and check the gauge’s reading.
It should be within the recommended range for your vehicle. Next, start the engine again and rev it up a bit, then let it idle. Check the gauge’s reading once more to make sure it doesn’t fluctuate too much.
If everything checks out, you’re good to go! Keep an eye on the gauge while driving, and if you notice any significant changes in pressure, have your engine checked by a professional immediately. Remember, your oil pressure gauge is a vital component of your vehicle, so it’s crucial to make sure it’s working properly.
Start engine and check gauge for accurate reading
When starting your engine, it’s important to check your gauge to ensure an accurate reading. This simple test will give you peace of mind and ensure that you have all the information you need to keep your engine running smoothly. To get started, turn on your engine and let it warm up for a few minutes.
Next, take a look at your gauge and make sure that the reading is in the normal range. If it is, you’re good to go! However, if the reading is too high or too low, you may have an issue that needs to be addressed. Don’t worry though, this is a common problem and can usually be easily fixed.
By taking the time to test your gauge, you’re ensuring that you have all the information you need to keep your car running smoothly and avoid any potential problems down the road. So next time you start your engine, remember to check your gauge and enjoy a stress-free ride!
Final steps
Once you have completed the previous steps, it’s time for the final installation of your aftermarket oil pressure gauge. First, make sure all the connections are secure and tight. Then, double-check the routing of wires and hoses, making sure they are not touching any abrasive or sharp surfaces.
Next, reconnect the battery and test the gauge to ensure it’s working correctly. Start your vehicle and check the oil pressure reading. If you notice any issues, recheck the connections or consult the manufacturer’s instructions.
Finally, tidy up all the wires and hoses with zip ties to avoid any tangles or interference with other vehicle components. Congratulations, you have successfully installed your new aftermarket oil pressure gauge, ensuring you can monitor your engine’s oil pressure levels accurately.
Secure wiring and check for any leaks or loose connections
Now that you have installed your new electrical system or made necessary repairs to your existing one, there are a few final steps to ensure that your home remains safe and free from any electrical hazards. It’s essential to secure all wiring and double-check for any leaks or loose connections. Loose wiring or poor connections can cause electrical shocks and even start electrical fires, so don’t leave any stone unturned.
Make sure all wires are neatly organized and secured in place with clamps or staples. Once you’ve done this, the final step is to test the system for any faults or abnormalities. This is especially important if you’re working with an existing electrical system as it may have its own set of issues.
It’s always better to be safe than sorry, and a minor fault could quickly escalate into a potential disaster if not detected early. So, take some time to run a few tests and ensure that everything is functioning correctly. In conclusion, securing wiring and checking for leaks or loose connections is a vital final step to ensure that your home’s electrical system is safe and free from any potential hazards.
Conclusion
Aftermarket oil pressure gauges can be a great addition to any car enthusiast’s vehicle, providing valuable insight into the health of their engine. Installing one is a straightforward process that requires a few basic tools and a bit of patience. Remember to follow the manufacturers’ instructions carefully and seek professional assistance if necessary.
And once installed, you’ll never have to wonder whether your engine is running low on oil pressure – you’ll have all the data at your fingertips. So, go ahead and add some style and substance to your ride with an aftermarket oil pressure gauge and enjoy the peace of mind that comes with knowing that you’re always in control.”
FAQs
What is an aftermarket oil pressure gauge?
An aftermarket oil pressure gauge is an additional gauge that measures the oil pressure in your car’s engine. Unlike the factory-installed gauge, an aftermarket gauge provides more accurate readings.
Why should I install an aftermarket oil pressure gauge?
Installing an aftermarket oil pressure gauge allows you to monitor the oil pressure in your car’s engine more accurately. This can help you detect any potential issues early on, which can prevent costly repairs down the line.
How do I install an aftermarket oil pressure gauge?
To install an aftermarket oil pressure gauge, you will need to follow the instructions provided by the manufacturer. Typically, this involves installing a new sending unit and running new wiring to the gauge. It is recommended that you have some experience with electrical work before attempting the installation.
Can I install an aftermarket oil pressure gauge myself?
Yes, it is possible to install an aftermarket oil pressure gauge yourself if you have the necessary tools and experience. However, if you are not comfortable with working on cars, it is recommended that you seek the assistance of a professional mechanic.

