Get Your Trailer Rolling Safely: A Step-by-Step Guide on How to Ground Trailer Lights
If you’re looking to take your trailer on the road, it’s essential to have properly functioning lights. But have you ever encountered a problem where the trailer lights don’t light up properly or not at all? Often, the culprit is an improperly grounded trailer light. Grounding a trailer light is an easy but essential step for ensuring your lights receive enough electrical current to work correctly.
Without proper grounding, the lights may flicker, dim, or not work at all, which is dangerous when driving on busy roads. In this blog post, we’ll walk you through the straightforward steps to ground your trailer lights, which will help keep you and other drivers safe on the road. By following our easy-to-understand guidelines, you can troubleshoot any issues with your trailer lighting and ensure they remain connected to the towing vehicle’s electrical system.
So, let’s get started!
Assess Trailer Lights & Wiring
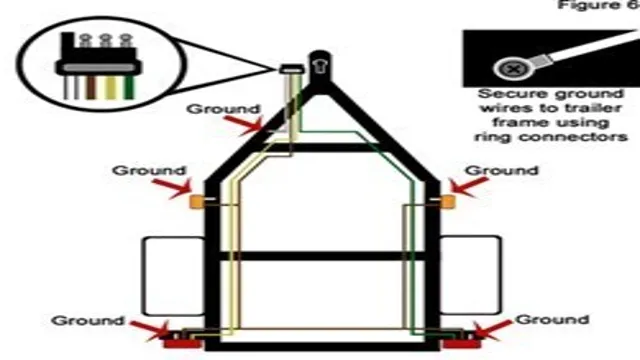
If you’re having trouble with your trailer lights, it may be time to assess the wiring and grounding of your system. Grounding is an important part of ensuring that your lights function properly and prevent any accidents on the road. The best way to ground a trailer light is to use a grounding wire, which is typically attached to the trailer frame and serves as a return path for electrical current.
It’s important to ensure that your wiring is properly connected and that there are no loose or frayed wires that could cause a short circuit. You can check the wiring by using a multimeter and tracing the electrical path from the tow vehicle to the trailer lights. If you’re unsure about how to ground your trailer lights, it’s best to consult a professional to ensure that your system is safe and functional.
Check the Connections on the Trailer
When it comes to ensuring your trailer is roadworthy, it’s essential to assess the lights and wiring. One of the most common issues with trailers is problems with the electrical connections, which can cause the lights to malfunction and the brakes to fail. It’s crucial to check that the brake lights, turn signals, and running lights are all working correctly before you hit the road.
You should visually inspect the wiring to ensure there are no frayed or damaged wires, which could cause a short-circuit or other electrical issues. Ensure all connections are secure, and if necessary, replace any damaged wiring or connectors. Don’t forget to inspect the trailer’s battery and charging system, as this can also affect the lights’ performance.
Overall, taking the time to assess trailer lights and wiring can help prevent accidents and ensure a safe journey.
Make Sure Wiring is Not Damaged
When assessing your trailer lights, it’s crucial to make sure that the wiring is not damaged. Damaged wiring can lead to malfunctioning lights, causing a safety hazard on the road. Start by inspecting the wiring for any visible signs of wear, such as fraying or cracks.
It’s also essential to check the connections and make sure they’re secure. If you notice any damage or questionable connections, it’s best to have a professional take a look and repair or replace any necessary parts. Keeping your trailer’s lights and wiring in good condition is not only important for your safety but also for the safety of others on the road.
So, always double-check your wiring before hitting the road.
Secure the Ground Wire
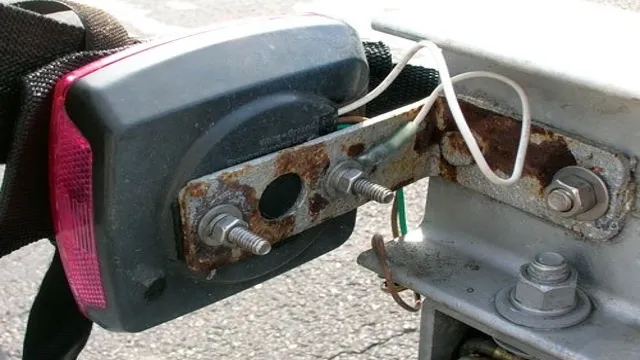
When it comes to trailer lights, grounding is a crucial step for ensuring their proper functionality. To ground a trailer light, start by identifying the ground wire, which is usually white or black in color. The ground wire should be securely attached to the frame of the trailer using a grounding screw or clip.
Make sure that the grounding connection is clean and free of rust or corrosion, as this can interfere with the electrical current flow. It’s important to note that the ground wire is what completes the circuit, so if it’s not properly secured, the lights may not work at all or may have sporadic issues. When working with trailer lights, safety is always a top priority, so be sure to handle any electrical components with care and turn off the power source before making any connections.
By following these steps and properly securing the ground wire, you can ensure that your trailer lights are functioning correctly and safely on the road.
Attach the Ground Wire to a Metal Surface
When it comes to electrical wiring, safety should be your number one priority. A vital component of ensuring electrical safety is securing the ground wire properly. If the ground wire isn’t secured correctly, it could cause a dangerous electrical shock.
To secure the ground wire, you should attach it to a metal surface. This provides a direct path for any stray electricity to flow to the ground and prevents the buildup of electric charges that can be hazardous. It is important to note that the metal surface must be clean and free of any paint, grease, or rust for the ground wire to work correctly.
So, before securing the ground wire, make sure to clean the surface thoroughly with an abrasive pad or sandpaper. With a properly secured ground wire, you can be sure that your electrical wiring is safer and less prone to shock hazards.
Use Star Washers for a Better Connection
If you’re setting up an electrical system that involves grounding wires, you’ll definitely want to invest in some star washers. These little metal discs with a star-shaped profile are a real lifesaver when it comes to ensuring a good connection between your wire and the grounding point. By placing a star washer between the wire and the grounding screw or post, you create a strong and secure bond that resists coming loose or corroding over time.
This is especially important for ground wires, which serve as a safety feature to prevent electrical shock or fire hazards. By using star washers, you’ll give yourself peace of mind that your electrical system is properly grounded and that you’re protecting your home or business from potential danger. So next time you’re setting up a ground wire, don’t skimp on the details – add a star washer to really seal the deal.
Clean Contact Surface for Better Grounding
When it comes to electrical wiring, proper grounding is essential. One crucial aspect of grounding is ensuring a clean contact surface, as this will help to provide a better connection. This means taking the time to clean any contact points thoroughly before attaching the ground wire.
This can be done with a wire brush or sandpaper, and it’s important to make sure there is no rust, debris, or other contaminants present. A secure ground wire is also essential, as any loose connections can create a hazard. It’s important to use the right size wire and connectors, and to ensure that the wire is tightened down securely.
By paying attention to these details and taking the time to do the job right, you can help to ensure that your wiring system is safe, reliable, and effective.
Double Check the Work
When it comes to safely operating a trailer, one of the most important things to keep in mind is making sure that your lights are grounded properly. Grounding your trailer lights ensures that electricity flows smoothly and accurately, helping you to avoid potentially dangerous situations on the road. One of the best ways to ground your trailer lights is to start by stripping off a section of your wiring harness, exposing the conductive wires.
Then, attach these wires securely to a solid ground, making sure that they are firmly connected and that the connections are protected from the elements. Finally, double check your work and ensure that everything is connected correctly before hitting the road. By taking a few extra minutes to ground your trailer lights properly, you can ensure that you and your cargo stay safe and protected while out on the road.
Test the Lights
After installing new lighting fixtures, it’s essential to double-check the work and test the lights. Testing the lights will ensure that everything is wired correctly and functioning properly. You wouldn’t want to complete the installation and then find out that the lights aren’t working.
To test the lights, turn on the power and verify that each fixture illuminates. Check if all bulbs are lit and look for any flickering or dimming. It’s also crucial to make sure that the switch properly controls the lights.
If something appears incorrect, turn off the power and check the wiring connections. Don’t hesitate to seek help from a professional if needed. By testing the lights, you can ensure a safe and functional installation that will last for years to come.
Remember, safety comes first, so never leave anything to chance.
Check Connections for Loose Wires
Checking for loose wires is a crucial step in ensuring the safety and functionality of any electrical system. No matter how well you’ve completed the electrical wiring, checking for connections is a wise precautionary measure that should not be overlooked. Double-checking your work can save you a lot of headaches in the long run.
Loose wires increase the likelihood of electrical shorts and could lead to electrocution or fire hazards. Before you begin using your new electrical system, go back and tighten all connections, making sure everything is properly secured and attached. Imagine loose wires as a water pipe that has a leak.
Just like a leaky pipe can cause water damage, loose wires can lead to electrical damage. Loose wires increase the likelihood of electrical shorts and fires, which can cause serious injury or death. To avoid such incidents, take the time to double-check your work and make sure everything is securely connected.
The few extra minutes that it takes you to ensure everything is tight and secure could mean the difference between safety and disaster. Additionally, this is an excellent time to tag all wires and cords, making future maintenance and inspections much more manageable. Always prioritize safety and give your electrical system the attention it deserves to keep things running smoothly.
Wrap Up – Your Trailer Lights are Grounded!
So, there you have it; your trailer lights are now grounded! This may seem like a small detail, but it makes a huge difference in the functionality and safety of your trailer. Taking the time to properly ground your trailer lights will save you from potential accidents on the road and ticket fines from law enforcement. Remember to always check your trailer lights before hitting the road, and if you ever run into any issues, don’t hesitate to refer back to this guide on how to ground your trailer lights.
Happy towing!
Conclusion
In summary, grounding a trailer light is as essential as grounding yourself before performing an electrical task. It ensures the safe and effective transfer of power, a bright and long-lasting light, and the prevention of any unnecessary sparks. So, take the time to properly ground your trailer light, and you’ll be cruising down the road, shining bright like a diamond.
“
FAQs
What are trailer light grounds?
Trailer light grounds are the connection points where the electrical circuit completes in order for the trailer lights to function.
Why is grounding important for trailer lights?
Grounding ensures that the electrical current flows through the circuit and completes the circuit. Without proper grounding, the trailer lights may not function properly, which can be not only a nuisance but also a safety hazard.
How can you test if your trailer light ground is working properly?
You can test your trailer light ground by using a multimeter to check for continuity between the ground wire and the trailer frame. If there is no continuity, the ground is not working properly.
What is the best way to ground a trailer light?
The best way to ground a trailer light is to use a dedicated ground wire that is connected directly to the trailer frame. This helps to ensure a strong and reliable ground connection for the lights.

