Maximize Your Traction: A Step-by-Step Guide on How to Adjust Your Traction Bars
If you’re looking to improve your vehicle’s traction on the road, then you’ve probably considered adding traction bars to your ride. Traction bars can help keep your wheels firmly on the pavement, reducing wheel hop and improving acceleration. However, to get the most out of your traction bars, they need to be adjusted properly.
In this step-by-step guide, we’ll walk you through the process of adjusting traction bars for optimal performance. Whether you’re a seasoned mechanic or just getting started with automotive upgrades, we’ll help you get the most out of your traction bars. So let’s get started!
What Are Traction Bars?
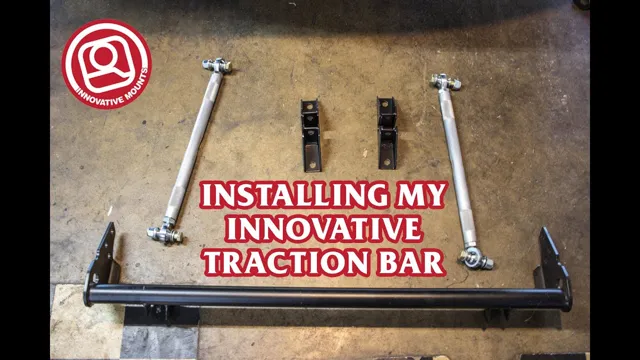
Traction bars are an essential component in vehicles that help to prevent wheel hop and improve traction. They work by limiting the amount of axle wrap that occurs when the vehicle is accelerating, which, in turn, helps to transfer power to the wheels more efficiently. Adjusting traction bars can prove to be a bit tricky, as there is no one-size-fits-all approach.
Depending on the make and model of your vehicle, the process may involve adjusting the length of the bar, changing the angle of attachment, or a combination of both. It’s essential to note that before making any modifications, it’s essential to do a thorough inspection of your vehicle’s rear suspension to determine if there are any other issues that need to be addressed. With the right tools, and some technical know-how, adjusting traction bars can be a straightforward process that can significantly improve your vehicle’s performance on and off-road.
Definition and Purpose of Traction Bars
Traction bars are suspension components that are designed to improve traction and stability on vehicles that experience excessive wheel hop or axle wrap. Wheel hop occurs when a tire loses traction during acceleration, causing it to bounce uncontrollably. Axle wrap, on the other hand, happens when the torque from the engine twists the axle, causing it to rotate unpredictably.
Traction bars work by limiting the movement of the suspension and stabilizing the axles, which in turn prevents wheel hop and axle wrap. These bars are especially useful in high-powered vehicles that have custom suspension setups or off-road vehicles that traverse uneven terrain. By improving traction and stability, traction bars not only improve the vehicle’s performance but also ensure a safer driving experience.
Types of Traction Bars
Traction bars are an essential component of any performance vehicle. These bars are used to prevent the axle from rotating and thereby improve traction, which can be especially useful during drag races or off-roading adventures. There are several different types of traction bars available on the market, including ladder bars, four-link bars, and leaf spring bars.
Ladder bars are the most common and consist of two long bars that run parallel to the axle and connect to the frame. Four-link bars are similar but use four shorter bars for added stability. Leaf spring bars attach to the leaf springs and are a great option for those who do not want to make significant modifications to their vehicle’s suspension.
No matter which type of traction bar you choose, it is essential to make sure that it is installed correctly to ensure optimal performance and safety.
When to Adjust Traction Bars
Adjusting traction bars is a crucial aspect of maintaining optimal vehicle performance. Traction bars are designed to improve traction by minimizing the amount of axle wrap during acceleration, which can lead to loss of traction and damage to the drivetrain. It is important to adjust traction bars when you notice excessive wheel hop or if you are experiencing issues with the vehicle’s handling.
To adjust traction bars, you will need to measure the distance between the frame and the axle, adjust the bar to achieve the desired gap distance, and then install or adjust the mounting brackets to secure the bar in place. You may also need to adjust the angle of the traction bar to match the angle of the drive shaft. By making these adjustments, you can improve your vehicle’s traction and performance, and prevent future issues with handling and drivetrain damage.
Signs that Traction Bars Need Adjustment
Traction Bars Adjustment Are you experiencing some unusual handling issues or something just doesn’t feel right with your vehicle? If so, it might be time to check and adjust your traction bars. Traction bars are designed to prevent wheel hop and improve traction by keeping the rear axle from rotating. If the bars are not adjusted properly, it can cause damage to your vehicle’s suspension and potentially lead to a serious accident.
A common sign that your traction bars need adjustment is if your vehicle’s nose dives or squats during acceleration. Another sign is if your wheels spin excessively or if your vehicle drifts while cornering. If you notice any of these signs, it’s essential to have your traction bars inspected and adjusted by a qualified mechanic.
Keep yourself and others on the road safe by ensuring your vehicle’s traction bars are properly adjusted.
How to Adjust Traction Bars
Adjusting traction bars can significantly help improve a vehicle’s handling, stability and traction. Whether you’re racing, off-roading, or simply improving your car’s performance, learning how to adjust traction bars is an important step. The first step is to loosen the adjustable brackets on your traction bars and slide them into position where you want them.
Generally, adjusting the angle of your traction bars can greatly affect how your vehicle shifts and grips, so it’s important to experiment and find the perfect angle that works for you. Once you’ve found the right position, tighten the brackets and make sure the traction bars are firmly secured to the vehicle’s frame. To achieve optimal results and prevent any damage, it’s best to refer to the manufacturer’s instructions when adjusting your traction bars.
By following these tips and regularly fine-tuning your traction bars, you can ensure your vehicle moves more smoothly and safely on the road.
Step 1: Measure the Height and Angle of the Traction Bars
Adjust Traction Bars Adjusting traction bars can be a tricky task, but it’s crucial for ensuring that your vehicle operates at its optimal level. The first step in adjusting your traction bars is to measure their height and angle. To do this, you’ll need a measuring tape and a protractor.
Start by taking measurements of the height and angle of your traction bars. You should measure the angle at which the bars are mounted, the distance from the ground to the lowest point on the bar, and the distance from the ground to the highest point on the bar. These measurements will help you determine how much you need to adjust the bars.
Once you have your measurements, it’s time to start adjusting the bars. Adjusting the bars can be done in a few different ways, depending on the type of bar and the vehicle. In some cases, you may need to adjust the height of the mounting bracket to raise or lower the bars.
In other cases, you may need to adjust the angle of the bars themselves by loosening the mounting bolts and rotating the bars to the desired angle. It’s important to be careful when adjusting the bars, as even small adjustments can have a significant impact on your vehicle’s performance. Overall, adjusting traction bars is an important task to ensure that your vehicle operates at its best.
By measuring the height and angle of your bars, you can determine how much you need to adjust them and make those adjustments accordingly. Whether you need to adjust the mounting bracket or the angle of the bars themselves, be careful and precise to ensure that your vehicle runs smoothly and safely.
Step 2: Adjust the Traction Bars to the Correct Height and Angle
Adjusting traction bars can greatly improve your vehicle’s handling and performance, making it an important step in any car modification project. The first thing you need to do is find the correct ride height and angle for your traction bars. This can be done by visual inspection or measurement, but it’s important to make sure they are level and are not too high or too low, as this can affect your car’s suspension.
Once you’ve determined the ideal positioning for your traction bars, you can use a wrench to adjust the height and angle. This should be done carefully, making sure not to overtighten or loosen the hardware. With the right adjustments, your traction bars will help your car grip the road better, reduce wheel hop, and provide a smoother ride.
It’s important to note that proper alignment and installation are crucial for effective traction bars, so it’s best to seek the advice of an experienced mechanic or do extensive research before attempting to do it yourself.
Step 3: Test Drive the Vehicle
When it comes to adjusting traction bars, it’s important to have the right tools and a general knowledge of how they work. Traction bars are designed to help prevent wheel hop during hard acceleration by limiting the amount of axle rotation and keeping the tires firmly planted on the ground. To adjust them, you’ll first need to loosen the mounting bolts and slide them to the desired position.
It’s important to ensure that the bars are level and evenly spaced before tightening the bolts back up. Once you’ve made your adjustments, you’ll want to test drive your vehicle to ensure that the bars are working correctly. Pay attention to how the car handles during hard acceleration and ensure that the tires stay firmly planted on the ground.
With a little bit of know-how and the right tools, adjusting traction bars can greatly improve your vehicle’s performance and handling.
Common Mistakes to Avoid When Adjusting Traction Bars
Adjusting traction bars is crucial for enhancing a vehicle’s performance, especially when it comes to traction and stability. However, it’s essential to avoid some common mistakes during the process. One mistake to avoid is adjusting both traction bars to the same length, which can lead to uneven weight distribution and create handling issues.
It’s better to measure the distance from the axle centerline to the mounting point on each side and adjust each traction bar accordingly. Another mistake is adjusting the traction bars too tight, which can cause excessive axle wrap and reduce traction. It’s best to adjust the traction bars to a sweet spot where they offer optimal traction without causing too much resistance.
Lastly, ignoring the vehicle’s suspension components’ wear can also lead to incorrect traction bar adjustment. It’s crucial to check and replace any worn-out components before adjusting the traction bars to ensure optimal performance. Following these tips can help you adjust your vehicle’s traction bars correctly and improve its performance.
Not Measuring Before Making Adjustments
One common mistake that people make when adjusting traction bars on their vehicle is not measuring before making changes. It may seem like a small oversight, but making adjustments without knowing the original setting can lead to bigger problems down the road. Without proper measurement, it’s challenging to know if you’ve achieved your desired results, and you could end up making the wrong adjustments.
It’s essential to measure the current height and angle of the traction bars before making any changes, as it will provide an accurate baseline for future adjustments. Once you have the baseline measurement recorded, you can make adjustments and track how they affect the performance of your vehicle. So before you start adjusting your traction bars, don’t forget to measure and record your starting point.
Over-Adjusting the Traction Bars
When it comes to upgrading your car’s traction, installing traction bars is an effective solution. But, adjusting traction bars incorrectly can result in overcompensating and causing more harm than good. One common mistake is over-adjusting the bars, which can lead to a stiff and uncomfortable ride.
It’s important to find a balance between too much and too little adjustment, and to make small adjustments at a time. Additionally, make sure to keep track of your adjustments to see how each change affects your car’s performance. By avoiding over-compensation and making gradual changes, you can enhance your car’s traction without sacrificing ride comfort.
Remember, balance is key when it comes to adjusting traction bars.
Conclusion
Adjusting traction bars is like tuning a guitar. You want to find the perfect balance to create harmony between the power of your engine and the grip of your tires. With a little bit of tweaking, you can fine-tune your traction bars to deliver optimal performance and ensure a smooth ride.
So go ahead, grab your wrench and get ready to rock and roll on the road!”
FAQs
What are traction bars and why do I need them?
Traction bars are suspension components that help reduce axle wrap and wheel hop, which can improve traction and handling characteristics. They are often used in performance vehicles, particularly those with high horsepower or uneven weight distribution.
How do I install traction bars on my vehicle?
The installation process of traction bars can vary depending on the make and model of your vehicle. However, it typically involves attaching the bars to the frame or subframe of the vehicle and to the rear axle, using brackets and bolts. It is recommended to follow the manufacturer’s instructions and to have a professional install them if you are unsure.
Can I adjust the tension on my traction bars?
Yes, some traction bar models come with adjustable tension or pre-load settings. This allows you to fine-tune your suspension for optimal performance and can help you achieve specific handling characteristics. It’s important to follow the manufacturer’s instructions for adjusting the tension, as over-tightening can damage your suspension components.
What kind of maintenance do traction bars require?
Traction bars typically require little to no maintenance beyond regular inspections for wear and damage. However, it’s important to keep them clean and free from debris, especially if you frequently drive in muddy or dusty conditions. Additionally, be sure to check the bolts and brackets periodically to ensure they are properly tightened and secure.

