Jumpstarting Your Car’s Solenoid: A Beginner’s Guide
If you’re having trouble starting your car, or you hear a clicking sound when you turn the key, there’s a chance the solenoid could be malfunctioning. Fortunately, you can jump the solenoid yourself and get your car started quickly and easily. In this step-by-step guide, we’ll walk you through the process of jumping a solenoid, so you can get back on the road in no time.
First, we’ll explain what a solenoid is, and why it’s essential for starting your vehicle. Then, we’ll walk you through the tools you’ll need to complete the job. After that, we’ll show you how to jump the solenoid step-by-step, with clear, easy-to-follow instructions.
Whether you’re an experienced DIY mechanic or a complete beginner, this guide will help you get your car back on the road quickly and easily. By the end of this article, you’ll have the confidence and knowledge to jump your solenoid yourself, without relying on expensive mechanics or towing services. So, grab your tools, put on your safety gear, and let’s get started!
What is a Solenoid?
Are you having trouble starting your vehicle? It could be a faulty solenoid. A solenoid is an electromagnetic switch that is responsible for controlling high-current circuits. If your car won’t start, you can try jumping the solenoid to see if that’s the issue.
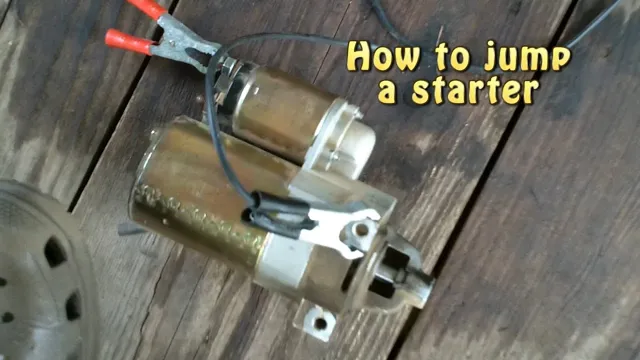
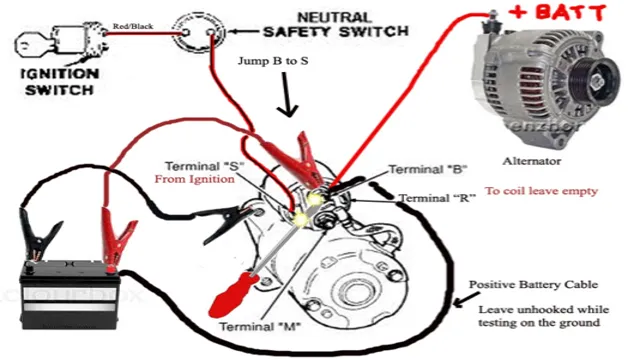
To jump a solenoid, you’ll need to locate it first. It’s usually near the battery or the starter. Once you find it, remove the two wires connected to the solenoid.
Take a wire and touch one end to the positive terminal on the battery and the other end to the terminal where the battery cable was connected. This will complete the circuit and the starter should engage. If it does, then you know that the solenoid is the problem.
If it doesn’t, then you may need to check the battery or starter. Jumping a solenoid can be a quick and easy way to diagnose a starting issue, but it’s important to remember that it’s only a temporary fix. If you continue to have problems starting your car, it’s best to take it to a professional mechanic to have it looked at.
Explanation and function of a solenoid
A solenoid is an electromechanical device that converts electrical energy into linear motion. It functions through the interaction between its electrically conductive coil and a ferromagnetic core. The coil is made up of wire wound around a central axis, while the core is a tube or rod of magnetically conductive material.
When an electric current passes through the coil, a magnetic field is generated that attracts the core towards the center of the coil. This creates a linear motion that can be used to perform mechanical work. Solenoids are used in a wide range of applications, including electric locks, valves, and switches.
They can be found in everything from cars and airplanes to vending machines and washing machines. Solenoids provide a reliable and efficient means of converting electrical energy into mechanical energy, making them an essential component in many modern devices. However, it is important to choose the right type of solenoid for a given application, as different designs can have different operating characteristics and requirements.
Reasons to Jump a Solenoid
If you’re having trouble starting your vehicle, one potential solution is to jump the solenoid. But what exactly does that mean, and why would you need to do it? Essentially, the solenoid is responsible for engaging the starter motor when you turn the key in the ignition. If the solenoid is malfunctioning or damaged, however, the starter won’t activate and your vehicle won’t start.
Jumping the solenoid means bypassing the faulty component by using a jumper wire to connect two of the electrical terminals. This can allow you to start your vehicle, at least temporarily, while you arrange for more permanent repairs. Keep in mind, however, that jumping the solenoid is not a long-term solution, and it should only be done with caution if you’re familiar with vehicle wiring and electrical systems.
If you’re unsure or uncomfortable with the process, it’s always best to seek professional assistance. But if you feel confident and prepared, jumping the solenoid can be a helpful trick to have up your sleeve when dealing with a stubborn vehicle.
List common issues that require jumping a solenoid
Jumping a solenoid is a technique that is commonly used by individuals to quickly and easily start a car that is having trouble starting. There are a number of different reasons why someone might need to jump a solenoid. One common issue is a worn out battery.
If the battery is not strong enough to turn the engine over and provide the required power to start the car, then jumping the solenoid can be a good option. Additionally, a bad alternator or starter motor may also require solenoid jumping. Other reasons why someone might jump a solenoid include corroded battery terminals or loose connections.
By jumping the solenoid, individuals can easily and quickly bypass these issues, allowing them to get back on the road and driving their car again. Overall, if you are experiencing problems starting your car, then jumping the solenoid may be a helpful solution to consider.
Tools Needed
Jump starting a car is an essential skill to have as a driver. If your car battery is dead, you can use a solenoid to jump start the engine. To do this, you’ll need a few tools, including a pair of jumper cables, a 12-volt battery, and safety gear such as gloves and goggles.
First, connect the positive terminal of the solenoid to the positive terminal of the 12-volt battery using a jumper cable. Then connect the negative terminal of the solenoid to the negative terminal of the battery using another jumper cable. Once the terminals are connected, turn on the ignition switch of the car to jump start it.
Make sure to wear protective gear and use caution when working with batteries, as they can be dangerous if mishandled. By following the proper technique and using the right tools, you can easily jump start your car’s engine using a solenoid.
List tools and materials needed to jump a solenoid
When it comes to jumping a solenoid, it’s important to have the right tools on hand. One essential tool is a pair of pliers, which will allow you to firmly grasp the wires and make a secure connection. You’ll also need a screwdriver to remove any screws or clamps that are holding the solenoid in place.
In addition to these basic tools, you’ll also need a wire jumper or a piece of wire to connect the solenoid to the battery. It’s important to make sure that the wire jumper is the correct size and length for your particular solenoid, as using a jumper of the wrong size could result in damage to the solenoid or the vehicle. Finally, you’ll need a functioning battery to provide the power needed to jump the solenoid.
By having these tools and materials on hand, you’ll be well equipped to jump a solenoid quickly and efficiently whenever the need arises.
Step 1: Disconnect battery and locate solenoid
Jumping a solenoid can be a helpful solution when you’re having issues with your vehicle’s starter. The first step in jumping a solenoid is to disconnect the battery to prevent any electrical shock. Once you have done that, you can locate the solenoid which is usually located in the engine compartment near the battery.
The solenoid is a cylindrical device with wires running to it. You can identify it by looking for the starter motor and following the wires to the solenoid. Once you have located the solenoid, you can begin the process of jumping it to start your car.
Remember to always be careful when working with electrical systems in your vehicle and to follow proper safety precautions. By following these steps, you can successfully jump a solenoid and get your vehicle back up and running.
Safety requirements and finding the solenoid
When it comes to working on the electrical components of your car, safety should always be your top priority. Before beginning any work, make sure to disconnect the battery to avoid any electrical shock or damage. Once the battery is disconnected, the next step is to locate the solenoid.
The solenoid is an important component of the electrical system, responsible for activating the starter motor and allowing the engine to turn over. Locating the solenoid may require some research or consultation with your vehicle’s manual. Once you’ve located the solenoid, it’s important to ensure that it’s the correct one for your vehicle and that all necessary safety precautions are taken before attempting any repairs or replacements.
Remember, taking the time to properly locate and work on the solenoid can ensure a safe and reliable vehicle.
Step 2: Connect jumper wire to battery and igniter post on solenoid
If you need to jump a solenoid, the second step is to connect a jumper wire to the battery and igniter post on the solenoid. This step ensures that the solenoid receives power from the battery and ignites the engine. The jumper wire acts as a bridge, providing a direct connection between the two posts and ensuring a smooth flow of electricity.
It’s important to make sure that the battery is fully charged and the jumper wire is connected securely. If the connection is loose or the battery is weak, the engine may not start or may sputter. Don’t forget to remove the jumper wire once the engine is running, as leaving it connected can damage the ignition system.
Following these steps can help you jump a solenoid and get your engine running smoothly again.
How to properly connect and what to look out for
Connecting a jumper wire to a battery and igniter post on solenoid can be a bit tricky, especially if you don’t have much experience in handling electrical components. However, with the right tools and a bit of patience, you can get it done in no time. First, ensure that both the battery and the solenoid are turned off before you start the connection process.
Once you have confirmed this, take your jumper wire and attach one end to the positive terminal of the battery and the other end to the igniter post on the solenoid. It is essential to make sure that the connection is secure and tight to avoid any potential hazards later on. Ensure that the wire is free from any damages or frays.
A damaged wire can cause a short circuit, which can be dangerous. Once the connection is secure, turn on the battery to check that everything is functioning correctly. If everything is working as it should, congratulations, you have successfully connected a jumper wire to a battery and an igniter post on a solenoid.
Step 3: Test the connection
Now that you’ve connected the jumper cables to the solenoid, it’s time to test the connection. Before starting, make sure that the ignition is turned off and that the car is properly secured with the handbrake engaged. Once you’ve secured the car, turn on the ignition and test the solenoid, making sure that the engine starts and the starter motor engages.
If the starter motor doesn’t engage, try wiggling the connection to ensure that it’s secure. If it still doesn’t work, try repositioning the cables and double-checking that the connections are properly attached. Once the connection is successful, don’t forget to disconnect the jumper cables in the reverse order of how you connected them to avoid any risk of electrical shock.
Congratulations, you have successfully jumped your solenoid!
Ensuring the connection is good and troubleshooting
Now that you have properly set up your internet connection, it’s time to test it and ensure it’s working as intended. To do this, you can try accessing websites, streaming videos or music and sending and receiving emails. If all of these operations are functioning correctly, then your connection is good to go.
However, if you encounter any issues during the test, then it’s time to troubleshoot. Some common problems could include slow internet speeds, connection drops, or difficulty connecting to certain websites. To resolve these issues, you can try restarting your router or modem, checking for any software updates, or contacting your internet service provider for further assistance.
It’s imperative to test your internet connection regularly to ensure it’s operating at maximum efficiency and to avoid any future connection issues that may arise.
Step 4: Turn on power
Now that you have connected the jumper cables and hooked up the solenoid, it’s time to turn on the power. Before you do, take a moment to make sure everything is properly connected and that the cables are secure. Once you’re sure everything is in order, turn on the power source.
If you have a battery charger, switch it on and wait for it to charge up the battery. If you’re using a car, turn on the engine and let it run for a few minutes to give the battery a boost. Keep an eye on the voltmeter or multimeter to make sure that the voltage is around 12 volts, which is the voltage that most solenoids require to function properly.
If everything looks good, then you’re ready to test your solenoid and see if it’s working. And there you have it – that’s how to jump a solenoid!
How to apply power and what to check for
Finally, it’s time to turn on the power! But before doing so, make sure everything is properly connected and installed. Double-check that all the cables and wires are connected firmly and securely. Ensure that all the switches or buttons are in the off position before turning on the power.
Once you’re ready, switch on the power source and keep an eye on the device to make sure it starts up without any problems. Check for any strange noises or smells, and monitor the voltage and current to ensure that they are within the device’s recommended specifications. Remember to always exercise caution when dealing with electrical equipment to avoid electrical shock or injury.
Step 5: Remove jumper wire and reconnect battery
Now that you’ve successfully jumped the solenoid, it’s time to remove the jumper wire and reconnect the battery. This step is crucial as leaving the jumper wire connected to the solenoid while the battery is connected can cause serious damage to your vehicle’s electrical system. To remove the jumper wire, simply disconnect it from the solenoid’s two terminals.
Then, carefully reconnect the positive and negative terminals of the battery. It’s important that you make sure all connections are secure and tight to prevent any loose wires and damage to your vehicle. Congrats, you’ve successfully jumped a solenoid and reconnected your battery safely!
Safely removing the jumper wire and final steps
Once you’re done resetting your check engine light with a jumper wire, it’s essential to remove it safely and reconnect the car battery. Step 5 of the process is crucial for preventing any damage to your car’s electrical system and ensuring the check engine light stays off. Start by turning off your car and carefully removing the jumper wire from the diagnostic connector.
Remember to hold onto the connector and not pull on the wire to avoid damaging it. Once the wire is out, take the time to check the connector for any damage or loose connections. Next, reconnect the positive and negative terminals of your car’s battery.
Make sure they are tightly fastened to avoid any electrical issues down the line. Finally, turn on your car and check whether the check engine light is still off. Congratulations! You’ve successfully reset your car’s check engine light and prevented any potential damage to your vehicle.
Conclusion
In conclusion, jumping a solenoid may seem daunting, but with the right approach and tools, it can be as easy as leaping over a hurdle. Whether you’re trying to start your car or impress your friends with your DIY skills, remember to first disconnect the battery and use caution when dealing with electrical components. In the end, you’ll be jumping for joy with the satisfaction of a job well done.
So go ahead, take that leap of faith and jump that solenoid like a pro!
Final thoughts and warnings
As we conclude this guide, it’s crucial to discuss the final step of removing the jumper wire and reconnecting the battery. This step is often overlooked, but it’s just as important as the others. After successfully jumpstarting your car, carefully remove the jumper wire, starting with the vehicle that received the charge and then the one that was being jumpstarted.
Be sure to place the jumper wire in a safe and secure place, preferably in your trunk or glove compartment. Now, it’s time to reconnect the battery. First, attach the positive cable, followed by the negative one.
Tighten both connections securely and ensure that they are snug. Remember, a loose connection can lead to more issues down the line. Finally, start up your vehicle and let it run for a few minutes to ensure that the battery is being charged.
With these steps complete, you’re ready to hit the road again! Just remember to drive around for at least 30 minutes to recharge the battery fully.
FAQs
What is a solenoid and how does it work?
A solenoid is an electromechanical device that converts electrical energy into linear motion. It works by using an electrical current to create a magnetic field that pulls or pushes a plunger or armature.
How do I jump a solenoid?
To jump a solenoid, you need to use a screwdriver or a jumper wire to connect the two large terminals on the solenoid. This will bypass the solenoid and allow the starter motor to turn over.
Can a faulty solenoid cause my car not to start?
Yes, a faulty solenoid can prevent your car from starting. If the solenoid is not engaging properly, it can prevent the starter motor from turning over. This can be caused by a number of issues, such as a worn out solenoid or a dead battery.
How do I know if my solenoid needs to be replaced?
You may need to replace your solenoid if you hear a clicking sound when you turn the key in the ignition or if your car won’t start. Other signs of a bad solenoid include dim headlights or other electrical issues. It’s best to have your solenoid tested by a professional to accurately diagnose the issue.