Unlocking the Secret: How to Easily Get 12 Volts from a 24 Volt System
Have you ever found yourself in a situation where you need to get 12 volts from a 24-volt system? It can be a bit tricky, especially if you’re not familiar with electrical systems. But fear not, because we’ve got you covered with this guide on how to get 12 volts from a 24-volt system. First things first, it’s important to understand the basics of electrical systems.
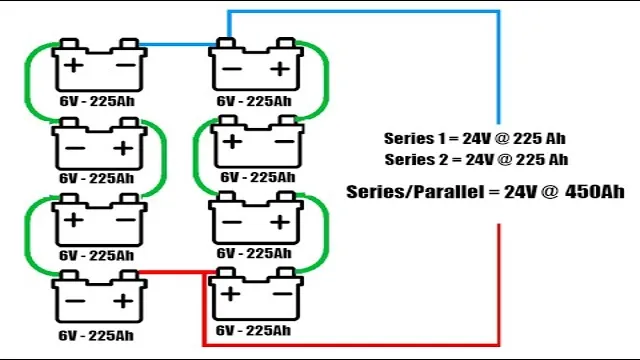
In a 24-volt system, there are two 12-volt batteries wired in series, which means that the voltage is doubled but the amperage remains the same. If you need to get 12 volts from this system, you’ll need to rewire the batteries in parallel, which will maintain the same voltage but double the amperage. To do this, you’ll need to connect the positive terminals of both batteries together, as well as the negative terminals.
This will create a parallel circuit, which will give you 12 volts and twice the amperage of a single battery. Keep in mind that you’ll need to use heavy-duty wiring and connectors to handle the increased amperage. Another option is to use a voltage regulator or a voltage converter.
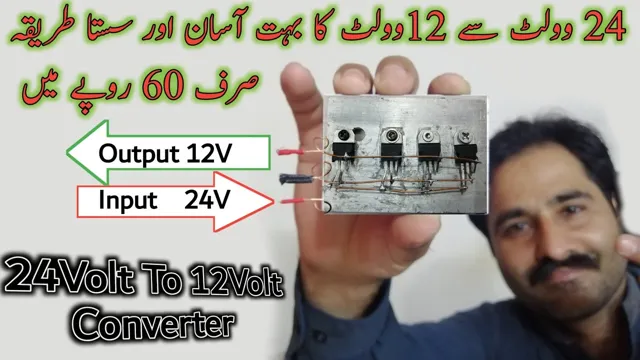
A voltage regulator will step down the voltage from 24 volts to 12 volts, while a voltage converter will convert the DC voltage to AC voltage and then back to DC voltage at a lower voltage level. Both of these methods are fairly simple to use, but you’ll need to make sure that you get a regulator or converter that can handle the amperage of your system. In conclusion, getting 12 volts from a 24-volt system may seem daunting at first, but with a little bit of knowledge and the right equipment, it’s definitely doable.
Whether you choose to rewire your batteries in parallel or use a voltage regulator/converter, just make sure that you take the necessary safety precautions and follow the instructions carefully.
Understanding the System
If you have a 24-volt system, but you need 12 volts to power a particular appliance, don’t worry. There are a few ways to tackle this issue. One option is to use a step-down converter that will reduce the voltage from 24 to 12 volts.
Another option is to use a voltage divider circuit. This involves using a resistor and a capacitor to divide the voltage in half. However, keep in mind that the voltage will not be as stable as it would be with a step-down converter.
Additionally, it’s essential to ensure that the appliance can handle the reduced voltage. Always read the manufacturer’s specifications to ensure that it is safe to operate at a lower voltage. By taking these precautions, you can successfully power your appliance with 12 volts from a 24-volt system.
Voltage 101
Voltage 101: Understanding the System If you’re new to the world of electricity, the term “voltage” may sound confusing, but it’s an essential part of any electrical system. Voltage is a measure of the electrical potential difference between two points in a circuit – in simpler terms, it’s a measure of the energy that’s available to move charged particles through the circuit. Voltage is measured in volts, and the higher the voltage, the more energy is available to move those charged particles.
Think of it like a water hose – the pressure of the water coming out of the hose is the voltage, while the flow of water is the current. In order for water to flow through the hose, there needs to be pressure behind it, just like in an electrical circuit, there needs to be voltage to push the current through. Voltage is a vital component of any electrical system, whether it’s a small circuit powering a light bulb or a huge power grid supplying electricity to millions of people.
Understanding how voltage works and how to measure it is key to working safely with electricity. So, whether you’re an electrical engineer or a curious layperson, learning the basics of voltage is an important first step on your journey.
Difference between 12V and 24V systems
The difference between 12V and 24V systems lies in the voltage of the electrical system. Basically, the difference boils down to how much power the system can handle. A 12V system means that the electrical system operates at a voltage of 12 volts, while a 24V system operates at twice the voltage.
The main advantage of a 24V system is that it can handle more power and has better efficiency, making it ideal for heavy-duty applications such as large trucks, buses, and industrial machinery. On the other hand, a 12V system is more common in smaller vehicles and boats as it requires less power and is easier to install and maintain. When choosing between a 12V and 24V system, it’s important to consider the power requirements of the equipment being used and the operating environment to ensure efficient performance.
So, if you need more power and efficiency, go for the 24V system, but for smaller applications, a 12V system will suffice.
Step-by-step Guide
Have you ever had a piece of equipment that requires a 12-volt power source, but all you have is a 24-volt system? Don’t worry; getting 12 volts from a 24-volt system is easier than you might think. The most straightforward approach is to use a voltage divider, which consists of two resistors in series. By selecting appropriate values for the resistors, you can get the desired output voltage.
However, keep in mind that this will decrease the available power, so it’s crucial to select appropriate resistors that can handle the current you need. Alternatively, you can use a DC-to-DC converter, which is a more efficient solution that can provide a stable 12-volt output while preserving the available power. Whether you choose to use a voltage divider or a DC-to-DC converter, make sure you have the necessary tools and knowledge to work safely with electricity.
With these simple steps, you’ll have your 12-volt power source up and running in no time.
Step 1: Get a voltage reducer
If you’re looking to install a new electronic device in your vehicle, the first step is often getting a voltage reducer. This device is designed to regulate the amount of voltage that reaches your new device, which can be especially important for sensitive electronics like car stereos, alarms, or dash cameras. Without a voltage reducer, your new electronics may draw too much power from your car battery, causing other systems to malfunction or even damaging the new device.
So, the first step in your installation process should be researching and selecting a voltage reducer that matches your vehicle’s power needs and the power requirements of your new device. This will ensure a smooth installation process and help prolong the life of your new electronics.
Step 2: Connect the reducer to the 24V system
Connecting the reducer to the 24V system is a crucial step in ensuring that your electric vehicle operates efficiently. To begin, you will need to identify the correct voltage level required for the reducer to function effectively. In most cases, this will be 24V.
Once you have confirmed the voltage level, it is essential to select a suitable connector that matches the voltage and amperage requirements of your reducer. It’s also crucial to ensure that the reducer is grounded correctly to avoid any electrical shocks or malfunctions. Remember to follow all the manufacturer’s instructions and safety guidelines when connecting the reducer to your 24V system.
With these simple steps, you can ensure that your electric vehicle’s reducer system operates at optimal efficiency and performance, providing you with the best driving experience possible.
Step 3: Attach the 12V device to the reducer
To attach the 12V device to the reducer, you’ll need some basic tools and a step-by-step guide to follow. Firstly, check the voltage of the device and make sure it’s compatible with the reducer’s output. Once you determine they’re compatible, connect the positive and negative wires of the device to the corresponding output terminals of the reducer.
Tighten the wires with screws or connectors. Make sure the connections are secure and tightened properly to avoid any loose wiring, which could cause a short circuit. Once the connections are made and tightened, turn on the device’s power and test it to ensure everything works correctly.
Remember to take necessary safety precautions as you handle electrical wiring and use tools such as wire strippers and a screwdriver. By following these simple steps, you can attach your 12V device to the reducer safely and efficiently.
Choosing the Right Voltage Reducer
If you’re trying to figure out how to get 12 volts from a 24 volt system, you’re going to need a voltage reducer. But with so many options available, how do you know which one to choose? First off, you’ll need to determine your power requirements – how much current do your devices need? Next, consider the size and placement of your voltage reducer. Will it fit in your desired location and can it handle the load without overheating? Other factors to consider include the operating temperature range and the overall efficiency of the voltage reducer.
It’s always a good idea to consult with a professional or do thorough research before making a decision, to ensure that you get the right voltage reducer for your specific needs.
Types of reducers
When it comes to choosing the right voltage reducer, there are a few different types to consider. The most common types are linear regulators, switching regulators, and buck-boost regulators. Linear regulators are the simplest type, but they aren’t very efficient and can generate a lot of heat.
Switching regulators are more efficient and can handle higher currents, but they can also introduce noise into the system. Buck-boost regulators are a bit more complex, but they can maintain a consistent voltage output even when the input voltage varies. Ultimately, the type of voltage reducer you choose will depend on your specific needs and the requirements of your particular application.
It’s important to take into account factors like the input voltage range, the required output voltage, and the maximum current that the regulator can handle. By carefully considering these factors and selecting the right regulator for your needs, you can ensure that your system runs smoothly and efficiently.
Factors to consider
Choosing the right voltage reducer can be a daunting task, especially with the myriad of options available in the market. One of the factors to consider is the voltage output you need for your specific application. It’s important to choose a voltage reducer that can handle the load of your electrical system while providing a steady and reliable voltage output.
Another factor to consider is the type of voltage reducer- buck or boost. A buck voltage reducer reduces the voltage while a boost voltage reducer increases it, so you need to choose the type that best suits your needs. Additionally, it’s important to consider the voltage reducer’s efficiency and whether it’s compatible with your electrical system’s wiring and layout.
Overall, selecting the right voltage reducer ensures that your electrical system runs smoothly and efficiently, and provides the necessary power for your devices, making sure that you get the most out of your investment.
Conclusion
In conclusion, getting 12 volts from a 24 volt system may seem like a daunting task, but with a little bit of electrical know-how, it’s as simple as cutting a cake in half (with a well-insulated knife, of course). Whether you use a voltage divider, a step-down converter, or a cleverly placed resistor, there are plenty of options to halve your voltage and power your 12 volt devices. So go forth, my electrical apprentice, and conquer the voltage divide with all the gusto of a hungry cake-lover.
Your 12 volt devices will thank you for it!”
FAQs
What is a step-down converter and how does it work to get 12 volts from a 24 volt system?
A step-down converter is a component that can convert a higher voltage to a lower voltage. It essentially regulates the current flow and uses an inductor to store energy and gradually release it in a way that lowers the voltage. The output voltage is typically set using a voltage divider or feedback loop. To get 12 volts from a 24 volt system, you would need a step-down converter with a voltage output of 12 volts.
Can I use a voltage divider to get 12 volts from a 24 volt system?
Yes, you could use a voltage divider to get 12 volts from a 24 volt system. A voltage divider is a simple circuit that uses two resistors in series to divide the voltage. By choosing the right ratio of resistor values, you can achieve a voltage output that is half the input voltage (e.g. 12 volts for a 24 volt input). However, voltage dividers are less efficient than other methods and may not be suitable for high current applications.
What is a buck-boost converter and how does it work to get 12 volts from a 24 volt system?
A buck-boost converter is a type of switching converter that can step up or step down the voltage. It essentially uses a combination of inductors, capacitors, and transistors to convert the input voltage to a regulated DC output voltage. To get 12 volts from a 24 volt system, you would need a buck-boost converter that is capable of stepping the voltage down by a factor of two.
How can I get 12 volts from a 24 volt system without using a converter?
It may be possible to use a voltage regulator or zener diode to drop the voltage from 24 volts to 12 volts. However, these methods may not be suitable for high current applications and could be less efficient than using a converter. Another option would be to use a transformer or voltage doubler circuit to achieve the desired voltage output. These methods would require more complex circuitry and may not be practical for all situations.