Say Goodbye to Noisy Rides: Learn How to Easily Fix Exhaust Leak at Flange
Do you hear a hissing or popping sound when accelerating your vehicle? Have you noticed that your car’s performance has decreased or that you can smell exhaust fumes? These could be signs of an exhaust leak at the flange. The flange is the connection point where two exhaust pipes meet, and it’s common for leaks to occur in this area due to wear and tear or incorrect installation. Don’t panic, though – fixing an exhaust leak at the flange is a relatively simple process that can be done at home with the right tools and some basic knowledge.
Follow these steps to get your car running smoothly and quietly again in no time.
Identify the Location of the Leak
If you’re experiencing a loud, hissing noise coming from under your car, you most likely have an exhaust leak. One of the first steps in fixing an exhaust leak at the flange is identifying the location of the leak. It’s not always easy to pinpoint, but there are some things you can do to help.
Start by listening for the noise and trying to locate the source. If you can’t find it by ear, try using a piece of tissue paper to detect the leak. Hold it near the flange while the engine is running, and if it starts to move, you’ve found the area of the leak.
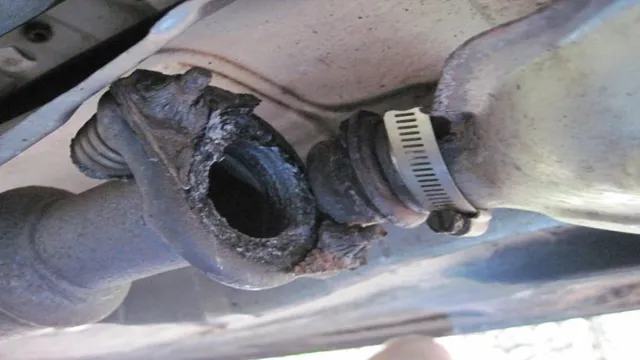
You can also visually inspect the flange and look for any cracks or damage. Once you’ve located the leak, you can move on to repairing it.
Listen for a hissing sound or feel for air escaping
When it comes to identifying the location of a leak, listening and feeling are two of the most effective methods you can use. If you suspect a leak in your home, start by listening for a hissing sound. This could be coming from a damaged pipe or valve that is allowing air or gas to escape.
If you don’t hear any sound, try feeling around the area for escaping air. You can do this by running your hand over the pipes or areas where you think the leak might be. You’ll feel a cool breeze coming from the leak, which can help you pinpoint the exact location.
Once you’ve identified the location of the leak, you can take steps to repair it or call a professional if necessary. It’s important to note that not all leaks are easy to identify using these methods. For example, if the leak is in a hidden or hard-to-reach area, you may need to use other tools or techniques to locate it.
In such cases, it’s best to consult an expert who can help you find and fix the problem. Remember that leaks can cause extensive damage if left unattended, so it’s always better to be safe than sorry. Overall, listening and feeling are simple yet effective methods for identifying the location of a leak.
By paying close attention to your surroundings and using your senses, you can quickly identify the source of the problem and take steps to solve it. So the next time you suspect a leak in your home, start by listening and feeling – you might be surprised at what you can discover!
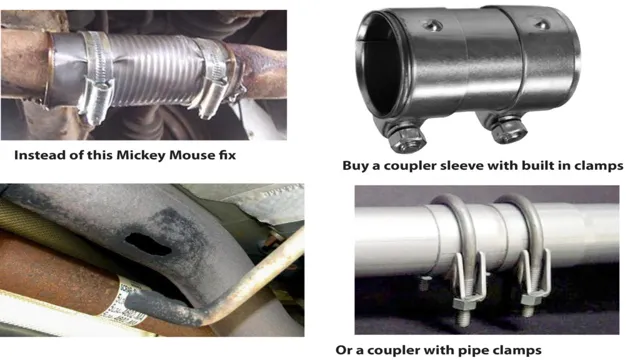
Gather Necessary Tools and Materials
If you’re dealing with an exhaust leak at the flange of your car, it’s crucial to gather the necessary tools and materials before attempting any repairs. The first step is to identify the location of the leak and inspect the flange to see if it’s cracked or damaged. Next, you’ll need to obtain a replacement gasket, some high-temperature sealant, a jack and stands, and a set of wrenches.
It’s important to make sure that the replacement gasket is the correct size and thickness for your specific make and model of vehicle. Once you have everything you need, begin by disconnecting the exhaust pipe from the flange, removing the old gasket and cleaning the surfaces with a wire brush. Apply a liberal amount of high-temperature sealant to the new gasket and position it correctly before tightening the bolts to secure the flange in place.
Taking the time to gather quality materials and tools will help ensure a successful repair that will last.
Exhaust sealant, clamps, exhaust tape, wrench, and socket set
When it comes to making repairs to your exhaust system, it’s important to gather all the necessary tools and materials ahead of time. These might include exhaust sealant, clamps, exhaust tape, a wrench, and socket set. By having everything you need on hand, you’ll be able to streamline the repair process and get your car back up and running as quickly as possible.
So take the time to create a comprehensive list of everything you need before you get started. That way, you won’t have to keep running back to the store or rummaging through your toolbox in search of the right tool. By being prepared, you’ll save yourself a lot of time and frustration in the long run.
So gather your materials and get ready to tackle your exhaust system repair with confidence!
Remove the Flange
If you’re dealing with an exhaust leak at the flange, the first step to fix it is to remove the flange itself. This may require you to loosen or remove any bolts or clamps holding it in place. Make sure to use the appropriate tools and be cautious not to damage any other parts of your exhaust system in the process.
Once you have the flange removed, you can inspect it for any damage or wear. If it appears to be in good condition, you can simply clean it off and reattach it to your exhaust system with new bolts or clamps. However, if there is any damage or corrosion present, it’s best to replace the flange entirely to ensure a more effective and long-term fix.
With the flange removed and any necessary repairs made, you can proceed to reattach it to your exhaust system and test for any remaining leaks. By taking this step-by-step approach, you can effectively tackle your exhaust flange leak and get back to enjoying a quieter and safer drive.
Unfasten bolts and pry off the flange with a pry bar
When it comes to removing the flange, the first step is to unfasten the bolts holding it in place. This can be done using a socket wrench or a set of pliers. Once the bolts are removed, the next step is to pry the flange off of its mounting surface using a pry bar.
It’s important to be gentle with this process, using just enough force to loosen the flange without damaging any surrounding components. It may take some wiggling and maneuvering to get the flange free, but with a bit of patience, it should come loose without too much trouble. It’s always best to have someone help you hold the pry bar in place while you use your other hand to pull the flange away from the surface it is attached to.
Once the flange is removed, it can be inspected for any signs of wear or damage before being replaced with a new one. By following these simple steps, you can safely and easily remove a flange and ensure that your machinery is running smoothly.
Clean the Flange and Exhaust Pipe
One of the reasons why you may have an exhaust leak is due to a damaged flange or exhaust pipe. So, before you attempt to fix the leak, it’s crucial to clean up the damaged area first properly. You’ll need a wire brush and a degreaser to do the job.
Begin by removing any traces of dirt or rust around the flange using the wire brush. Make sure you reach every nook and cranny around the damaged area. Then, apply the degreaser to the same location thoroughly and let it sit for a few minutes.
Afterward, wipe the excess degreaser off using a clean rag and repeat the process to remove any remaining traces of grease. The next step is to clean the exhaust pipe in the same way until it’s smooth and shiny. A properly cleaned and degreased surface allows for a better seal and reduces the risk of another leak.
Finally, ensure that the flange alignment is correct before tightening it to the required torque. With proper cleaning and preparation, you can save yourself from a lot of headaches and have a more secure and safer ride on the road.
Use a wire brush to remove rust and debris
If you’re replacing your exhaust system, it’s important to clean the flange and exhaust pipe before installing the new system. Dirt, debris, and rust can build up and make it difficult to properly seal the new components together. To begin, grab a wire brush and start scrubbing away any rust or debris from the flange and exhaust pipe.
Be sure to use some elbow grease and get into all the nooks and crannies. This will help ensure that the new system fits snugly and won’t leak once it’s installed. Remember, a little bit of prep work goes a long way when it comes to getting the most out of your new exhaust system.
So, take your time and clean everything thoroughly. Your new system will thank you for it in the long run!
Apply Exhaust Sealant
One effective way to fix an exhaust leak at the flange is by applying an exhaust sealant. This specialized sealant is designed to withstand high temperatures and is perfect for sealing small gaps and cracks in the exhaust systems. To apply exhaust sealant, locate the leaking area and remove any debris and rust to ensure a clean surface.
Next, apply the sealant carefully around the flange, making sure it covers the entire area. Allow the sealant to dry completely before starting the engine. Once dried, the sealant will provide a tight seal around the flange, preventing any exhaust from leaking out and causing damage to the environment and your car’s engine.
It’s important to note that while exhaust sealant is effective for small leaks, bigger exhaust problems should be addressed by a professional mechanic to ensure proper repair and safety. Remember, always wear protective gear and work with caution when dealing with the exhaust system.
Spread the sealant on both sides of the flange and the exhaust pipe
Exhaust Sealant Applying exhaust sealant is a vital step in ensuring your exhaust system remains leak-free. The sealant works by filling any gaps or openings, preventing exhaust gases from escaping and causing potential harm. To apply the sealant, make sure your exhaust pipe and flange are clean and dry before spreading the sealant on both sides of the flange and around the circumference of the pipe.
It’s essential to avoid using too much sealant, or it could interfere with the exhaust’s proper flow. Once you’ve applied the sealant, gently tighten the bolts until they’re snugly in place, taking care not to over-torque them. Remember that an airtight seal is crucial for your exhaust system’s longevity and function, so be sure to check for any leaks or issues that may need addressing regularly.
With the correct use of exhaust sealant, you can rest assured that your vehicle’s exhaust system remains in great shape and running smoothly. So, make sure you apply the sealant correctly and maintain your exhaust system’s integrity for a safe and reliable driving experience.
Reattach the Flange and Tighten Bolts
To fix an exhaust leak at the flange, reattaching the flange and tightening the bolts is key. After identifying the location of the leak, use a wrench to loosen and remove the bolts holding the flange to the exhaust pipe. Then, clean the surfaces of the flange and pipe thoroughly to ensure a good seal.
Apply a small amount of exhaust sealant to the mating surfaces of the flange before placing it back onto the exhaust pipe. Carefully align the bolt holes, and then replace and hand-tighten the bolts. Finally, use a wrench to torque the bolts to the specification listed in your vehicle’s manual.
By reattaching the flange and tightening the bolts securely and properly, you can seal the leak and get your vehicle running smoothly again. Remember to keep an eye out for any future signs of leaks and address them promptly to prevent further damage.
Install new gasket and secure the flange with bolts and clamps
If you’ve successfully removed the old gasket, it’s now time to install a new one and secure the flange with bolts and clamps. This step requires precision and a steady hand to ensure that everything lines up perfectly. Start by placing the new gasket in the correct location, making sure it sits flush against the flange.
Then, carefully reattach the flange and insert the bolts through the holes. Make sure the bolts are aligned and tighten each one gradually, alternating between them to achieve even pressure. Be careful not to over-tighten the bolts, as this could damage the gasket or warp the flange.
Once all the bolts are snug, finish tightening them with a torque wrench to the manufacturer’s recommended specifications. Finally, secure the flange with clamps, ensuring that they are tight enough to prevent any leaks. With these steps completed, your new gasket is ready to go, and your equipment should be back in top working condition.
Test for Leaks
If you’ve got an exhaust leak at the flange, don’t worry, it’s a common problem that can be fixed quite easily. First, you’ll need to identify the exact location of the leak. This can be done by running your hand along the exhaust pipe until you feel a blast of air.
Once you’ve found the leak, you’ll need to clean the area thoroughly to ensure a good seal. Use a wire brush or sandpaper to remove any rust or debris in the area. Next, apply a generous amount of exhaust sealant to the flange area.
Be sure to spread it evenly to ensure a tight seal. If necessary, you can use a gasket to help create a better seal. Finally, tighten the bolts on the flange to the manufacturer’s recommended torque specification.
With these steps, you’ll be able to fix your exhaust leak at the flange in no time.
Start the engine and check for any hissing sounds or air escaping
When starting your engine, it’s important to check for any air escaping or hissing sounds to test for leaks. A leak in your car’s system can lead to a variety of problems, from reduced performance to damage to other parts of the vehicle. That’s why taking the time to test for leaks is an essential part of vehicle maintenance.
So, before starting your engine, take a few minutes to do a visual inspection and listen for any unusual sounds. It’s also a good idea to check the fluid levels and make sure there are no obvious signs of damage or wear and tear. Once you’ve done this, start the engine and listen for any hissing sounds or air escaping.
If you hear anything unusual, it’s a sign that there may be a leak in the system. This could be from a cracked hose, loose fitting, or damaged seal. If you do notice a leak, it’s important to get it fixed as soon as possible to prevent any further damage to your car.
By taking the time to test for leaks, you can ensure your vehicle is running at its best and avoid any potential problems down the road.
Conclusion
Fixing an exhaust leak at the flange may seem daunting, but with a few simple steps, you can show that leak who’s boss. First, ensure that your flange is properly aligned and tightened. Use some sealant to seal any remaining gaps and prevent future leaks.
Don’t forget to double-check your work and test your newly fixed exhaust system. With these tips, you’ll be cruising down the road with a silent and smooth ride – sorry noisy, leaky exhaust, it’s time for you to hit the road.”
Exhaust leaks can cause harmful fumes and decrease engine performance. Fixing them at the flange is a simple DIY solution.
Exhaust leaks are a common issue that can cause harmful fumes and decrease engine performance. Thankfully, fixing them at the flange is a simple DIY solution that can save you money and protect you and your passengers. But how do you test for leaks? First, start your engine and let it warm up for a few minutes.
Then, hold a rag over the exhaust pipe and listen for any hissing sounds. If you hear a hiss, it means there’s a leak. Another method is to spray a water and dish soap mixture over the flange while the engine is running.
If there’s a leak, you’ll see bubbles forming where the flange and exhaust pipe meet. Once you’ve identified the leak, you can begin the process of fixing it at the flange. Remember, it’s important not to ignore exhaust leaks as they can be dangerous for you and everyone in the car.
By regularly testing for leaks and fixing them promptly, you can ensure your car is running smoothly, safely, and efficiently.
FAQs
What are the common causes of exhaust leaks at the flange?
Common causes of exhaust leaks at the flange include a worn-out gasket, a loose flange, rust or corrosion of the flange, or improper installation.
How can I identify if there is an exhaust leak at the flange?
The signs of an exhaust leak at the flange include a hissing or popping sound coming from your engine, reduced engine performance, the smell of gas or burning rubber, and visible damage or rust around the flange.
Can I fix an exhaust leak at the flange by tightening the bolt?
Tightening the bolt may work for a temporary fix, but it’s not a permanent solution. The leak could reoccur, or it could cause further damage to your exhaust system. It’s best to replace the gasket or have a professional mechanic check the flange and repair it if necessary.
Can I drive with an exhaust leak at the flange?
It’s not recommended to drive with an exhaust leak at the flange. It can affect the performance of your engine, and it’s also a safety hazard as toxic gases can leak into the passenger compartment. It’s best to have the leak repaired as soon as possible.

