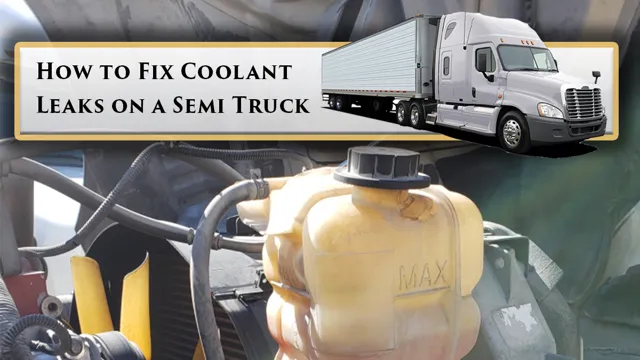
Cracked Coolant Reservoir? Here’s Your Ultimate Fix-it Guide!
If you’ve noticed that your vehicle’s coolant levels are dropping more quickly than usual or there’s a puddle of coolant forming underneath your car, it’s possible that your coolant reservoir is cracked. This issue may seem minor, but it’s important to address it as soon as possible to prevent further damage to your car’s engine. In this blog, we’ll discuss everything you need to know about fixing a cracked coolant reservoir so that you can get back on the road safely.
From identifying the cause of the crack to patching it up or replacing the reservoir altogether, we’ll guide you through the process step-by-step. So sit back, grab a cup of coffee, and let’s get started!
Identify and Assess the Damage
If you have a cracked coolant reservoir on your vehicle, the first step is to identify and assess the damage. This is an important part of the process as it will determine the extent of the repair work needed. You will need to inspect the reservoir carefully to determine where the crack is and how big it is.
It is also essential to check for any leaks to ensure that the coolant is not escaping. Once you have identified the damage, you can then determine the best course of action. If the crack is small and not leaking, you may be able to fix it by using a sealant.
However, if the crack is significant, you may need to replace the entire coolant reservoir. It is important to fix any issues promptly to prevent further damage to your vehicle’s engine, so don’t delay in addressing the problem.
Check for Leaks and Coolant Levels
When it comes to car maintenance, one of the most important things you can do is regularly check for leaks and coolant levels. This will help you identify potential issues before they become larger, more expensive problems. When checking for leaks, be sure to inspect all hoses, connections, and the radiator itself.
Look for any signs of corrosion or wear and tear, and if you notice any leaks, it’s important to address them quickly. Additionally, keeping an eye on your coolant levels is crucial. Make sure your coolant is always topped off to the appropriate level.
Low coolant levels can lead to overheating and engine damage, so it’s important to stay on top of it. By regularly checking for leaks and monitoring your coolant levels, you can help prevent major issues and keep your car running smoothly.
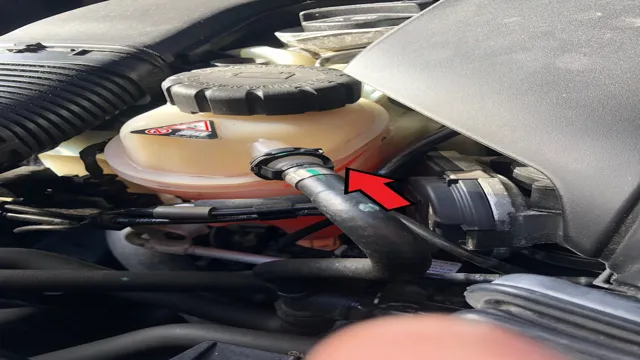
Inspect the Reservoir for Cracks and Breaks
When inspecting your reservoir, the first thing to look out for is any cracks or breaks. This is important to do regularly, as even small damage can lead to more significant problems down the line. Identifying and assessing the extent of the damage can help you determine if a repair or replacement is necessary.
If you notice any cracks or breaks, it’s essential to act quickly to prevent any leaks or contamination. Think of your reservoir like a bottle of water: if it has a crack, the water will slowly leak out, and if left unattended, it could eventually spill out completely. Regularly checking your reservoir for damage will ensure that you catch any problems early, saving you time, money, and water.
So, don’t forget to keep an eye out for any cracks or breaks during your inspections, and take action immediately if you do spot any damage.
Assess the Severity of the Damage
When dealing with damage, it is important to identify and assess the severity of the problem before taking any further steps. This can be done by taking a look at the affected area and identifying any visible signs of damage, such as cracks or holes. It is also important to consider the type of damage, whether it be structural, cosmetic, or both, as well as the extent of the damage.
This information will help determine the appropriate course of action needed to effectively repair the damage. For example, If you notice a crack in your home’s foundation, it is important to assess the severity of the crack by measuring its width and depth. This will help you to determine whether the crack is superficial or if it is a result of a more serious underlying issue.
It is also important to consider if the crack is causing any structural damage to the house or if it is purely cosmetic. By assessing these factors, you can determine the best approach to repairing the damage. Overall, it is important to take the time to properly identify and assess any damage.
This will help ensure that the appropriate steps are taken to repair the damage and prevent any future issues from arising.
Preparation and Safety Measures
If you’ve noticed that your coolant levels have been dropping and found a crack in your coolant reservoir, it’s important to fix the issue as soon as possible. Before getting started, make sure your engine is cold and turned off to prevent any burns or injuries. You’ll need to drain the remaining coolant from the system and remove the old reservoir.
Check for any signs of damage or leaks in the surrounding areas as well. When installing the new reservoir, make sure it’s properly aligned and secured with the right bolts or screws. Ensure that your coolant levels are at the recommended amount before starting up the engine again.
It’s important to always take safety measures when working on your vehicle and wear the appropriate protective gear. By properly preparing and fixing a cracked coolant reservoir, you can prevent further damage to your engine and keep it running smoothly.
Drain the Coolant and Remove the Reservoir
Before starting any car maintenance task, safety should always be a top priority. Hence, prepare a few tools such as a drain pan, a pair of gloves, and safety glasses before proceeding with the coolant draining and reservoir removal. Begin by checking the engine’s condition and make sure it is cool before draining the coolant.
Locate the radiator drain plug, which is usually found at the bottom of the radiator and place the drain pan underneath it to catch the coolant. Once all the coolant is drained, disconnect the hoses connected to the reservoir and remove it from the engine bay. Remember to properly dispose of the used coolant by taking it to a recycling facility.
By following these safety measures and preparation steps, the process of draining the coolant and removing the reservoir can be done safely and efficiently.
Prepare the Surface for Repair
When preparing a surface for repair, it is important to follow proper safety measures to avoid potential hazards. First, make sure to wear appropriate protective gear such as gloves, safety goggles, and a respirator if working with hazardous materials. Next, remove any loose debris or contaminants from the surface using a scraper, wire brush, or sandpaper.
It’s crucial to ensure that the surface is clean and dry before proceeding with any repairs. It’s also essential to analyze the type of surface you want to repair and use the appropriate materials, for instance, using an epoxy resin on a concrete surface. Overall, taking proper safety measures and adequately preparing the surface for repair will lead to a successful and long-lasting repair.
Take Safety Precautions
Preparation and Safety Measures When it comes to outdoor activities, taking safety precautions is crucial. Whether you’re hiking, camping, or rock climbing, accidents can happen without warning. By taking proper preparation and safety measures, you can minimize the risk of injury or getting lost.
Some crucial preparations include researching the trail or area you’re visiting, packing essential items like first aid and navigation tools, and checking the weather conditions beforehand. Additionally, wearing appropriate clothing and footwear, staying hydrated, and avoiding risky behavior are all crucial steps in ensuring your safety outdoors. Remember, even if you’ve hiked the same trail a dozen times, it’s essential to take the necessary precautions every time you venture out.
By being prepared and taking the proper safety measures, you’ll be able to enjoy your outdoor activities with peace of mind.
Repair the Cracked Reservoir
If you find that your coolant reservoir has a crack in it, don’t worry – it can be fixed! The first step is to drain the coolant from the reservoir and remove it from the car. Check if the crack can be fixed by using a plastic welder or epoxy resin. If these options don’t work, you may need to replace the reservoir altogether, which can be found and purchased through an auto parts store or a mechanic.
It’s important to note that driving with a cracked reservoir can lead to major engine damage, so it’s best to get it fixed as soon as possible. By fixing or replacing the reservoir, you can save yourself from costly engine repairs down the line and ensure that your car is running smoothly.
Choose a Repair Method
When it comes to repairing a cracked reservoir, there are a few different methods to consider. The most common options include using epoxy or resin to patch the crack, welding the crack shut, or replacing the reservoir altogether. Each option has its pros and cons, depending on factors like the severity of the crack, the age and condition of the reservoir, and your budget.
If you’re dealing with a minor crack, epoxy or resin may be a quick and affordable option. Welding can be more expensive, but it may be the best choice for larger or more significant cracks. Ultimately, the decision will come down to a few different factors, and it’s important to weigh each option carefully before choosing a repair method.
Remember, repairing a cracked reservoir is always preferable to replacing it entirely, so take the time to explore your options and choose the best one for your needs.
Apply the Repair Material and Allow Time to Dry
When it comes to repairing a cracked reservoir, one must apply the repair material and allow it time to dry properly. This step is crucial in ensuring a successful and long-lasting fix. Before applying the repair material, it’s important to clean and prep the surface thoroughly.
Once that is done, the chosen repair material, such as a sealant or epoxy, can be applied to the crack. Make sure to follow the manufacturer’s instructions carefully in order to achieve the best results. After the repair material is applied, it’s important to wait the recommended amount of time for it to dry completely before testing the repair.
Rushing this step can result in a subpar fix that may not hold up over time. It may also be a good idea to do a test run with water or whatever substance the reservoir will be handling to ensure that the repair is waterproof and functioning properly. By taking the time to properly apply the repair material and allowing it to dry completely, a cracked reservoir can be fixed and function just like new.
Reinstall the Reservoir and Refill the Coolant
If you’ve discovered a crack in your coolant reservoir, don’t panic! This is a common problem that can be easily fixed with a replacement reservoir and some basic tools. To begin, allow your engine to cool down completely before attempting any repairs. Once cool, locate your coolant reservoir and carefully remove it from the engine bay.
Take note of any hoses or fittings that will need to be disconnected. It’s important to avoid spilling any coolant during this process to prevent environmental damage and potential engine damage. Once the damaged reservoir has been removed, carefully install the new replacement reservoir, reconnecting any hoses or fittings as necessary.
Finally, refill the coolant to the recommended level and check for any leaks or abnormalities. Following these steps will have your engine running smoothly and efficiently once again. So, don’t let a cracked coolant reservoir ruin your day – fix it quickly and easily!
Replace the Reservoir and Tighten Connections
Replacing the reservoir and tightening connections are crucial steps when dealing with coolant leaks. After disconnecting any hoses and electrical connections from the coolant reservoir, you can then inspect the reservoir for any signs of damage or wear. If it’s damaged, you’ll need to replace it with a new one.
You’ll also want to check all the connections for wear signs. It’s important to replace any damaged connections as they could potentially leak later. Once you’ve done this, it’s time to reinstall the reservoir and refill the coolant.
Make sure you follow the manufacturer’s instructions and use the recommended type of coolant. You can easily add the coolant by pouring it into the reservoir and then replacing the cap. If you’re unsure of what type of coolant to use or how much to add, it’s best to consult the vehicle owner’s manual.
By replacing the reservoir and tightening connections, you’ll ensure that your coolant system is operating correctly, minimizing the risk of leaks and engine damage.
Refill the System with Coolant
When you’ve completed flushing the coolant system of your vehicle, it’s time to reinstall the reservoir and refill it with coolant. First, reattach the reservoir to its mounting bracket. Then, connect any hoses or electrical connectors that were removed during the flushing process.
Next, pour the appropriate amount of coolant into the reservoir. Be sure to refer to your vehicle’s owner’s manual or consult with a mechanic to determine the correct type and amount of coolant to use. Once the coolant has been added, start the engine and let it run for a few minutes to help distribute the coolant throughout the system.
Check the level of coolant in the reservoir and add more if necessary. It’s important to make sure that the coolant is at the proper level to help prevent overheating and engine damage. With these steps, you can successfully refill your vehicle’s coolant system and ensure that it runs smoothly.
Test for Leaks and Proper Functioning
If you’ve noticed that your car’s coolant levels are lower than usual, or you’re having to top up your coolant tank more frequently than before, it’s possible that you have a cracked coolant reservoir. A leak in your coolant system can lead to overheating and engine damage. Fortunately, fixing a cracked coolant reservoir isn’t as difficult as you might think.
The first step is to identify the source of the problem. Start by conducting a visual inspection of your coolant tank and the hoses leading to and from it. Check for cracks, leaks, or any signs of damage.
Next, you’ll need to drain the coolant system and remove the damaged reservoir. Replace it with a new one and refill the system with coolant. Finally, test the system for leaks and proper functioning by running your car and monitoring the coolant levels.
With a little bit of effort, you can fix your cracked coolant reservoir and ensure your car is running smoothly again.
Start the Engine and Check for Leaks
When it comes to testing your engine for leaks and proper functioning, it’s important to take a thorough approach. Before you even start the engine, visually inspect the area around it for any signs of leaking fluids. If you do see any, don’t start the engine until you’ve identified and fixed the issue.
Once you’ve confirmed that there are no visible leaks, it’s time to start the engine and proceed with your tests. While the engine is running, carefully check all of the hoses and connections for signs of leaking or damage. Pay attention to the sound of the engine as well – any unusual noises could indicate a problem that needs addressing.
Additionally, be sure to check that all of the engine’s systems are functioning properly, such as the alternator and air conditioning. By taking the time to test for leaks and proper functioning, you can ensure that your engine is running safely and smoothly.
Monitor the Coolant Level and Engine Temperature
As car owners, it’s important that we take the time to monitor the coolant level and engine temperature of our vehicles. Not only does this help prevent serious engine damage, but it can also improve overall performance and fuel efficiency. One of the key things to keep in mind when monitoring these levels is to test for leaks and ensure proper functioning of the coolant system.
This can include checking the radiator, hoses, water pump, and thermostat for any signs of damage or wear. It’s also a good idea to visually inspect the coolant level under the hood and make sure it’s at the recommended level. By doing these simple checks regularly, you can avoid costly repairs down the road and ensure that your car is running smoothly.
So the next time you get behind the wheel, take a moment to check your coolant levels and engine temperature to keep your car in top shape.
Regular Maintenance for Prevention of Future Damage
If you want to avoid a cracked coolant reservoir, regular maintenance is key. One way to take care of your coolant reservoir is by checking its level regularly and topping it off when needed. It’s also important to inspect the reservoir for any signs of cracks or leaks, as well as making sure all connections are secure.
If you do find a crack, it’s best to take care of it as soon as possible to avoid further damage to the reservoir and potentially your engine. Luckily, fixing a cracked coolant reservoir is a fairly simple task that can typically be done with an epoxy or plastic welding kit. Just make sure to follow the instructions carefully and allow ample time for the repair to set before refilling the coolant.
While it may be tempting to put off regular maintenance tasks, taking care of your coolant reservoir can prevent larger issues down the road and keep your vehicle running smoothly.
Monitor Coolant Levels and Replace as Needed
Maintaining proper coolant levels is essential to prevent engine damage and ensure your vehicle runs smoothly. Coolant, also known as antifreeze, plays a critical role in regulating the temperature of your engine. Overheating can cause significant damage to engine components, leading to costly repairs and potentially rendering your vehicle inoperable.
To avoid these issues, it’s essential to monitor your coolant levels regularly. Check the coolant level in your vehicle’s reservoir monthly, making sure it sits at the designated level. If the level appears low, add more coolant as needed.
Never attempt to open the reservoir or radiator cap while the engine is hot, as the pressure inside can cause severe burns. If you notice a significant decrease in coolant levels within a short period, it could indicate a leak in the system or a more serious problem. At this point, it’s best to contact a certified mechanic to diagnose the issue and make the necessary repairs.
Regular coolant replacement is also crucial. Over time, the coolant in your vehicle can break down, and its effectiveness decreases. A worn-out coolant system can lead to leaks and overheating, causing significant damage to your engine.
It’s recommended to flush and replace your coolant every 2-3 years or according to the manufacturer’s recommendation. Regular maintenance of your coolant system is essential to prevent potential damage, extend the life of your vehicle, and save money on costly repairs down the line.
Check Reservoir for Signs of Wear and Tear
Regular maintenance of your car’s reservoir is crucial in preventing future damage. It is important to check for any wear and tear signs in the reservoir regularly. The reservoir is responsible for storing various types of fluids, such as power steering fluid, brake fluid, and windshield wiper fluid, among others.
A damaged reservoir could lead to a hazardous situation, such as loss of control of the vehicle. Checking for signs of wear and tear in the reservoir involves inspecting the outside of the reservoir for any cracks, leaks, or damage and ensuring that the caps or covers are tight. It is essential to replace any damaged reservoirs promptly to prevent further damages.
By conducting regular checks and maintaining the reservoirs according to the manufacturer’s recommendations, this will ensure that your vehicle runs smoothly, avoiding costly repairs. Ultimately, it is essential to avoid procrastination when it comes to regular car maintenance to avoid problematic issues that come with neglecting regular car checkups.
Perform Regular Inspections by a Professional Mechanic
Regular Maintenance for Prevention of Future Damage: Perform Regular Inspections by a Professional Mechanic Regular maintenance of your vehicle is essential for its optimal performance and longevity. One of the best practices to prevent future damage to your vehicle is to perform regular inspections by a professional mechanic. An experienced mechanic can detect any potential issues with your vehicle during the inspection and fix them before they cause significant damage.
They use specialized tools and techniques to inspect every component of your vehicle, including the engine, transmission, brakes, suspension, and more. By performing regular inspections, you can identify and fix small problems before they turn into major repairs. This can save you a considerable amount of money in the long term.
Additionally, regular inspections ensure that your vehicle runs smoothly, reducing the chances of sudden breakdowns while driving. It is recommended to schedule inspections every six to twelve months, depending on your vehicle’s make and model, driving habits, and the type of roads you usually drive on. By following a regular maintenance schedule, you can prolong the life of your vehicle and maintain its resale value.
In conclusion, regular maintenance is essential for preventing future damage to your vehicle. By performing regular inspections by a professional mechanic, you can detect potential issues and fix them before they cause significant damage. So, make sure to schedule regular inspections of your vehicle to keep it running smoothly and prolong its lifespan.
Conclusion
So, there you have it – a quick guide on how to fix a cracked coolant reservoir! Just remember to gather your materials, clean the area, apply the adhesive according to instructions, and wait for it to dry. And if all else fails, just pour some duct tape over it and call it a day. Hey, at least your car will still be running, right? Just don’t forget to top off your coolant levels.
Happy fixin’!”
FAQs
What causes a coolant reservoir to crack?
A coolant reservoir can crack due to several reasons such as exposure to extreme temperatures, chemical damage, or physical impact.
Can a cracked coolant reservoir be repaired?
It is possible to repair a cracked coolant reservoir. However, depending on the severity of the crack and the material of the reservoir, it may be more cost-effective to replace it instead.
What are the consequences of driving with a cracked coolant reservoir?
Driving with a cracked coolant reservoir can lead to coolant leaks, which can cause the engine to overheat and potentially cause damage. It is recommended to fix the issue as soon as possible to avoid further damage.
How can a cracked coolant reservoir be fixed at home?
One option is to use an epoxy or plastic weld to repair the crack. However, it is important to ensure that the repair is done properly to prevent any further leaks. It is recommended to consult with a professional for a more permanent solution.