Click No More: Quick and Effective Solutions to Fix Your Clicking Relay Issues
Are you tired of the constant clicking sound coming from your relay? It can be very annoying and distracting, not to mention it might be a sign of trouble. But don’t worry! Fixing a clicking relay is not as complicated as it may seem. In fact, you can do it yourself with just a few simple steps.
In this blog post, we’ll provide you with 10 easy-to-follow steps that will help you fix that clicking relay once and for all. No need for any fancy tools or expensive equipment – all you need is a little bit of time and patience. We’ll guide you through each step, and we’ll explain everything in detail so that even if you have no prior knowledge of relays, you’ll be able to do it.
Think of it as a puzzle – every step is a piece, and once you put them all together, your relay will stop clicking and start working properly again. We’ll also discuss some common causes of relay clicking, so you’ll have a better understanding of what might have caused the problem in the first place. So, if you’re ready to get your hands a bit dirty and fix that annoying clicking relay, let’s get started! These simple yet effective steps will have you back to listening to a peaceful and silent environment in no time.
Step 1: Identify Relay Location
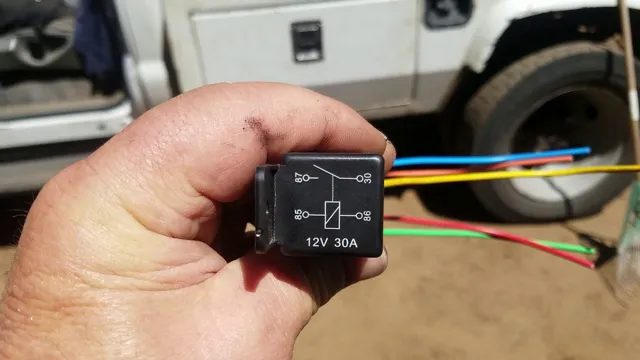
If you’re experiencing a clicking relay on your vehicle, the first step to fixing it is identifying the relay’s location. Relays are usually located in a fuse box or relay box and can be identified by their distinct shape and labeling. Check your vehicle’s owner manual or use the internet to find the exact location of the relay you need to troubleshoot.
Once you’ve identified it, visually inspect it for any signs of damage or wear and tear. If the relay looks fine, you can use a multimeter to check the voltage and continuity levels to see if it’s working correctly. However, if the relay is damaged, it will need to be replaced.
Knowing where your relay is located and inspecting it regularly can help prevent any potential issues and prolong the life of your vehicle.
Use manual or diagram
When it comes to identifying the relay location in your car, there are a couple of different methods you can use. First, you can try checking your car’s manual to see if it provides any information on the location of the relay you need to access. Many manuals will include diagrams or instructions for finding specific parts of your car, making it easy to pinpoint the location of your relays.
Alternatively, you can use a diagram to help you locate your relay. There are a number of resources available online that provide detailed diagrams of different car models, including the location of relays. These diagrams can be especially helpful if you don’t have access to a physical manual, or if the manual doesn’t include the information you need.
Regardless of which method you choose, it’s important to take your time and be patient when identifying the relay location in your car. Relays can be located in a variety of different places, depending on the make and model of your vehicle, so you may need to do some digging to find the right spot. Once you’ve located your relay, you can move on to the next step in the process of troubleshooting or replacing the relay to get your car back on the road.
Overall, with a little persistence and the right resources, identifying the relay location in your car should be a manageable task.

Step 2: Inspect Relay
If you hear a clicking sound coming from your relay, the first thing to do is to inspect it. Turn off the power source and locate the relay. Check for any visible damage such as burns, cracks, or corrosion.
If you notice any of these signs, it’s likely that the relay needs to be replaced. If you don’t see any visible damage, you can use a multimeter to check if the relay is working properly. Set the multimeter to the resistance mode and use the probes to check for continuity.
If there’s no continuity, this means the relay is faulty and needs to be replaced. By inspecting your relay, you can determine if it needs to be replaced or if it’s just a minor issue that can be fixed.
Check for damage or loose connections
After detecting that a relay is malfunctioning, the next step is to inspect it for damage or any loose connections. You might want to start by unplugging the relay and checking the pins to see if all of them are intact. Look for signs of rust, corrosion, or physical damage, which could cause the contacts to fail.
Inspect the wires connected to the relay to make sure there are no frays or breaks. Loose connections can also be a culprit for problems, so make sure that the wires are securely connected to the relay. If you find any issues, it is best to replace the relay or repair the damaged wires to avoid any further problems.
Taking the time to check for damage or loose connections could save you a lot of time and money in the long run, ensuring that your equipment is working correctly without any hitches.
Step 3: Unpower Vehicle
If you’re trying to fix a clicking relay in your vehicle, the first step is to ensure the ignition is off and the keys are out of the ignition. Next, locate the relay, which can usually be found in the power distribution box under the hood. Then, disconnect the negative cable from the battery to avoid any electrical hazards.
This step is crucial in preventing accidents, so don’t skip it. Once the vehicle is unpowered, you can proceed to inspect the relay and identify the root cause of the clicking sound. Remember to always exercise caution when dealing with electrical components to avoid any potential danger.
By following these simple steps, you’ll be one step closer to fixing a clicking relay and ensuring your vehicle runs smoothly.
Disconnect battery or power source
Before conducting any maintenance or repairs on your vehicle, it’s crucial to disconnect the battery or power source to ensure your safety. This step is essential, as it eliminates any electric current running through the car’s systems. Failure to do so can result in electrical shock or injury.
It’s equally important to disconnect the power source even when dealing with minor repairs such as replacing a fuse or light bulb. The process is straightforward, and the owner’s manual provides specific instructions to follow. Once the battery or power source is disconnected, it’s safe to start performing the necessary repairs or maintenance.
Remember, safety should always come first, and disconnecting the power source is an integral part of ensuring that you stay safe.
Step 4: Remove Relay
Now that you have located the clicking relay, it’s time to remove it. This is a delicate process, and you need to exercise caution to avoid damaging other components in your vehicle. Before doing anything else, make sure to cut the power supply to the relay and any connected devices.
Then, use a pair of pliers or a socket wrench to loosen the bolts or screws holding the relay in place. Once you have removed the relay, inspect it for any visible signs of damage or wear. If you find any issues, you will need to replace the relay with a new one.
If the relay appears to be in good condition, you can try cleaning it with contact cleaner before reinstalling it. Remember to tighten the bolts or screws firmly, but not too tight, as overtightening can cause damage. With the relay removed and properly installed again, you are one step closer to fixing the clicking issue in your vehicle.
Follow manufacturer instructions
When it comes to removing a relay, it’s essential to follow the manufacturer’s instructions to avoid damaging your vehicle’s electrical system. Start by consulting your vehicle owner’s manual to identify the location of the relay you need to remove. Once you’ve located the relay, carefully disconnect any wiring harnesses or connectors that are attached to it.
Depending on the type of relay you’re working with, you may need to use a specialized tool to release any securing clips or tabs that are holding it in place. Be sure to handle the relay gently to avoid bending or breaking any of its delicate contact pins. With the relay removed, you’re now ready to inspect it for any signs of damage or wear.
If you’re replacing the relay, make sure to choose a suitable replacement that matches the specifications of your vehicle’s electrical system. By taking a methodical and careful approach to removing your vehicle’s relays, you can avoid costly repairs and ensure that your vehicle’s electrical system continues to function properly.
Step 5: Clean Relay Contacts
So, you’ve heard a clicking sound coming from your relay and want to know what to do about it. The fifth step in fixing a clicking relay is to clean the contacts. Over time, the contacts can become dirty or corroded, causing intermittent or complete failure of the relay.
To clean the contacts, you will need to disconnect the relay from the power source and remove the cover. Use a clean, dry cloth or a small brush to gently remove any debris or oxidation from the contact surfaces. If there is significant corrosion, you may need to use a specialized contact cleaner.
Once the contacts are clean, reattach the cover and reconnect the relay to the power source. Testing the relay’s function is the final step to ensure everything is working properly. Remember to always use caution when working with electronic equipment and consult a professional if you are uncertain about any steps in the process.
With a little care and attention, this simple fix could save you the cost of a replacement part.
Use contact cleaner and cloth
Relay Contacts In order to keep your electronic devices running smoothly, it’s important to clean the relay contacts regularly. Over time, dust and debris can build up on the contacts, which can cause electrical resistance and even lead to malfunctioning of the device. The best way to deep clean relay contacts is to use a contact cleaner and a soft cloth.
First, disconnect the device from its power source to avoid any electrical shock. Then, using the contact cleaner, spray a small amount onto the contacts and let it sit for a minute or two to dissolve any grime. After that, use the soft cloth to gently remove the cleaner and any remaining debris.
It’s important to be gentle and not use any abrasive materials as this can damage the contacts. Once the contacts are cleaned, reassemble the device and reconnect it to its power source. Regularly cleaning the relay contacts will not only extend the life of your device but also ensure that it is running at its optimal performance.
Step 6: Inspect Wiring Harness
Now that you’ve checked the relay and confirmed that it’s the source of the clicking sound, it’s time to move on to inspecting the wiring harness. A damaged or frayed wiring harness can cause issues with the relay and prevent it from functioning properly. Start by visually examining the wiring harness for any signs of wear or damage.
Look for any frayed wires, corrosion, or loose connections and tighten or replace as necessary. It’s also a good idea to check the wiring diagram for your specific vehicle to ensure that the wiring connections are correct. If you’re unsure about how to inspect the wiring harness, you can consult with a mechanic or refer to your vehicle’s manual for guidance.
By addressing any issues with the wiring, you’ll be able to improve the overall performance of your vehicle and prevent any larger issues from arising in the future.
Check for damage or wear
When inspecting the wiring harness, it is important to check for any damage or wear. This includes checking for any cracks or frayed wires that may have resulted in exposed metal which could interfere with the proper functioning of the system. It’s also important to check for signs of wear and tear such as brittleness, which may be caused by prolonged exposure to heat or environmental factors.
One way to inspect the wiring harness is to gently tug on the wires, checking for any looseness or damage to the insulation. Another way is to visually inspect the harness for any visible signs of damage. It’s important to take the time to inspect the wiring harness thoroughly to avoid any potential electrical hazards that could cause damage to the system, or worse, harm to individuals.
Taking these precautions will ensure that the wiring harness is in good condition and functioning properly, safeguarding the overall performance of the system.
Step 7: Replace Relay
One of the common reasons why your relay keeps making clicking sounds is because it might be faulty or worn out after prolonged use. Depending on the make and model of your relay, it might be easier or harder to replace it. However, in most cases, the process involves detaching the old relay from its mount and disconnecting the wires, then connecting the new relay and putting everything back in place.
To ensure maximum safety, ensure your vehicle is switched off before attempting any repairs and use appropriate safety gear. If you are not confident enough to replace the relay yourself, or you do not possess the necessary skills and knowledge, seek the help of a professional mechanic to get your vehicle running smoothly again. By replacing the relay, you fix the clicking sound, and simultaneously, you’ll prevent other problems that may arise from a worn-out part.
Use compatible replacement
If you’ve determined that a faulty relay is the problem with your electrical system, it’s time to replace it. However, before you run out to buy any replacement, make sure that it is compatible with your system. Using a non-compatible relay could cause even more damage to your electrical system and possibly start a fire.
Make sure to check the manufacturer’s specifications for the replacement and match it exactly. It may take some time to find the right replacement, but it’s worth it in the end. A compatible replacement will ensure that your electrical system is working correctly and safely.
Don’t compromise on safety by trying to save a few bucks with an improper replacement. Remember to always prioritize safety.
Step 8: Reconnect Wiring Harness
Once you have located the clicking relay and replaced it, it’s time to reconnect the wiring harness. This may seem like a simple step, but it’s important to ensure that the wiring is properly connected to avoid any future problems. Make sure that you align the connectors correctly and firmly insert them into the ports until you hear a distinct “click” sound.
Once all the connectors have been correctly inserted, double-check that the wiring is secured in place and won’t come loose. This will give you peace of mind that the relay is functioning correctly, and there won’t be any electrical issues in the future. With this step completed, your relay should now be working properly, and the clicking sound should be gone for good.
Ensure proper connections
When it comes to reconnecting the wiring harness, it’s crucial to ensure proper connections. This step is essential because faulty connections can lead to a plethora of issues, such as electrical problems or even damage to the vehicle’s components. To ensure that you make the right connections, start by matching the harness plugs with their corresponding connectors.
Be sure to double-check the alignment of the plugs and connectors to avoid any misalignment, which could prevent them from locking correctly. Once you make the connection, give the harness a gentle tug to ensure that it’s securely in place. Remember, even a single loose connector can result in significant electrical issues.
So, it is always better to take your time and double-check everything when reconnecting the wiring harness properly.
Step 9: Repower Vehicle
Once you’ve replaced the clicking relay in your vehicle, it’s time to repower it and see if the problem has been resolved. To do this, simply reconnect the battery cables and turn the key in the ignition. If you hear the engine start and everything else seems to be functioning normally, you’re all set! However, if the clicking sound persists, or if the engine won’t start at all, you may need to take a closer look at the wiring or other components of your vehicle’s electrical system.
Always be sure to follow proper safety precautions when working with electrical systems, and don’t hesitate to seek the assistance of a qualified mechanic if you’re unsure about anything. And that’s how to fix a clicking relay and get your vehicle up and running again!
Reconnect battery or power source
After following all previous steps, it’s time to reconnect the battery or power source and repower the vehicle. This process is very important because it brings your vehicle back to life. Before you reconnect the battery, make sure that all connections are clean and tight.
Dirty or loose connections can lead to poor performance and even damage to the electrical system of your car. Once you have checked the connections, it’s time to reattach the battery cables or connectors. For safety reasons, it’s important to connect the positive cable first, then the negative.
This way, you can avoid any accidental sparks that might cause a fire or explosion. After reconnecting the battery or power source, start the engine and let it run for a few minutes. This step will allow the engine to recharge the battery and get it up to a full charge.
Once the engine is running smoothly, you can turn off the vehicle, and you’re done! Your vehicle is ready to hit the road again.
Step 10: Test System
Now that you’ve gone through all the previous steps, it’s time to test your system and see if your efforts in fixing the clicking relay were successful. The first thing you should do is to double-check all your connections, making sure that all wires are securely fastened and that nothing was missed during the repair process. Afterward, turn on the power and see if the relay still clicks.
If the clicking noise is gone, congratulations! You’ve successfully fixed the issue. However, if the clicking continues, you may need to revisit some of the earlier troubleshooting steps or seek the help of a professional electrician. Testing is crucial because it helps you ensure that your system is working as intended and prevents future problems.
Remember, an ounce of prevention is worth a pound of cure.
Ensure proper function
When it comes to ensuring proper function of your system, testing is a crucial step in the process. It’s important to check that all the components are working together effectively and that there are no technical issues or glitches. This can be done through manual testing, automated testing, or a combination of both.
Manual testing involves a person working through various scenarios and interactions to assess the system’s functionality. Automated testing uses software designed to repeat specific tests and highlight any errors or issues. Both approaches are valuable in their own right, but it’s essential to consider the specific needs of your system and your testing environment to determine the most effective approach.
By testing your system thoroughly, you can catch any issues early on and ensure that it’s running smoothly before it’s rolled out to users or customers. This can save you time, money, and reputation damage in the long run.
Conclusion
In conclusion, fixing a clicking relay is like solving a mystery. You must investigate the problem, gather the clues, and determine the culprit causing the clicking sound. Once you have identified the issue, whether it be a weak battery, faulty wiring, or a malfunctioning switch, you can take the necessary steps to rectify the problem.
With a bit of patience and persistence, you can silence that pesky clicking relay and enjoy a fully functioning electrical system once again. Sherlock would be proud.”
FAQs
What causes a clicking relay sound in a vehicle?
A clicking relay sound in a vehicle can be caused by a faulty relay, low battery voltage, loose or damaged wiring, or a damaged component connected to the relay.
How do I identify which relay is causing the clicking sound?
You can use a multimeter to check the continuity of each relay in the electrical system. If a relay has no continuity, it may be faulty and causing the clicking sound.
Can I fix a clicking relay myself?
Yes, you can fix a clicking relay yourself by replacing the faulty relay or repairing the damaged wiring/connection. However, if you are not familiar with electrical systems, it is best to seek professional help.
How much does it cost to fix a clicking relay in a car?
The cost of fixing a clicking relay in a car depends on the extent of the damage and the make and model of the vehicle. On average, the cost can range from $50 to $300 for parts and labor.