Mastering Multimeter Basics: A Step-By-Step Guide to Checking 5V Reference for Accurate Measurements
Checking the 5V reference voltage is crucial in any electronic device, as it serves as a steady and reliable voltage source for other components. However, measuring it accurately can be tricky without the right tools and knowledge. That’s where a multimeter comes into play, a helpful device that allows you to check the voltage level quickly and easily.
In this blog, we’ll explain step-by-step how to check the 5V reference with a multimeter, so you can troubleshoot any issues and ensure your electronic device is working correctly. Get ready to put your multimeter to good use!
Step 1: Set Multimeter to Voltage Mode
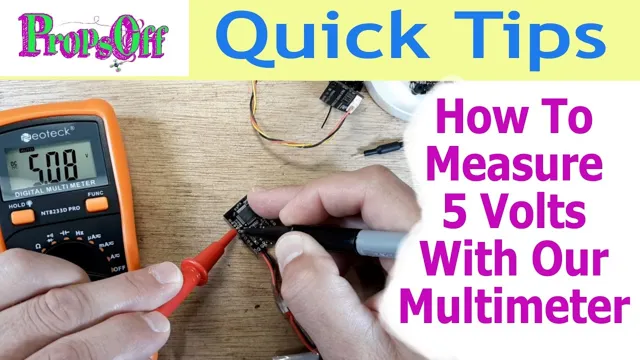
To check the 5v reference using a multimeter, the first step is to set the multimeter to voltage mode. This is a crucial step as it allows the multimeter to accurately measure the voltage. To start, turn on your multimeter and select the voltage mode.
Next, locate the positive and negative probes on the multimeter. The red probe is usually positive, and the black probe is negative. Place the probes on the 5v reference points you want to measure.
Make sure that the positive lead is touching the positive point, and the negative lead is touching the negative point. Once the probes are in place, read the measurement displayed on the multimeter screen. Ensure that the reading matches the 5v reference value.
If the reading is inaccurate, recheck the probe connections or contact an expert for further assistance. Checking the 5v reference using a multimeter is a simple task that will help you ensure the proper functioning of your device.
Explanation and Example
When measuring voltage with a multimeter, the first step is to set the multimeter to voltage mode. This will allow the tool to read voltage accurately and give you an idea of the voltage level in a particular circuit. To do this, you first need to locate the dial or button on your multimeter to switch to voltage mode.
Once you find it, turn it to the voltage setting. You should make sure that the range is set to the correct voltage level so that you get an accurate reading. For example, if you are measuring an AC voltage of 120V, make sure to set your multimeter to a range that supports readings up to that level.
Failure to do so may result in incorrect readings, and thus, inaccurate results. It is essential to double-check the settings before taking a voltage measurement to ensure accuracy. By setting the multimeter to the correct voltage mode and range, you’ll be able to get precise measurements, making it easier to diagnose and troubleshoot any problems in your circuits.
Step 2: Connect the Multimeter to 5V Reference Pin
When it comes to checking the 5V reference on your electronic device, using a multimeter is the way to go. To do so, you’ll need to first connect your multimeter to the 5V reference pin. Locate the pin on your device, and then connect the black probe of your multimeter to any ground pin.
Next, connect the red probe to the 5V reference pin. Before proceeding, ensure that your multimeter is set to the appropriate voltage range setting as designated by the manufacturer’s specifications or the manual. Once you’ve confirmed everything is set up correctly, turn on your device and take a reading on your multimeter.
A healthy 5V reference will typically range between 75 and 25 volts.
If you get a reading outside of this range, there may be issues with your 5V reference that you need to troubleshoot and fix. By following these simple steps, you can easily verify the 5V reference on your electronic device and ensure it’s functioning correctly.
Explanation and Example
Now that we have identified the 5V reference pin, the next step is to connect our multimeter to it. This will allow us to measure the voltage output of the pin accurately. Before we begin, we need to ensure that the multimeter is set to the correct voltage range.
We can do this by turning the multimeter dial to the DC voltage range and selecting a range that is higher than 5V. Once we have done this, we need to connect the red probe to the positive terminal of the multimeter and the black probe to the negative terminal. We can then touch the probes to the 5V reference pin, ensuring that the red probe is connected to the pin itself and the black probe is connected to the ground.
The multimeter should now display a reading of approximately 5V. If the reading is significantly different, we may need to check our connections or troubleshoot any issues with the circuit. This method can be useful when trying to diagnose problems with a circuit or when testing the accuracy of voltage regulators.
Step 3: Record the Voltage Reading
Once you have connected your multimeter to the 5V reference pin, it’s time to record the voltage reading. The voltage reading should be displayed on the screen of your multimeter. If the voltage reading is within the acceptable range, which is generally between
8V to 2V, then the 5V reference is working correctly. However, if the voltage reading is lower or higher than this range, it could be an indication that there is something wrong with the 5V reference circuit.
To verify this, you can run additional tests or check the circuit’s components for any damage or malfunctions. Remember to carefully observe the reading while recording it and ensure that you’ve followed all the previous steps correctly, including setting the multimeter to voltage and ensuring that the multimeter probes are properly connected to the right pins. Overall, understanding how to check the 5V reference with a multimeter is crucial, as it helps you to diagnose and troubleshoot any issues with your electronic circuits.
Explanation and Example
When it comes to taking voltage readings, recording accurately is crucial. After choosing the appropriate range and connecting the probes correctly, it’s time to record the voltage reading. Simply look at the digital or analog display and note the number down.
Make sure to include the unit of measurement, such as volts (V) or millivolts (mV), to ensure the accuracy of the recording. For example, if the voltage reading on a digital multimeter is 120 volts, you would record it as “120V.” It’s important to take note of even the slightest change in the reading as it can indicate issues with the circuit or device being tested.
For instance, if you notice that the voltage reading changes significantly when a device is turned on or off, it can imply a problem with the electrical current flow in the circuit. So, always follow the steps accurately and record the readings carefully to ensure accurate readings and proper troubleshooting.
Troubleshooting Tips
If you’re troubleshooting your vehicle and suspect an issue with the 5v reference, it’s important to know how to check it with a multimeter. First, locate the 5v reference circuit in your vehicle’s wiring diagram. Then, turn on your vehicle’s ignition and connect the black lead of your multimeter to a ground source.
Next, carefully probe the connector pins of the 5v reference circuit with the red lead of your multimeter. If the voltage reads at or near 5v, the circuit is functioning properly. However, if the voltage is below or above that range, there may be an issue with the circuit.
It’s important to note that a problem with the 5v reference can cause a range of issues with your vehicle’s performance, so it’s essential to address any problems quickly and accurately. By checking the 5v reference with a multimeter, you can diagnose the issue and get back on the road safely.
How to resolve common issues when checking 5V reference
When checking a 5V reference, it’s common to experience issues that can be frustrating to resolve. But don’t worry, there are some simple troubleshooting tips to help you get your 5V reference back on track. Firstly, check that the power source is providing the correct voltage.
Secondly, make sure that the connection for the voltage reference is clean and secure. Sometimes, a dirty or loose connection can cause the voltage to fluctuate. If these two steps don’t solve the issue, you might need to check the regulator or the resistors in the circuit.
A faulty regulator or resistor can cause the output voltage to be too low or high. Another tip is to use a multimeter to measure the voltage at different points in the circuit to pinpoint the issue. With these simple steps, you can troubleshoot and resolve most 5V reference issues efficiently.
Conclusion
In conclusion, checking the 5v reference with a multimeter is as simple as a flick of the wrist and a twist of the knob. With a keen eye for detail and a steady hand, you too can detect any fluctuations in the voltage and ensure your electrical system is running smoothly. So grab your trusty multimeter and let’s volt our way to a brighter tomorrow!”
Recap of the steps and key takeaways
Recap of the Steps and Key Takeaways: Troubleshooting Tips Troubleshooting your tech can be frustrating, but don’t worry, we’ve got you covered! First, check your connections. Often, simple issues arise from partially unplugged cords or cables. Next, try restarting your device.
This allows any background processes that may have caused the issue to reset. If that doesn’t work, check for updates or run a virus scan to ensure that the problem is not caused by outdated software or malware. Additionally, be sure to keep your device clean and free of clutter, as this can cause issues as well.
Finally, if all else fails, consult a professional. Don’t try to fix a problem beyond your knowledge, as this could cause further damage. Keep these tips in mind and you’ll be troubleshooting like a pro in no time!
FAQs
How do I set my multimeter to measure voltage?
To set your multimeter to measure voltage, turn on your multimeter and select the voltage measurement setting. Ensure that the range is set to a value higher than the expected voltage to avoid damaging the multimeter.
How do I identify the ground terminal on my device when measuring voltage with a multimeter?
Look for a metal terminal or wire that is connected to the metal frame or chassis of the device. Alternatively, consult the device’s user manual for guidance on the location of the ground terminal.
What is the reference voltage and how do I measure it with a multimeter?
The reference voltage is a stable voltage that is used as a baseline for other circuit measurements. To measure the reference voltage with a multimeter, connect the positive lead of the multimeter to the test point for the reference voltage and the negative lead of the multimeter to the ground terminal.
What do I do if my multimeter displays a reading that is different from the expected value?
Double-check that the multimeter is set to the correct measurement range and that the leads are connected correctly. If the issue persists, troubleshoot the circuit to identify the root cause of the discrepancy.