Unlocking Your Car’s Full Potential: A Comprehensive Guide on How to Upgrade from OBD1 to OBD2
Have you ever wanted to switch your car’s onboard diagnostics (OBD) system from OBD1 to OBD2? Maybe you’re trying to stay updated with the latest regulations or you want access to more advanced diagnostic features. Whatever your reason, switching from OBD1 to OBD2 can seem like a daunting task. But fear not! In this blog, we’ll dive into the world of OBD and the differences between OBD1 and OBD
We’ll also explore the steps you can take to successfully make the switch, including the tools you’ll need and potential challenges you may face. Get ready to learn all about changing OBD1 to OBD2 and take control of your car’s diagnostic system.
Introduction
If you’re interested in upgrading your car’s OBD system to the latest technology, you might find yourself wondering how to change OBD1 to OBD OBD, or On-Board Diagnostics, is a system built into modern cars that helps to detect and diagnose potential problems. OBD1 and OBD2 are two different versions of this system, with OBD1 being an older technology that is no longer used in modern cars.
To make the switch to OBD2, you’ll need to purchase an OBD2 scanner and install it in your car. This will allow you to read and interpret the data that your car’s OBD2 system generates, giving you more accurate information about your car’s health and performance. Overall, the process of changing from OBD1 to OBD2 can be a bit challenging, but with the right tools and knowledge, it’s definitely doable.
Understanding OBD1 and OBD2
OBD1, OBD2 Do you know the difference between OBD1 and OBD2? Onboard Diagnostic systems, or OBDs, are crucial components of modern cars that help diagnose and fix issues. OBD1 is an older system used in cars from 1981 to 1995, while OBD2 was introduced in 1996 and is still used in cars today. OBD1 has a more limited range of diagnostic capabilities, while OBD2 can provide much more detailed information about a car’s performance.
This is because OBD2 systems can monitor more systems in the car, including emissions and engine performance. Understanding the differences between these two systems is crucial when it comes to repairing or maintaining your car.

Getting Started
If you’re looking to switch from an OBD1 computer to an OBD2 system, there are a few key things to keep in mind. First, you’ll need to make sure you have the right tools and equipment for the job. This includes an OBD2 scanner, wiring diagrams, and a set of hand tools.
Additionally, you’ll need to take some time to research the specific OBD2 system you’ll be using, as different systems may have different requirements or compatibility issues. Once you’ve gathered all the necessary tools and information, it’s time to start the process of swapping out your old system for the new one. This typically involves removing the old computer, wiring in the new OBD2 system, and making any necessary adjustments to your engine or other components.
With some time and effort, however, you can successfully upgrade your vehicle to an OBD2 system and enjoy all of the benefits that come with it!
Gathering Tools and Parts
When it comes to starting a new DIY project, one of the most important steps is gathering all of the necessary tools and parts. It can be overwhelming at first, but with a little planning and organization, you’ll be ready to tackle any project. First, take the time to research exactly what you need for your project and make a list.
This will help you stay organized and avoid forgetting anything important. Next, assess what tools and parts you already have and which ones you need to purchase or borrow. When selecting tools, consider the quality and durability as well as the price.
You may want to invest in higher quality tools that will last longer and give you better results in the long run. Finally, don’t forget about safety equipment like gloves, goggles, and ear protection. With the right tools and parts, you can turn any DIY project into a success.
Prepping Your Vehicle
Prepping your vehicle is an important step to ensure that it is in good condition before you take it on any adventure. It is essential to inspect your vehicle thoroughly to identify any issues that may cause problems during your trip. One of the first things you want to do is to check the fluid levels, including the oil, coolant, brake, and transmission fluids.
Ensure they are at the appropriate levels. Secondly, check the wiper blades, brake pads and tires to ensure they are in good condition. Also, ensure that your spare tire and jack are in the trunk, so you can quickly change a flat tire if necessary.
By performing these checks, you can be sure your vehicle is ready to keep you and your passengers safe during your travels.
Making the Change
Changing your car from OBD1 to OBD2 can be a daunting task, but it’s definitely doable with the right tools and knowledge. The first step is to determine if your car is compatible with the OBD2 system. This can be done by checking your car’s manual or consulting with a mechanic.
If your car is compatible, you will need to acquire an OBD2 converter kit to update your car’s computer. This kit will allow your car to communicate with the new OBD2 system and provide real-time information about your car’s performance. Installing the converter kit requires some technical skill and may require assistance from a mechanic.
Once the kit is installed, you will need to have your car reprogrammed by a professional using an OBD2 scanner to ensure that your car is working properly. While the process may seem complicated, changing your car from OBD1 to OBD2 can provide numerous advantages, including improved fuel efficiency, more accurate diagnostic tools, and reduced emissions.
Removing the Old OBD System
If you’re looking to upgrade your vehicle’s OBD system, the first step is to remove the old one. This may sound daunting, but it’s actually a relatively straightforward process. Begin by disconnecting the battery to ensure that you don’t accidentally trigger any sensors while you work.
Next, locate the old OBD system and carefully remove it from the vehicle’s engine bay. Be sure to disconnect any wires or hoses that are connected to it before removing it entirely. Once you’ve removed the old system, it’s time to install the new one.
This process will vary depending on the make and model of your vehicle and the type of OBD system you’re installing. It’s important to follow the manufacturer’s instructions closely to ensure that everything is installed correctly and your new OBD system works as intended. With a little bit of time and effort, you can upgrade your vehicle’s OBD system and enjoy the benefits of improved diagnostics and performance.
Installing the OBD2 System
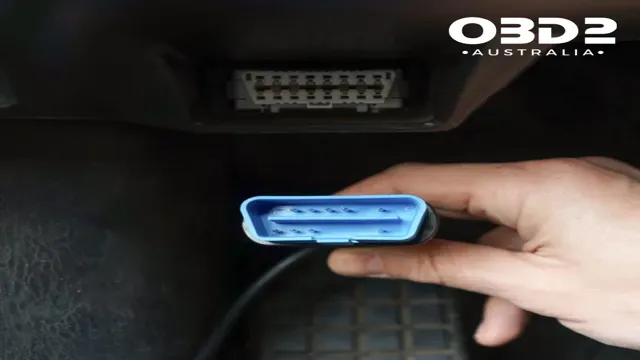
Installing an OBD2 system can seem daunting, but the process is relatively straightforward. Before beginning, it’s crucial to ensure that you have the right tools and equipment. The first step is to plug the OBD2 scanner into the diagnostic port, which is usually located under the dashboard on the driver’s side.
Once connected, the scanner will prompt you to turn on the vehicle’s ignition. After that, follow the scanner’s instructions to complete the installation process. It’s essential to make sure that the scanner is securely connected and that the wires and connectors are not loose.
Once installed, the scanner will provide you with real-time data about your car’s performance, including fuel consumption, engine speed, and emissions. With this information, you’ll be able to identify any existing or potential issues and take the necessary steps to address them. Overall, installing an OBD2 system is a simple yet effective way to maintain your car’s health and performance.
Testing and Finalizing
If you’re interested in learning how to change OBD1 to OBD2, it’s important to understand that the process involves several steps. One of the first things you’ll need to do is to invest in an OBD2 reader and scanner, as this will allow you to read the data being transmitted by your vehicle in real-time. Once you have this equipment in hand, you’ll need to locate the OBD1 connector on your vehicle and replace it with an OBD2 connector.
This process may require some electrical wiring work, but it’s typically not too difficult. Once this step is complete, you’ll need to test your vehicle and ensure that everything is working as it should be. This may involve running a diagnostic test or simply taking the car for a test drive to see how it performs under different driving conditions.
Finally, once you’re happy with the performance of your newly-modified vehicle, you can finalize the conversion process and enjoy the benefits of having an OBD2-equipped car.
Checking for Errors
When it comes to testing and finalizing your project, it’s crucial to check thoroughly for errors before launching. Even the slightest mistake can have a significant impact on the end result of your project. Start by checking for spelling, grammar, and punctuation errors using a tool like Grammarly or having someone proofread your work.
Next, go through each page of your project and test all features, links, and buttons to ensure they’re working correctly. You might also consider user testing to get feedback from unbiased individuals on how easy or challenging it is to navigate your project. Once all errors have been fixed and you’re confident everything is working as it should, it’s time to launch your project.
Remember, it’s always better to take a little extra time in the testing phase than to launch a project full of errors that could have been avoided.
Calibrating Your Vehicle
Now that you have made the necessary adjustments to your vehicle, it’s time to test it out and finalize your calibration. First, start by taking your vehicle for a spin and see if it’s performing at optimal levels. Check if all the modifications you’ve made are functioning as they should be, and ensure that your engine isn’t making any strange sounds.
If you notice any inconsistencies, don’t hesitate to make additional adjustments until you’re satisfied with your vehicle’s performance. Once you’re happy with how it’s running, it’s time to finalize your calibration. Make sure to document all the changes you’ve made, including any modifications or replacements that were made.
This helps keep track of your vehicle’s history and provides valuable information for future tuning. And with that, you’re ready to take your newly calibrated vehicle out on the road! Remember, maintaining your vehicle’s health is essential to its longevity and performance, and proper calibration can do wonders for your ride.
Conclusion
In conclusion, changing from OBD1 to OBD2 is like upgrading from a flip phone to a smartphone. It may seem overwhelming at first, but the benefits of better engine diagnostics and improved performance make it worth the effort. With the right tools and a bit of know-how, you can easily make the switch and enter the world of modern car technology.
So, don’t be afraid to take the leap and transform your ride into a high-tech powerhouse!”
FAQs
What is the difference between OBD1 and OBD2?
OBD1 is an older system that provides limited diagnostic capabilities, while OBD2 is a more advanced system that offers enhanced diagnostic capabilities and standardized trouble codes.
Can I convert an OBD1 car to OBD2?
Yes, it is possible to convert an OBD1 car to OBD2, but it requires significant modifications and may not be cost-effective.
What do I need to convert my car from OBD1 to OBD2?
To convert your car from OBD1 to OBD2, you will need an OBD2 compatible engine control module (ECM), wiring harness, OBD2 diagnostic port, and other components specific to your vehicle make and model.
Why would I want to convert my car from OBD1 to OBD2?
Converting your car from OBD1 to OBD2 may provide you with enhanced diagnostic capabilities, improved performance, and better fuel efficiency. Additionally, OBD2 systems are required for emissions testing in many states, so a conversion may be necessary to pass inspection.