Revitalize Your Engine: A Step-by-Step Guide on How to Change Lifters Like a Pro
If you’re hearing a strange tapping sound coming from your engine, it might be time to change your lifters. Don’t worry – changing lifters in your car is actually a pretty straightforward process. With a bit of patience and some basic tools, you can have your engine running smoothly again in no time.
In this step-by-step guide, we’ll walk you through the process of changing lifters in your car, so you can get back on the road with a quieter, smoother engine. From removing the valve covers to installing the new lifters and adjusting the valves, we’ve got you covered. So, grab a cup of coffee, put on your favorite tunes, and let’s get started!
Assessing the Situation
If you notice a ticking or knocking noise coming from your engine, it may be time to assess the situation and change your lifters. The lifters are responsible for opening and closing the valves in your engine, and if they become worn or damaged, they can cause a loss of power or even engine damage if left unaddressed. Begin by identifying which lifters are causing the issue by listening for the noise and using a mechanic’s stethoscope to locate the source.
Once you determine which lifters need to be replaced, you’ll need to remove the valve covers, pushrods, and rocker arms. From there, you can remove the old lifters, clean the lifter bore, and install the new lifters. Be sure to follow the manufacturer’s recommended torque specifications and reassemble the components in the reverse order of removal.
Changing lifters can be a time-consuming task, but it’s essential to keep your engine functioning properly and avoid costly repairs down the line.
Identifying Faulty Lifters
If you suspect that you might have a faulty lifter in your vehicle engine, it’s important to assess the situation before taking any action. First off, consider if you’ve been hearing any abnormal ticking or tapping noises coming from the engine. These sounds are an indication that something is off, and it could be a worn-out lifter.
It’s also worth checking the oil level and condition, as low oil pressure or dirty oil can cause lifter issues. If you’re unsure about the cause of the problem, it’s best to take your vehicle to a trusted mechanic who can perform a thorough inspection and provide a proper diagnosis. Trying to fix a faulty lifter without knowing the root cause could lead to further damage to your engine, resulting in costly repairs.
Gathering Necessary Tools and Parts
Before starting any repair or maintenance work, it’s important to assess the situation to identify the necessary tools and parts you’ll need. Take a moment to examine the problem and determine what’s causing it. Are there any broken or damaged parts that need replacing? Knowing what you’re dealing with will help you gather the correct tools and parts, saving you time and frustration down the road.
Keep in mind that each repair job may require different tools and parts, so take stock of what you already have and what you need to purchase or rent. It’s always better to have everything you need before starting the work, so you can work efficiently and focus on the problem at hand. In summary, assessing the situation is a crucial first step in gathering the necessary tools and parts to successfully complete your repair job.
Removing Old Lifters
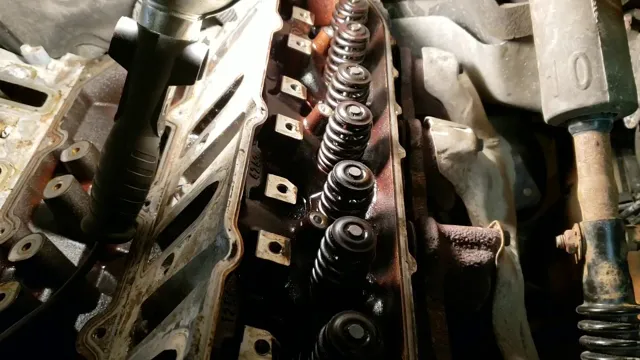
If you’ve got an engine that’s been running a while and the lifters have started to fail, it might be time for a change. To swap out your old lifters, you’ll first need to remove them. Start by removing the valve covers on your engine.
From there, you’ll need to turn the engine over until each lifter is at the bottom of its lobe. You can then use a lifter removal tool to take out each individual lifter. Be sure to keep track of which lifter goes where, since they need to be reinstalled in the same spots they came from.
Once all your old lifters are removed, it’s time to install the new ones. This process can be a bit more involved, and it’s important to make sure you get the right replacement lifters for your specific engine model. But with a little care and some patience, changing out your old lifters can help keep your engine running smoothly for years to come.
Locating and Accessing Lifters
When it comes to removing old lifters, finding and accessing them can be a tricky task. First and foremost, you’ll need to locate them within the engine. Lifters are typically found within the cylinder block or head and can be either hydraulic or mechanical.
Once you’ve located the lifters, accessing them will depend on the make and model of your vehicle. Some models require partial or complete disassembly of the engine, while others may just need the removal of a valve cover. It’s important to consult your vehicle’s manual or seek professional guidance to ensure the proper removal process.
When removing old lifters, it’s crucial to handle them with care to prevent any damage to the surrounding components. With the right knowledge and tools, removing old lifters can be a manageable task that contributes to a smoother engine operation.
Removing Intake Manifold and Rocker Arms
When it comes to removing old lifters during an engine overhaul, there are a few important steps to follow to ensure you don’t damage any parts. First, you will need to remove the intake manifold and rocker arms before getting access to the lifters. This can be a time-consuming process, but it is crucial to prevent any unnecessary wear and tear.
Once you have access to the lifters, it is important to carefully remove each one without damaging the camshaft or lifter bore. One helpful tip is to use a magnet to pull the lifters out rather than prying them out with a tool. This helps prevent any accidental scratching or cracking of the lifter bores.
In addition, be sure to keep track of which lifter goes where, as they are all unique to their specific bore. By taking your time and carefully removing each lifter, you can ensure a successful engine overhaul without causing any damage to vital engine components.
Carefully Extracting Lifters from Their Bore
Removing old lifters from their bore requires a delicate touch and precision. One must first identify the location of the lifters within the engine block and carefully extract them one by one. This process is crucial to ensure that the lifter is not damaged during removal, as it can lead to serious engine problems down the line.
To begin, the engine must be turned off and allowed to cool. Then, the rocker arm assembly must be removed to gain access to the lifters. Next, a lifter removal tool can be used to extract the lifter from its bore.
It’s important to be patient during this step, as forcing the lifter out can cause serious damage. Once the lifters are removed, they should be examined closely for signs of wear or damage. If necessary, the lifters can be replaced with new ones to ensure maximum engine performance.
Overall, removing lifters from their bore is a critical step in maintaining a healthy engine and should be done with great care.
Installing New Lifters
If you need to change lifters in your vehicle, it’s important to know the steps to take. Firstly, you need to determine which type of lifter your vehicle has. Hydraulic lifters are the most common, and they require a pressure tool to remove them.
Solid lifters, on the other hand, require a different process which involves adjusting the rocker arms. Once you’ve identified which type of lifter your vehicle has, you need to prepare the engine for the lifter change. This includes removing the valve covers, disconnecting the pushrods, and removing the old lifters.
After this, it’s time to install the new lifters. Ensure that the lifters are properly aligned and seated, and then reattach the pushrods and valve covers. It’s important to also adjust the valve lash after installing the new lifters.
Remember, changing lifters can be a complex job and may require specialized tools. If you don’t have the necessary skills or equipment, it may be best to seek the help of a professional mechanic.
Preparing New Lifters for Installation
When it comes to installing new lifters, preparation is key! You want to make sure that the lifters are properly cleaned and lubricated before installation to ensure optimal performance. A common mistake that new lifters make is not properly torquing the lifters to the engine’s specs. This can cause major issues down the line, including engine damage.
It’s important to follow the manufacturer’s instructions and use a torque wrench to make sure that the lifters are installed correctly. Additionally, it’s important to check the lifter bores for any damage or debris before installation, as this can also cause problems. Taking the time to properly prepare and install new lifters will ensure that your engine runs smoothly and efficiently.
Installing Lifters into Their Bore
Installing lifters into their bore is a crucial step in the engine rebuilding process. These small components play a vital role in ensuring that your engine is running smoothly. When installing new lifters, it’s essential to check the bore for any signs of damage, wear or debris that may cause malfunctions.
Begin by placing a drop of engine oil on the top surface of each lifter and gently lower them into the lifter bore. Ensure that the pushrod seat is correctly aligned and that the lifter sits flat in the bore. Using an installation tool or pushrod, give the lifter a slight turn to ensure it’s seated correctly.
After fitting all the lifters, carefully rotate the engine a few times to ensure the lifters are rotating correctly. When installation is complete, remember to follow the manufacturer’s recommendations for break-in procedure of the new lifters. Proper installation of new lifters will make your engine run smoother and put a huge smile on your face.
Testing and Finishing Touches
If you want to learn how to change lifters in your engine, it’s important to understand that testing and finishing touches are crucial steps in the process. Before you start reassembling the engine, it’s important to test the new lifters to make sure they’re properly installed and functioning correctly. This may involve using a torque wrench to adjust the lifters to the right level of tension, or using a compression gauge to check the compression of each cylinder.
You might also want to double-check that all of the parts are free of debris and properly lubricated, as these small details can impact the overall performance of your engine. Once you’re satisfied that everything is in working order, it’s time for the finishing touches: reattach all parts and components, tighten all bolts and fittings, and finish up any other small tasks that need to be done. These last few steps may seem tedious, but they’re important for ensuring that your engine runs smoothly and safely for years to come.
So, take your time and don’t rush the process – with a little patience, attention to detail, and the right tools, you can change your lifters like a pro.
Reinstalling the Rocker Arms and Intake Manifold
Testing and finishing touches are crucial when reinstalling rocker arms and the intake manifold. Once the rocker arms have been reinstalled, they must be checked for proper clearance. Additionally, the pushrods must be reinstalled and tested to ensure they are correctly seated.
After the pushrods have been tested, the new intake gaskets can be installed. The intake manifold can then be reinstalled, and the bolts should be tightened to the correct torque specifications. Once the intake manifold is securely in place, the fuel injectors and other electrical connections should be reconnected.
The finishing touches include installing the engine cover and starting the engine to check for leaks and proper operation. Regular maintenance and testing are essential to ensure your vehicle performs at its best and lasts for years to come. By following these steps, you can reinstall the rocker arms and intake manifold correctly and with confidence.
Adding Oil and Testing to Ensure Proper Functioning
After you have added oil to your engine, it’s time to test it to ensure proper functioning. This is a crucial step that cannot be overlooked if you want to avoid damage to your vehicle. Checking the oil level and quality is vital, as it ensures that the engine is lubricated enough to run smoothly.
Testing also helps to detect any potential issues before they turn into big problems. A simple way to check your oil is by removing the dipstick and wiping it clean, then reinserting it and taking it out again to see the oil level. Make sure the oil is at the recommended level and looks clean and clear.
Once you have confirmed that your oil level is optimal, you can start your engine and let it warm up for a few minutes. Afterward, turn it off and check your oil level again. If it has dropped, you may have a leak or an issue with your engine that requires attention.
Checking the oil and testing the engine can mean the difference between a smooth ride and an expensive repair bill.
Conclusion
In conclusion, changing lifters is a task that requires patience, attention to detail, and a steady hand. It’s not a job for the faint of heart, but with the right tools and a bit of know-how, even the most novice mechanic can get the job done. So, whether you’re swapping out a noisy lifter or simply taking on a new challenge, remember to take your time, stay focused, and above all else, be confident.
Who knows, by the time you’re finished, you might just have found a new appreciation for the art of engine repair!”
FAQs
What are lifters in a car engine?
Lifters are components that help to open and close the valves in an engine.
How do I know if my lifters need to be changed?
Some signs that your lifters may need to be changed include engine ticking or tapping noises, loss of power or acceleration, and poor fuel economy.
Can I change the lifters myself or should I take my car to a mechanic?
Changing lifters can be a complex and difficult process, and may require specialized tools. It is recommended that you take your car to a mechanic to have lifters changed.
How much does it typically cost to replace lifters in a car engine?
The cost of replacing lifters can vary greatly depending on the make and model of your car, as well as the labor costs of your mechanic. On average, it can cost anywhere from $500 to $1000 to replace lifters.

