Mastering the Art of Adjusting Neutral Safety Switch: A Step-by-Step Guide for DIY Enthusiasts
Have you been experiencing problems with your car’s neutral safety switch? Maybe you’ve noticed that your car won’t start, or it starts in gear, or perhaps it won’t start at all. These issues can be caused by a misaligned or faulty neutral safety switch, but luckily, adjusting this vital component is a relatively simple task. In this step-by-step guide, we’ll cover all the necessary steps to adjust the neutral safety switch on your car, providing you with a comprehensive understanding of the process.
From the necessary tools to the crucial safety precautions, we’ll walk you through the entire process, ensuring that your car starts smoothly, every time. But why is the neutral safety switch so essential? Essentially, the neutral safety switch is responsible for preventing the car from starting unless it is in ‘neutral’ or ‘park’ mode. Without this vital component, the car could start in any gear, leading to dangerous consequences.
Moreover, a faulty switch can prevent the car from starting altogether, causing inconvenience and frustration. Therefore, understanding how to adjust the neutral safety switch on your vehicle is an important skill to possess, ensuring that your car is safe and operates correctly. So, without further ado, let’s get started on this important task and enjoy a worry-free driving experience.
Understanding the Neutral Safety Switch
If you’re experiencing issues with your vehicle starting or shifting gears, the culprit could be the neutral safety switch. This small component is responsible for ensuring that your car won’t start unless it’s in proper gear, preventing accidents and damage to the engine. Adjusting the neutral safety switch can be a straightforward process, but it’s essential to get it right to maintain the safety of your vehicle.
To do so, locate the switch, which is usually on the transmission or shifter housing, and then loosen the bolts that hold it in place. Next, adjust the switch so that it lines up correctly with the gear selector, ensuring that it only allows the car to start when in park or neutral. Finally, re-tighten the bolts, start the car, and test the gears to make sure everything is functioning properly.
By taking the time to adjust your neutral safety switch, you can ensure that your car remains reliable and safe for you and your passengers.
What is a Neutral Safety Switch?
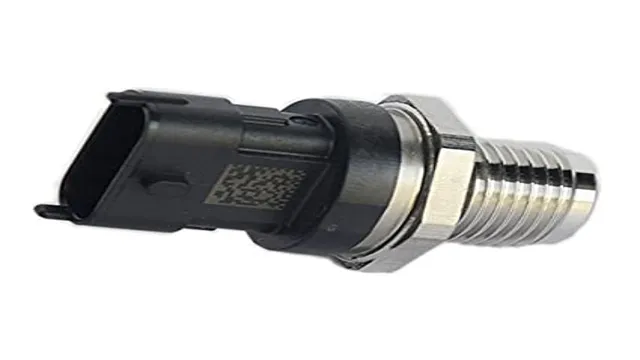
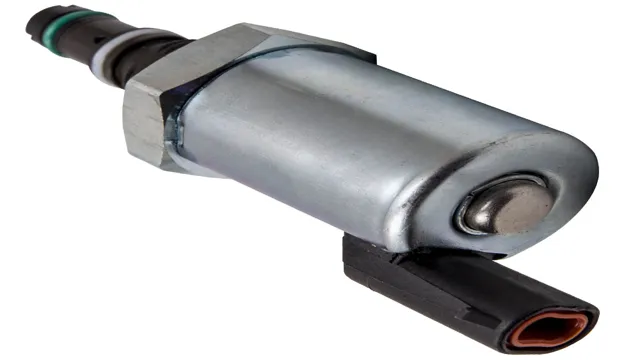
A Neutral Safety Switch is an essential part of a vehicle’s transmission system that prevents the engine from starting unless the shift lever is in either Park or Neutral. It’s designed to ensure the safety of you and your vehicle by keeping it from inadvertently moving when starting the engine. This component works by sending a signal to the engine control module, which allows the engine to start only if the transmission gearshift is in the correct position.
The Neutral Safety Switch is an important component that should be checked and maintained regularly to avoid any problems that can cause harm to the driver, passengers, or the vehicle. Neglecting regular maintenance or replacing an old switch can increase the likelihood of a vehicle starting in Drive or Reverse, which can cause the car to jump forward or backward without warning. Therefore, it’s important to have a Neutral Safety Switch that works efficiently and reliably, so you can confidently start your car and enjoy a safe driving experience.
Why Adjust a Neutral Safety Switch?
The neutral safety switch is an important component in your vehicle’s safety system that prevents accidental starting of the engine and keeps the car from being started in any gear other than Park or Neutral. Adjusting this switch may seem like a difficult task, but it’s actually a relatively easy process that can be done at home with the right tools. When the switch is not adjusted correctly, it may cause the engine to start in gear, which can be dangerous.
Other signs that the switch needs adjusting include a starter that won’t engage or a reverse light that doesn’t work. By adjusting the neutral safety switch, you can ensure that your car is safe to drive and that you won’t encounter any issues when starting it up.
Gathering the Required Tools
If you’re looking to make adjustments to your car’s neutral safety switch, you’ll need to gather a few essential tools first. Firstly, you’ll need to make sure you have the owner’s manual for your vehicle, as this will provide you with clear instructions on how to locate and access the switch. You’ll also need a pair of pliers or a wrench to loosen the bolts that hold the switch in place.
Additionally, you’ll need a multimeter to check the switch’s continuity and help diagnose any problems with it. A flashlight could also be helpful to give you better visibility of your work area. Finally, make sure you have all the necessary protective gear, such as gloves and eye protection, to keep yourself safe as you work on your car.
With the right tools in hand, you’ll be well-equipped to tackle the task of adjusting your car’s neutral safety switch and ensure that your vehicle runs as smoothly and safely as possible.
What You Need to Get Started
To get started in a new project, it’s essential to gather the required tools. For most projects, you’ll need basic tools like a hammer, screwdrivers, and pliers. These are readily available at any hardware store and are often sold in sets.
If you’re working on a more specialized project, like woodworking or metalworking, you may need more specific tools like a saw, welding torch, or lathe. These tools can be purchased at specialty stores or online. It’s important to invest in high-quality tools that will last for many projects.
Not only will this save you money in the long run, but it will also make your work easier and more efficient. Don’t forget to consider safety when gathering your tools and invest in proper safety equipment like goggles, gloves, and helmets. With the right tools, you can tackle any project with confidence and get the job done right.
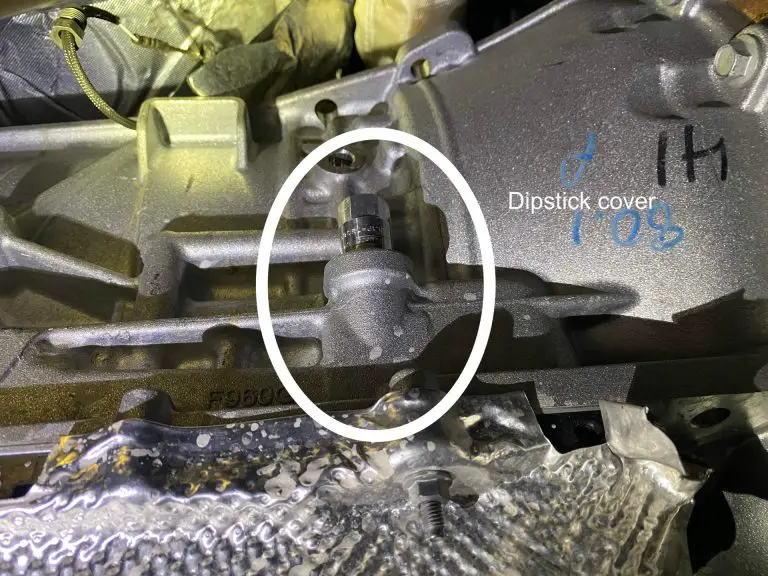
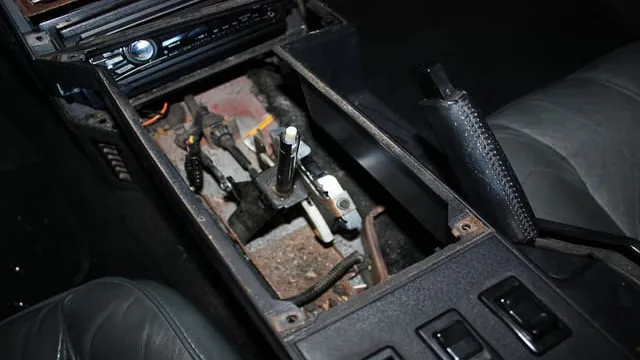
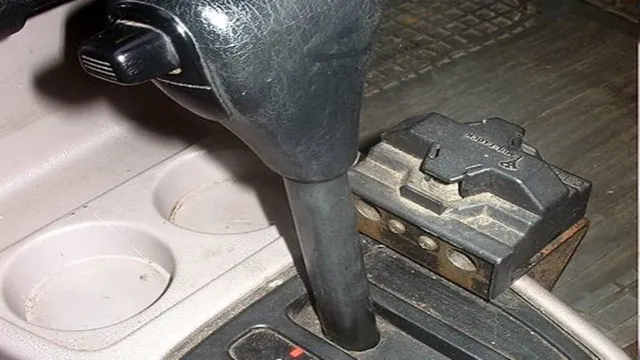
Locating the Neutral Safety Switch
Adjusting the neutral safety switch is a crucial step in maintaining the safety of your vehicle. To locate the switch, start by looking under the dashboard on the driver’s side. You may need to remove the paneling to access it.
The neutral safety switch is usually located near the base of the steering column, close to where it connects to the transmission. Once you have located the switch, check the connections and make sure they are secure. If the switch is not securely connected, this can result in problems with starting your car or stalling while driving.
To adjust the neutral safety switch, turn the ignition on and put the vehicle in neutral. Use a multimeter to check the voltage between the switch’s terminals, and adjust them accordingly. By following these steps, you can adjust the neutral safety switch and ensure it functions properly, keeping you and your passengers safe on the road.
Where to Find the Neutral Safety Switch
The neutral safety switch is a crucial component of your vehicle’s transmission system that prevents the engine from starting if the transmission is not in the neutral or park position. It’s located on the transmission’s linkage or shifter mechanism and is usually easy to spot. If you’re having trouble finding it, consult your vehicle’s owner’s manual or look it up online.
Once located, it’s a matter of testing the switch with a multimeter or manually adjusting it to ensure everything is working correctly. Just remember, if your vehicle is having trouble starting, it’s best to have a professional diagnose the issue before attempting any DIY repairs involving the neutral safety switch.
Adjusting the Neutral Safety Switch
If you own a vehicle with an automatic transmission, then you probably have a neutral safety switch installed. This switch plays a crucial role in preventing accidental starts and ensuring your safety. However, over time, the switch may become misaligned causing it to either not work correctly or engage when it shouldn’t.
To adjust the neutral safety switch, you will first need to locate it. Typically, they can be found under the vehicle’s hood or near the transmission linkage. Once located, use a wrench or socket to loosen the mounting screws or bolts that secure the switch in place.
Next, adjust the switch’s position until the contacts are aligned correctly, ensuring that the switch is neither too loose nor too tight. Tighten the bolts gently to keep the switch in place and check that everything is working correctly. If you’re unsure whether you’ve adjusted the switch correctly, try starting the car in neutral and park to ensure that the engine only turns over when the car is in park or neutral.
By following these simple steps, you can adjust the neutral safety switch and restore the safety of your vehicle.
Step 1: Checking the Position of the Shifter
When adjusting the neutral safety switch, step one is to check the position of the shifter. This is important because the shifter needs to be in the correct position for the safety switch to work properly. The neutral safety switch is crucial for the safe operation of your vehicle because it prevents the engine from starting unless the transmission is in neutral or park.
To check the position of the shifter, make sure your vehicle is in park or neutral, and then look at the shifter to make sure it is aligned with the proper gear. If the shifter is not in the correct position, it can cause the neutral safety switch to malfunction and put you and your passengers at risk. So always make sure the shifter is in the correct position before adjusting the neutral safety switch.
Step 2: Loosening the Locking Nut
Adjusting the neutral safety switch is a crucial task that must be done correctly to ensure your vehicle starts safely. The second step in the process involves loosening the locking nut. You may need to use a wrench to do this, but be careful not to overtighten and damage the casing.
Once the nut is loose, you can adjust the switch to the correct position. The neutral safety switch serves as a safety feature to prevent the vehicle from starting in gear, causing potential accidents or damage to the transmission. Ensuring it is adjusted correctly will give you peace of mind and ensure your vehicle’s longevity.
Don’t forget to tighten the nut back up once you have made the necessary adjustments, so the switch stays in its correct position. By taking the time to adjust the neutral safety switch, you are investing in your vehicle’s safety and maintaining its integrity.
Step 3: Adjusting the Switch
Adjusting the neutral safety switch is a crucial step in making sure your vehicle starts only when it’s in park or neutral. The switch ensures that the engine cannot crank unless the transmission is in one of these positions. To adjust the switch, first, locate the switch on the transmission, and use a wrench or pliers to loosen the bolts holding it in place.
After loosening the bolts, you can move the switch to adjust its position until the desired function is achieved. Re-tighten the bolts once you’ve found the correct position. It’s important to test the switch and make sure that the car starts only when it’s in park or neutral.
If not, readjust the switch until it operates correctly. It’s a simple process that should be done with care and precision to ensure the proper functioning of your vehicle.
Testing the Adjusted Neutral Safety Switch
Adjusting the neutral safety switch can seem like an intimidating task, but it’s actually a fairly simple process. To begin, make sure your vehicle is in park or neutral, and then locate the neutral safety switch. It should be near where the shifter connects to the transmission.
Once you’ve found it, remove the bolts attaching the switch to the transmission and move it until the contacts are aligned with the gear selector. Tighten the bolts back up, start your vehicle, and test if it starts properly in park and neutral. If it does, congratulations – you’ve successfully adjusted your neutral safety switch! If not, you may need to repeat the process with slight adjustments until it works correctly.
Remember, having a malfunctioning neutral safety switch can be dangerous and may prevent your vehicle from starting, so it’s important to make sure it’s working properly.
Conclusion
Adjusting the neutral safety switch may seem daunting, but with a little patience and attention to detail, it’s like a game of Operation: make one wrong move and everything goes haywire. Remember to disconnect your battery, locate the switch, adjust the loose connector, and test that it’s working properly before hitting the ignition. Trust us, it’s much easier than trying to convince your boss that your car won’t start and you can’t come into work – again.
“
FAQs
What is a neutral safety switch?
A neutral safety switch is a safety component in a vehicle that prevents the engine from starting unless the transmission is in neutral or park.
What are the signs of a faulty neutral safety switch?
Signs of a faulty neutral safety switch include difficulty starting the engine, the engine starting in gear, or the engine not starting at all.
How do you adjust the neutral safety switch on a manual transmission vehicle?
To adjust the neutral safety switch on a manual transmission vehicle, slightly loosen the switch mounting bolts and adjust the switch until it detects the neutral position of the transmission.
How do you adjust the neutral safety switch on an automatic transmission vehicle?
To adjust the neutral safety switch on an automatic transmission vehicle, loosen the switch mounting bolts, move the switch until it detects the neutral position of the transmission, and then tighten the mounting bolts to secure it in place.