Step-by-Step Guide: Installing Your Truck Tool Box like a Pro
Installing a truck tool box may seem complicated and daunting, particularly for those with limited experience in the automotive field. However, the process is relatively simple and straightforward with the correct tools and a few basic steps. A truck tool box is an essential addition to any truck owner’s arsenal, as it provides secure storage for tools, equipment, and other supplies, thus ensuring you’re always prepared for any potential scenario.
In this article, we’ll walk you through how to install a truck tool box step by step, so you can confidently take on the task yourself.
Tools You’ll Need
When it comes to installing a truck tool box, you’ll first need to gather a few tools. These tools include a tape measure, a drill with assorted bits, a level, a wrench or socket set, and screws. It’s also important to have someone to help you with the installation, as the tool box can be heavy and difficult to maneuver on your own.
Once you have your tools and a helper, you’ll need to measure where you want the tool box to be installed on the truck bed and mark the placement with a pen or marker. Use the level to make sure the tool box is straight before drilling holes for the screws. With the holes drilled, line up the tool box with the holes and use the wrench or socket set to tighten the screws into place.
It’s important to check that the tool box is secure and won’t move around during transport. With these steps, you can confidently install an ideal truck tool box to meet your needs.
Measuring Your Truck Bed
Measuring your truck bed may sound like a daunting task, but if you have the right tools, it’s actually quite simple. First, you’ll need a tape measure. It’s important to have a tape measure that’s at least as long as the length of your truck bed.
Next, you’ll need a piece of paper and a pen to write down your measurements. It’s also helpful to have a flashlight on hand in case you’re measuring in a low-light area. Finally, if you’re measuring the width of your truck bed, you can use a yardstick or a level, but a tape measure works just as well.
By using these tools, you’ll be able to accurately measure your truck bed without any hassle.
Choosing the Right Truck Tool Box
When it comes to choosing the right truck tool box, it’s important to consider the types of tools you’ll need to carry with you day in and day out. If you’re a contractor or DIY enthusiast, chances are you’ll need to cart around a lot of heavy-duty tools, so you’ll need a tool box that can withstand the rigors of the road. Look for a tool box that’s made from heavy-duty materials, like steel or aluminum, and that has strong hinges and latches to keep your tools secure.
You’ll also want to consider the size of the tool box and how it will fit in your truck bed. Make sure to measure the bed of your truck and choose a tool box that will fit snugly and securely without taking up too much space. By choosing the right tool box, you’ll be able to keep your tools organized and protected, no matter where you’re headed.
Preparing Your Truck Bed
Installing a truck tool box can be a great way to increase storage space and keep your tools organized while on the go. Before you start the installation process, it’s important to prepare your truck bed properly to ensure a secure fit for your tool box. Start by measuring the dimensions of your truck bed and the tool box to make sure they are compatible.
Then, clean and dry the truck bed thoroughly to remove any debris or moisture that could interfere with the installation process. You may also need to apply a sealant or liner to the bed to provide extra protection against rust and corrosion. Once your truck bed is fully prepped, you can begin the tool box installation process with confidence, knowing that you’ve taken the necessary steps to ensure a safe and reliable fit.
Cleaning Your Truck Bed
Preparing Your Truck Bed for a good cleaning is an important step for maintaining the look and longevity of your vehicle. Start by removing anything that might be in the bed, such as tools or debris. Then, use a high-pressure washer or a regular garden hose with a jet nozzle to blast any dirt or grime off the bed.
If there are any stubborn stains or tough spots, use a degreaser or a mild detergent to help loosen them up. Be sure to scrub the surface gently with a soft-bristled brush, so as not to damage the paint or finish of the bed. Finally, rinse the entire bed thoroughly to remove any remaining cleaning solution and let it dry completely before loading anything back in.
Taking the time to properly prepare your truck bed for cleaning can help ensure the best results and a longer lifespan for your vehicle.
Laying Out the Toolbox Position
Preparing your truck bed is the first step to laying out the toolbox position effectively. Proper preparation ensures that the toolbox fits snugly, without the risk of shifting or sliding around while you’re on the road. First things first, clear out any debris or dirt left in the bed of your truck, and clean it thoroughly.
Next, measure your truck bed to determine the size of the toolbox that will fit comfortably without taking up too much space. Additionally, consider the weight and size of the tools that you plan to carry to ensure that the toolbox is durable and sturdy enough to handle them. Overall, taking the time to prepare your truck bed for the toolbox installation ensures that your tools are secure and your truck is safe for the journey ahead.
Installing the Truck Tool Box
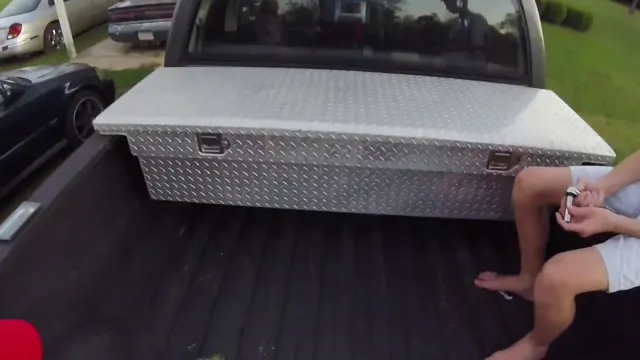
If you’re wondering how to install a truck tool box, the process can be fairly simple with just a few steps. First, you need to measure the dimensions of your truck bed to ensure the toolbox fits properly. Then, place the toolbox onto the truck bed and align it with the bed rails.
Use clamps to hold the toolbox in place and mark the areas where you’ll be drilling holes. Once you drill the holes, use bolts, nuts, and washers to mount the box. Make sure to tighten and secure everything before loading the toolbox with your equipment and tools.
Doing this installation yourself can save you money and provide you with a sense of accomplishment. Plus, with your tools organized and easily accessible, you’ll be ready for any job that comes your way.
Attaching the Mounting Brackets
Installing a truck tool box may seem like a daunting task, but with the right instructions and tools, it can be done in no time. One of the essential steps in installing a truck tool box is attaching the mounting brackets. These brackets are what will secure the toolbox to the truck bed and keep it in place during transportation.
To attach the mounting brackets, first, locate the pre-drilled holes on the truck bed and ensure that they align with the holes on the toolbox. Then, insert bolts into the holes and tighten them with nuts and washers. It’s important to use the correct size bolts and hardware specified by the toolbox manufacturer to ensure a secure fit.
Once the brackets are securely attached, the toolbox can be lifted onto the brackets and secured in place with any additional hardware that may be required. By following these simple steps, your truck tool box will be securely attached, and you can be confident that it will stay in place during transportation.
Securing the Toolbox to the Brackets
“truck tool box installation” Installing a truck tool box can be an excellent way to keep your tools and equipment organized while on the go. To secure the toolbox to the brackets, first locate the mounting points on your truck bed. These mounting points are typically found near the wheel wells or at the rear of the bed.
Next, position the brackets onto the mounting points, making sure they are evenly spaced and level. Then place the toolbox onto the brackets, ensuring that it fits snugly. Finally, secure the toolbox to the brackets by tightening the bolts with a wrench.
It’s important to make sure the toolbox is securely fastened before hitting the road to avoid any accidents or damage to your tool box or the items inside. With these simple steps, you can confidently install your truck tool box and enjoy the convenience and organization it provides on the job.
Tips for Maintenance
Installing a truck tool box is a great way to optimize your vehicle’s storage capacity and ensure that your tools are always within easy reach. To get started, first gather all the necessary tools such as a measuring tape, drill, screws, and a sealant. Then, measure the space in your truck bed where you want to install the tool box to ensure that it fits properly.
Next, attach the mounting brackets onto the box and use the drill to secure them onto the truck bed. It’s important to use the exact placement of the brackets and marks as per the manufacturer’s instructions to ensure safety. Once the box is securely attached, apply a sealant around the edges to prevent water from seeping in.
Finally, test the tool box to ensure that it is secure and in place. With these simple tips, installing a truck tool box can be a hassle-free task.
Treating Rust or Corrosion
When it comes to maintaining your equipment or vehicles, rust or corrosion can be a nuisance. However, with the right tips and tricks, you can prevent, manage, and treat rust or corrosion effectively. One useful tip is to clean and dry your equipment regularly, especially after use or exposure to moisture.
Additionally, applying a protective coating or rust inhibitor can help prevent rust formation. Suppose rust has already developed on your equipment. In that case, you can try using a rust converter or a wire brush to remove the rust and then apply a rust inhibitor to prevent future rust formation.
To prevent further corrosion, it’s essential to address the underlying cause, whether it’s exposure to moisture, salt, or chemicals. By taking simple steps to prevent and treat rust or corrosion, you can extend the lifespan of your equipment and save money in the long run.
Conclusion
In conclusion, installing a truck tool box doesn’t have to be a difficult or confusing process. With a few basic tools, a little patience, and some clever maneuvers, you can have your new toolbox securely mounted and ready to go in no time. Remember to measure carefully, use the right hardware, and follow the manufacturer’s instructions for best results.
And if all else fails, don’t be afraid to call in a professional to help. After all, there’s nothing wrong with admitting you need a little extra assistance to get the job done right. So go forth and conquer, fellow DIYers.
Your truck and all its tools will thank you!”
FAQs
What tools do I need to install a truck tool box?
You will need a measuring tape, drill, drill bits, screwdriver, mounting hardware, and sealant.
Can I install a truck tool box by myself?
Yes, you can install a truck tool box by yourself if you have the tools and some basic DIY skills.
How do I measure the size of my truck bed for a tool box?
Measure the length and the width of your truck bed, then check the specifications of the tool box to ensure a proper fit.
How do I choose the best truck tool box for my needs?
Consider the size of your truck bed, the type of tools you need to carry, and your budget. Some additional features to consider are lock security, weather resistance, and ease of installation.

