Step-by-Step Guide: How to Efficiently Drain Your Torque Converter
Have you ever experienced a sluggish acceleration in your vehicle? Or maybe you noticed a strange noise coming from it? Chances are, you might be dealing with a clogged torque converter. This essential component of automatic transmissions is responsible for transferring power from the engine to the rest of the drivetrain. Over time, it can accumulate debris, sludge, and other contaminants that hinder its performance.
However, fear not, as draining a torque converter is simpler than you might expect, and can restore your vehicle’s power and performance in no time. Read on for a step-by-step guide on how to drain a torque converter and keep your transmission in pristine condition.
What is a Torque Converter?
If you’re wondering how to drain a torque converter, you’re not alone. As an essential component of an automatic transmission, the torque converter is responsible for transferring engine power to the transmission, allowing the wheels to turn. Over time, the torque converter can accumulate debris and old fluid, which can lead to sluggish performance and reduced fuel efficiency.
To drain a torque converter, you’ll need to access the drain plug, which is usually located on the bottom of the converter. Before draining, it’s important to warm up the engine and drive the vehicle for a few minutes to help loosen any sediment or buildup. Once you’ve drained the fluid, replace the drain plug, refill the transmission fluid, and take your vehicle for a test drive to see the difference in performance.
Remember to always follow your manufacturer’s recommendations when it comes to maintaining your vehicle’s torque converter, as neglecting it can lead to costly repairs down the road.
Explanation of a torque converter and how it works
A torque converter is a fluid coupling that connects the engine of a vehicle to its transmission. But what exactly does that mean and how does it work? Essentially, the torque converter allows the engine to continue running while the car is stopped or moving at a slow speed. This is because the converter is filled with transmission fluid, which transfers power from the engine to the transmission.
When the driver presses the accelerator, the converter pressurizes the fluid, which then drives the turbine and transmits power to the transmission. The most important thing to know about a torque converter is that it helps to multiply torque and improve acceleration. It’s like having an extra gear in your car, but one that is always engaged.
So next time you’re driving around town, thank your torque converter for making your ride that much smoother.
Why would you need to drain a torque converter?
If you’re wondering how to drain a torque converter, there are several reasons why you might need to do so. Typically, you would want to drain the torque converter during a transmission service or repair. This is because the torque converter stores fluid that can become contaminated with debris and metal shavings over time, which could lead to transmission failure.
Draining the torque converter allows you to remove any sludge or debris from the system, preventing costly repairs down the line. Additionally, if you’re installing a new transmission or rebuilding an old one, it’s important to properly drain and refill the torque converter to ensure optimal performance and longevity. So, if you’re experiencing transmission issues or planning any transmission-related maintenance, don’t forget to drain the torque converter as part of your routine.
Reasons for draining a torque converter
One of the reasons you may need to drain a torque converter is if there is contamination in the transmission fluid. This type of contamination can come from debris, dirt, or metal shavings that have built up over time or from a damaged component in the transmission system. If the contaminated fluid is not drained, it can cause damage to the transmission and ultimately require costly repairs.
Another reason for draining a torque converter is during a transmission fluid change or flush. Draining the torque converter ensures that all of the old fluid is removed and replaced with new, clean fluid. This helps to prolong the life of the transmission and ensures that it continues to run smoothly.
Ultimately, draining a torque converter is an essential part of maintaining a healthy transmission system and avoiding costly repairs down the road.
What you’ll need
If you’re planning on draining your torque converter, here’s everything you’ll need to have on hand. First and foremost, you’ll need to locate the torque converter drain plug, which is usually located on the bottom of the torque converter housing. You’ll also need a socket wrench or a torque wrench to remove the drain plug, as well as a drain pan to catch the fluid that will be draining out.
Once you have all of your necessary tools at the ready, it’s time to start draining the torque converter. To do this, you’ll need to remove the drain plug and allow the old fluid to drain out completely. Depending on the size of your torque converter, this process can take some time, so be sure to be patient and let gravity do the work for you.
After the fluid has drained out completely, you can replace the drain plug and refill the torque converter with fresh fluid. Be sure to consult your owner’s manual to determine the correct type of fluid to use, as using the wrong type can cause serious damage to your transmission. Overall, draining your torque converter is a simple process that can help prolong the life of your transmission.
With the right tools and a bit of patience, you can get the job done quickly and easily.
Tools and equipment necessary for the job
When it comes to any job, having the right tools and equipment is essential. If you’re planning on tackling a new project, it’s important to know what tools you’ll need to make it a success. Some of the necessary tools for most jobs include a hammer, screwdriver, pliers, level, measuring tape, and a saw.
Depending on the project, you may also need other tools such as a drill, wrench, or circular saw. It’s important to have high-quality tools that are appropriate for the job, as using the wrong tools can not only make the job more difficult but also lead to mistakes and potentially dangerous situations. In addition to the necessary tools, you’ll also need to make sure you have the right safety equipment.
This can include gloves, eye protection, a dust mask, and a hard hat. Even if the job doesn’t seem particularly dangerous, it’s always better to err on the side of caution and make sure you’re properly equipped. Another thing to keep in mind is that having the right tools and equipment isn’t always enough – you also need to know how to use them.
Before starting any job, take the time to read the instructions and make sure you understand how to use all of the tools you’ll be using. If you’re not sure about something, don’t hesitate to ask for help or advice. Overall, having the right tools and equipment is crucial for any job.
Make sure you’re properly equipped and prepared to take on the project at hand, and always prioritize safety and proper usage of tools and equipment. With the right tools and a little know-how, you’ll be well on your way to successfully completing any job.
Step-by-Step Guide to Draining a Torque Converter
If you need to drain a torque converter, there are a few simple steps you can follow to get the job done. First, you’ll need to locate the drain plug on the torque converter. This can usually be found on the bottom of the converter itself, and you’ll need to remove it using a socket wrench.
Once the plug is removed, the fluid will start to drain out of the converter, so make sure you have a container ready to catch it. You may need to use a funnel or hose to direct the fluid into the container, depending on the location of the drain plug. Keep in mind that torque converters can hold a significant amount of fluid, so be prepared for a messy job if you don’t have the right tools.
Once the fluid has drained out, replace the drain plug and add new fluid back into the torque converter until it reaches the proper level. With these steps, you’ll be able to drain your torque converter quickly and easily.
Step 1: Prepare your workspace and gather necessary tools
Draining a torque converter can seem like a daunting task, but with the right tools and preparation, anyone can do it. The first step is to make sure you have all the necessary tools and a clean workspace. You’ll need a torque converter drain plug wrench, a drain pan, a torque wrench, and possibly a filter wrench, depending on your transmission.
It’s important to have a clean and well-lit workspace so you can see what you’re doing and avoid any contamination of the transmission fluid. Once you have everything ready, it’s time to move onto the next steps of the process. For more detailed instructions on how to drain a torque converter, continue reading our step-by-step guide.
Step 2: Locate the torque converter drain plug and remove it
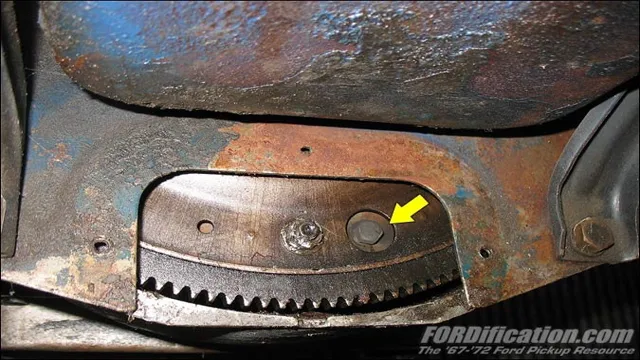
When it comes to draining a torque converter, it’s important to follow the proper steps to avoid any damage or mishaps. After locating your vehicle’s torque converter, the next step is to find the drain plug. This can usually be found at the bottom of the converter housing.
The drain plug is responsible for releasing all of the old transmission fluid. Once you have found the drain plug, it’s important to use caution when removing it. Make sure you have a drain pan underneath to collect the old fluid.
It’s also a good idea to wear gloves to protect your hands from the hot fluid. Once you have removed the drain plug, let the old fluid drain completely before reinstalling the drain plug. Remember, regular maintenance on your vehicle’s torque converter can help it last longer and perform better, so don’t skip this important step!
Step 3: Drain the fluid from the torque converter
When it comes to maintaining your vehicle’s performance, one aspect you definitely shouldn’t overlook is the torque converter. Over time, this component can become clogged with debris and dirty fluid, leading to decreased efficiency and potentially even complete failure. That’s why it’s important to regularly drain and replace the fluid in your torque converter.
The first step in this process involves draining the fluid from the converter itself. To do this, you’ll need to remove the torque converter from your vehicle and then carefully drain the fluid using a specialized tool. This process can be tricky, so it’s important to follow a step-by-step guide to ensure you’re doing it correctly.
By taking the time to properly drain your torque converter, you’ll ensure that it’s running smoothly and efficiently for years to come.
Step 4: Replace the torque converter drain plug
After completing the draining process, it’s time to replace the torque converter drain plug. This may seem like a minor step, but it’s important to ensure that the plug is tightened securely and that it’s not cross-threaded. Make sure to clean the drain plug and the surrounding area before reinserting it to prevent any leaks.
Once the plug is hand-tightened, use a torque wrench to tighten it to the manufacturer’s specifications. If you over-tighten the plug, it may damage the threads and cause leaks. On the other hand, loose plugs can also cause leaks and even lead to catastrophic transmission failure.
Taking the time to tighten the drain plug properly will ensure that your torque converter functions properly and prolong the lifespan of your vehicle.
Conclusion
And there you have it, folks – the ins and outs of draining a torque converter. So when the time comes and you find yourself face-to-face with a stubborn converter that just won’t quit, remember to play it cool and take your time. It may seem like a daunting task, but with a bit of patience and determination, you’ll have that pesky converter drained faster than you can say ‘out with the old, in with the new’.
Happy draining!”
The importance of proper maintenance and care for your vehicle’s torque converter
Proper maintenance of your vehicle’s torque converter is crucial for the longevity of your car’s transmission and overall performance. One of the essential tasks to keep your torque converter in good condition is draining the old fluid and replacing it with fresh fluid. Draining the torque converter might seem intimidating for some car owners, but with a step-by-step guide, it can be done easily.
First, start by buying the right fluid for your specific car model. Then, locate the drain plug on the torque converter and place a drain pan underneath it. Next, use a wrench to loosen the drain plug and let the old fluid drain completely.
Once the torque converter is empty, replace the drain plug and fill the converter with fresh fluid. It’s important to note that because some torque converters don’t have drain plugs, you might have to bring your vehicle to a professional mechanic to have the fluid drained and replaced correctly. By taking the time to maintain your torque converter properly, you can ensure that your car runs smoothly and efficiently for years to come.
FAQs
What is a torque converter?
A torque converter is a fluid coupling that transfers torque from the engine to the transmission.
Why do you need to drain a torque converter?
Draining a torque converter is necessary when changing the transmission fluid or replacing the torque converter.
How do you drain a torque converter?
To drain a torque converter, locate the drain plug on the transmission and remove it. Then, turn the engine on and let it idle until all the fluid has drained out.
How often should you drain your torque converter?
It is recommended to drain your torque converter every 30,000 to 60,000 miles, or as specified in your vehicle’s owner manual.
What are the signs of a bad torque converter?
Signs of a bad torque converter include transmission slipping, shuddering or vibrating while driving, and a decline in fuel efficiency.

