Stop Safely: A Step-by-Step Guide on How to Adjust Your Emergency Brake on Disc Brakes
If you’re driving a car with disc brakes, it’s crucial to ensure that your emergency brakes are adjusted correctly. Having properly adjusted emergency brakes not only enhances your vehicle’s safety but also saves you a lot of money in the long run. However, adjusting emergency brakes on disc brakes can be a real hassle for many people.
With so many autonomous moving parts, getting the right balance can seem a daunting task. But worry not, as we’ve got you covered. In this blog, we’ll help you learn all about adjusting emergency brakes on disc brakes, so you can avoid potentially dangerous situations on the road.
So, sit back and read on as we take you through the basics of disc brake adjustment.
Checking the Emergency Brake Cable Tension
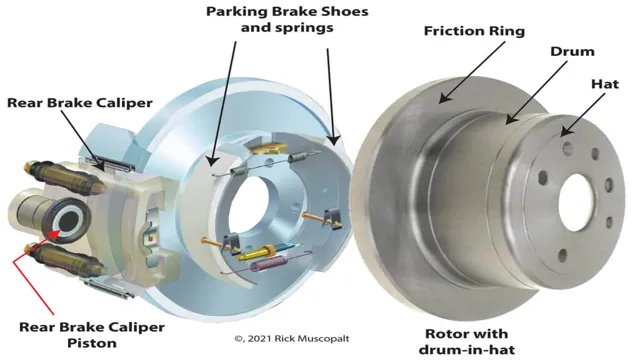
If you’ve noticed your emergency brake isn’t holding your car in place or you’re hearing a strange noise, it’s time to check the emergency brake cable tension. For disc brakes, the first step is to locate the emergency brake cable. You’ll need to get under the car and find it near the back of the brake caliper.
Once you’ve found it, check the cable tension by pulling up the emergency brake lever and making sure there isn’t too much give. If there is, it’s time to adjust the tension. To do this, you’ll need a wrench to loosen the nut that secures the cable to the brake caliper, and then tighten the nut until there’s no slack in the cable.
Repeat this for both sides and test the emergency brake to make sure it’s holding the car in place. By keeping your emergency brake cable properly adjusted, you’ll ensure your car is safe and secure when parked on an incline.
Park on a level surface and engage the brake
If you’re going to be checking the emergency brake cable tension, the first thing you need to do is park your vehicle on a level surface and engage the brake. This ensures that the vehicle won’t roll away while you’re working on it, which is absolutely crucial for safety reasons. Once you’re ready to start, locate the emergency brake cable underneath the vehicle and carefully inspect it for any signs of damage or wear.
The cable should be taut and tight, and there should be no sagging or looseness. If you do find any issues, it’s important to address them immediately, as a faulty emergency brake could lead to serious accidents on the road. With a little bit of attention and care, however, you can easily keep your vehicle’s emergency brake in good working order and enjoy peace of mind whenever you hit the road.
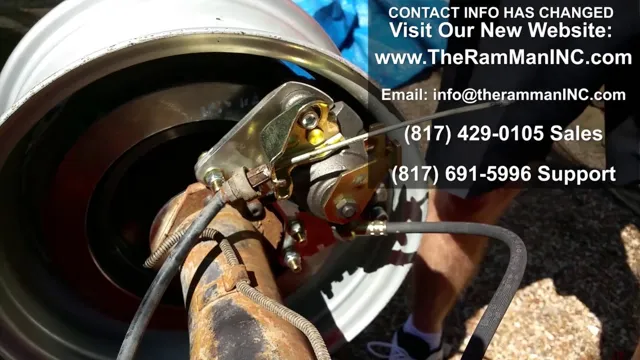
Locate the emergency brake cable under the vehicle
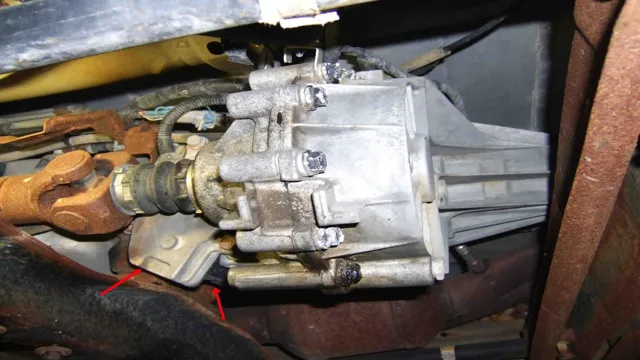
If you need to check the tension on your emergency brake cable, it’s important to know how to locate it. Generally, it can be found underneath the vehicle, depending on the make and model. You may want to use a jack to lift the car and make the cable easier to access.
Once you’ve found it, you can check the tension by pulling up on the cable with your hands. If it feels loose, you may need to tighten it. Keep in mind that your emergency brake should be disengaged before attempting to tighten the cable, or you risk damaging the brake system.
It’s also important to make sure the cable isn’t too tight, which can cause unnecessary wear on the brake pads. By checking the tension on your emergency brake cable, you’re ensuring that your vehicle is safe and secure while parked.
Check the cable tension with your hand or a wrench
When it comes to ensuring the safety of your vehicle, checking the emergency brake cable tension is crucial. The emergency brake cable helps keep your car from rolling away when parked, and therefore, it’s essential to make sure it’s properly functioning. Checking the cable tension can be done with your hand or a wrench.
Begin by pulling the emergency brake lever and releasing it. Then, crawl underneath your vehicle and locate the emergency brake cable. Apply pressure to the cable with your hand or wrench and check for any slackness.
If there’s slackness, tighten the cable until it’s taut but not too tight. Doing this simple check will not only ensure the safety of your vehicle but also give you peace of mind while driving. So, take a few minutes and do the emergency brake cable tension check today!
Adjusting the Emergency Brake Cable
Do you need to adjust the emergency brake on your disc brakes? Adjusting the emergency brake cable isn’t as difficult as you might think. To get started, first locate the cable and the adjustment nut. You might need to remove the rear wheel and rotor to access the cable.
Once you have access to the cable, loosen the locking nut and make small adjustments to the adjustment nut until the desired amount of tension is achieved. Keep in mind that each vehicle is different, and you may need to consult your owner’s manual or a professional mechanic for more detailed instructions. With a well-adjusted emergency brake, you can feel confident that your vehicle will stay put when you park it on a hill or slope.
Loosen the lock nut on the cable adjuster
If you’re experiencing issues with your emergency brake, adjusting the cable may be the solution you need. To get started, you’ll need to loosen the lock nut on the cable adjuster. This is typically located underneath your vehicle, near the emergency brake lever.
Once you’ve located it, use a wrench to turn the lock nut in a counterclockwise direction, until you’re able to freely move the cable adjuster. This will allow you to adjust the emergency brake cable to the proper tension, ensuring that your brakes engage as they should. Remember to tighten the lock nut once you’ve made your adjustments, to prevent the cable from slipping out of place.
With a little bit of effort, you’ll be able to get your emergency brake running smoothly in no time.
Turn the adjuster until the cable tension is right
Adjusting the emergency brake cable is an important aspect of car maintenance that can’t be ignored. To adjust the cable, start by locating the emergency brake lever under the dashboard. Pull the lever and apply the emergency brake to ensure the cable is engaged.
Next, locate the adjustment screw on the emergency brake cable. Using a wrench, turn the adjuster until the cable tension is right. You want to aim for a tension that’s just tight enough to prevent the car from rolling without being too tight.
The emergency brake should hold the car in place on a hill but shouldn’t be too difficult to disengage. After making adjustments, test the emergency brake and ensure it’s working properly. Keep in mind that a properly adjusted emergency brake is crucial for maintaining vehicle safety, especially when parking on hills or inclines.
By taking care of your emergency brake, you can ensure that it’s ready to activate in case of an emergency.
Tighten the lock nut to secure the new adjustment
Adjusting the emergency brake cable in your vehicle is an important task that you should know how to do. To begin, locate the adjustment nut on the cable under the vehicle. Use a wrench to loosen the lock nut and turn the adjustment nut until the cable is tight enough to hold the car in place when the brake is engaged.
Once you have adjusted the cable to the desired tension, tighten the lock nut to secure the new adjustment. It’s important to note that you should test the brake after making any adjustments to ensure that it is working properly. Regularly adjusting your emergency brake cable can help prevent accidents on steep inclines and keep your vehicle in place when parked.
So, don’t hesitate to make the necessary adjustments to ensure your brake system is in good working order.
Testing the Emergency Brake
If you need to adjust the emergency brake on your disc brakes, it’s best to start by testing it out first. Find a safe and empty parking lot or private road where you can apply the brake without impeding traffic. Begin by engaging the emergency brake and then attempting to move your vehicle.
If it doesn’t hold, the brake needs adjustment. You can do this by finding the adjustment knob or nut underneath your car or inside the brake drum assembly. Turn the knob or nut clockwise to increase tension on the brake cable until it’s properly tightened.
Take your car for a test drive and test the brake frequently to make sure it’s working correctly. Remember, a properly adjusted emergency brake is essential for safety and should never be neglected.
Test drive the vehicle to confirm the adjustment
After adjusting the emergency brake on your vehicle, the final step is to test it out to ensure it’s working correctly. Take the time to find an empty parking lot or deserted street where you won’t pose a danger to other drivers. Engage the brake and slowly begin driving forward.
If the brake is working well, your car should come to a complete stop. If it does not, you might need to tighten the adjustment or repeat the process until it functions correctly. It’s vital to test your emergency brake regularly, even when you haven’t just adjusted it.
By doing this, you will ensure it works correctly when you need it most. You might be tempted to neglect or overlook the importance of your emergency brake because you haven’t had to use it before, but this is a significant vehicle feature that could prevent an accident. Therefore, take the time to get to know your emergency brake, so it’s always working correctly when you need it.
Check the cable tension again as needed
When it comes to testing the emergency brake, it’s important to start by checking the cable tension. This is because a loose cable can result in the brake not engaging properly, which could lead to a dangerous situation. To check the tension, simply pull on the emergency brake lever and make sure there is a noticeable resistance.
If the cable is loose, adjust it accordingly, but be careful not to over-tighten it as this can cause the brake to stick. Once you’ve adjusted the cable, it’s important to test the brake again to make sure it’s working properly. You don’t want to be caught in an emergency situation only to realize that your brake isn’t working as it should.
So, take the time to check the tension and test the brake as needed to ensure that you’re prepared in case of an emergency on the road.
Conclusion: Safety First!
In conclusion, adjusting the emergency brake on disc brakes may seem like a daunting task, but it can be easily accomplished with a little patience and the right tools. Remember, just like life, brakes need balance to function properly – so don’t forget to keep both sides even. Adjusting your emergency brake can be the difference between hitting the brakes and hitting the wall, so make sure you take the time to do it right.
With these steps in your arsenal, you’ll be well on your way to being a true brake master. Happy stopping!”
FAQs
What are the signs that indicate the emergency brake needs adjustment on disc brakes?
Signs include excessive play in the brake pedal, the brakes not holding the vehicle when parked, and uneven braking when engaging the emergency brake.
Can I adjust the emergency brake on disc brakes myself, or should I take it to a professional?
It is recommended that adjustments to the emergency brake on disc brakes be done by a professional as it requires specialized tools and expertise.
How often should I have the emergency brake adjusted on disc brakes?
It is recommended to have the emergency brake on disc brakes adjusted every 20,000 to 30,000 miles or as recommended by the vehicle manufacturer.
What is the process for adjusting the emergency brake on disc brakes?
The process involves removing the tire, accessing the emergency brake assembly, adjusting the tension on the cable, and reassembling the tire. It is recommended to have this done by a professional.

