Unleash Your Car’s Full Potential: Learn How to Hook Up an Amp Gauge like a Pro
Have you ever found yourself in a situation where you need to monitor the electrical current in your vehicle? If so, then you may need to hook up an amp gauge. An amp gauge is a handy tool that measures the amount of electrical current flowing through your car’s electrical system. This can be very useful in diagnosing electrical issues, such as a failing alternator or battery.
In this blog, we’ll show you how to hook up an amp gauge in your car, step-by-step. So, buckle up and let’s get started!
Gauge Selection
If you’re wondering how to hook up an amp gauge, it’s important to first choose the right gauge for your vehicle. Amp gauges are typically rated between 60 and 100 amps, so it’s important to choose one that matches your vehicle’s electrical system. Once you have the correct gauge, you’ll need to connect it to the vehicle’s electrical system.
The gauge has two wires, one for power and one for ground. The power wire should be connected to a power source that’s always on, such as the battery or a hot wire from the ignition switch. The ground wire should be connected to a clean, bare metal surface on the vehicle’s frame.
It’s important to follow the manufacturer’s instructions carefully to ensure a safe and accurate installation. By installing an amp gauge, you’ll be able to monitor your vehicle’s electrical system and ensure that it’s operating properly.
Choose the right amp gauge for your application
Choosing the right amp gauge is crucial for ensuring the safety and efficiency of your electrical system. There are a variety of amp gauges available on the market, each with its own specific purpose and capabilities. When selecting an amp gauge, it’s important to consider the scope of your application and the amount of electrical current your system will require.
For low current applications, a standard analog gauge may suffice, but for more complex systems that require precise monitoring and control, a digital amp gauge may be necessary. It’s also important to consider the accuracy and readability of the gauge, as well as its durability and reliability in harsh environments. By carefully selecting the right amp gauge for your application, you can ensure that your electrical system performs at its best and minimize the risk of costly electrical failures and accidents.
Preparation
If you want to hook up an amp gauge, you need to prepare yourself with the right tools and equipment. First of all, ensure that you have a basic understanding of electrical circuits and wiring. You will need to have some knowledge of how to read a wiring diagram, use a multimeter, and identify the positive and negative terminals on your battery.
Once you have these skills in place, it’s time to gather the necessary materials, including wires, fuses, a fuse holder, and of course, an amp gauge. It’s important to choose an amp gauge that matches the electrical system in your vehicle. Once you have assembled all the necessary equipment, plan out your installation carefully and pay close attention to the instructions that come with your amp gauge.
With the right preparation, you can hook up your amp gauge safely and accurately, ensuring smooth and efficient electrical performance in your vehicle.
Gather the necessary tools and materials before starting
When it comes to DIY projects, preparation is key to a successful outcome. Before starting, make sure to gather all the necessary tools and materials for the job. This will save you time and hassle in the long run, as you won’t have to stop midway through the project to run to the store for something you forgot.
Take inventory of what you have and what you need, and create a checklist to ensure you have everything before you begin. Make sure to also have any safety equipment or gear required for the project, such as gloves, goggles or a mask. By taking the time to prepare ahead of time, you’ll be setting yourself up for a smoother, more efficient DIY experience.
Locate a suitable location for the gauge installation
When it comes to installing a water gauge, it’s crucial to find the perfect location that ensures accurate readings and functionality. Before you start installation, it’s important to prepare by assessing the area and considering factors like accessibility, visibility, and proximity to the main water supply. Look for an area that is easy to access and free from obstructions that could interfere with the installation or readings.
You’ll also want to make sure that the gauge is visible and easily readable, so it’s important to choose a location with adequate lighting and minimal shadows. If possible, try to locate the gauge as close to the main water supply as possible to ensure max accuracy. With a well-placed water gauge, you can keep track of your water usage and detect any leaks or problems early on before they become major issues.
Wiring and Installation
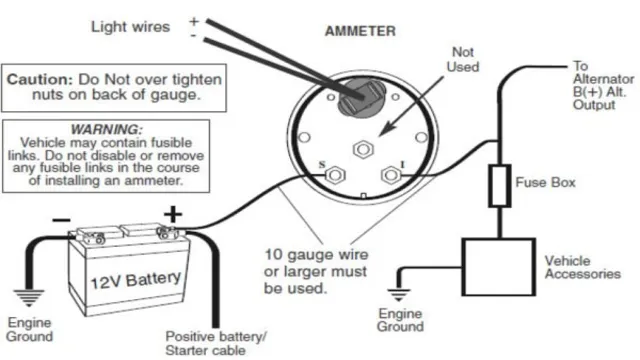
Are you wondering how to hook up an amp gauge? Well, it’s not as complicated as you might think. The first step is to locate and disconnect the negative battery cable to avoid any electrical shock during installation. Next, you need to locate a suitable location for the gauge.
A common location is in the dashboard, but it can also be mounted on the engine block. Once you have chosen a location, drill a hole and feed the gauge wires through it. Be sure to use a grommet to protect the wires from any sharp edges.
Use a wire crimper to attach the wires to the gauge according to the manufacturer’s instructions. Finally, reconnect the negative battery cable and test the gauge to make sure everything is working correctly. With these steps, you’ve successfully hooked up your new amp gauge and can now track your vehicle’s electrical system performance.
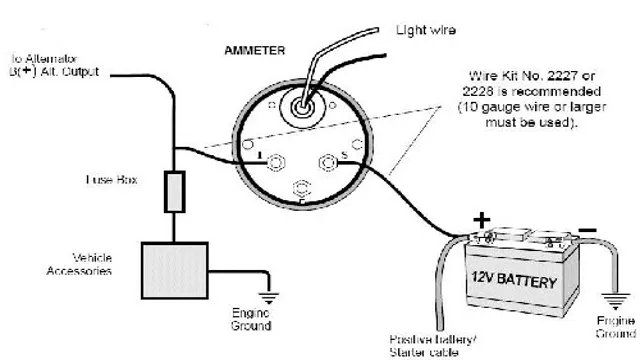
Connect the gauge using the correct wiring diagram
Installing a gauge for accurate and real-time measurements is essential for monitoring various systems and components in a vehicle. However, it is crucial to connect the gauge using the correct wiring diagram to ensure reliable readings. The wiring and installation process differ depending on the gauge and system being monitored.
It is important to consult the gauge’s manual and the vehicle’s wiring diagram to ensure the proper wiring connections. A wrong connection can cause damage to the gauge and the system being monitored, leading to costly repairs. So, be sure to double-check the connections and follow the instructions carefully.
Remember, accurate readings rely on well-founded and efficient wiring connections.
Mount the gauge securely in place
When it comes to wiring and installing your gauge, it’s crucial to mount it securely in place. A loose gauge can be a major hazard, as it can vibrate or even fall off while you’re driving. To ensure the safest possible installation, start by selecting a sturdy mounting location.
Dash panels, center consoles, and pillars are all common choices, but be sure to choose a spot that’s easily visible and won’t obstruct your view of the road. Next, use the appropriate screws or brackets to attach the gauge firmly to its mounting location. When the gauge is securely mounted, you can begin wiring it to your vehicle’s electrical system.
Remember to follow the manufacturer’s instructions carefully, and use caution when working with electrical components. Overall, mounting your gauge securely is a critical step in ensuring accurate readings and safe driving.
Calibration and Verification
If you’re wondering how to hook up an amp gauge, it’s important to start with calibration and verification. Proper calibration ensures that the gauge readings are accurate, while verification is necessary to confirm that the gauge is properly installed and functioning correctly. To begin, you’ll need to choose a location for the gauge that is easily visible and accessible.
Next, connect the gauge to a power source, such as the ignition switch, and ensure that the wires are properly grounded to prevent electrical issues. Once the gauge is mounted and connected, it’s time to calibrate it. This involves testing the voltage at various levels and adjusting the gauge accordingly.
Finally, verify that the gauge is working correctly by testing it with a known load or by using a separate meter to confirm the readings. By following these steps, you can ensure that your amp gauge is properly installed and functioning as it should.
Calibrate the amp gauge for accuracy
Calibrating and verifying the accuracy of your amp gauge is an essential step in ensuring that your electrical system is functioning at its best. To calibrate the amp gauge, you need a reliable ammeter that you can use as a reference. Make sure that the reference ammeter is accurate and calibrated, as a faulty reference could lead to inaccurate readings on your amp gauge.
With the reference ammeter in place, turn on your electrical system and switch on various components to see how much current they draw. Compare the readings on your amp gauge with the readings on the reference ammeter to see how accurate your gauge is. If there are any discrepancies, adjust the gauge accordingly until it matches the reference ammeter.
Keep in mind that an incorrectly calibrated amp gauge could lead to electrical system issues, so it’s best to take the time to calibrate it correctly.
Verify successful installation and functionality
Once you have installed the necessary software and hardware for your system, it’s time to verify its successful installation and functionality. Calibration and verification are crucial in ensuring that your system can accurately measure and monitor. Calibration involves adjusting the system to match a known standard, while verification confirms that the measurements taken by the system are correct.
First, check your system’s calibration according to the manufacturer’s instructions. Once calibrated, you can verify its functionality by running tests in various conditions to ensure that the measurements taken fall within an acceptable range. Remember, regular calibration and verification are necessary to maintain accuracy and prevent costly errors.
Keep in mind that these processes can vary depending on the type and purpose of your system. Careful attention to detail during setup and careful verification of your system’s accuracy will ensure optimal performance and results.
Final Thoughts
When it comes to installing an amp gauge, it can seem like a daunting task, but it’s essential for monitoring your vehicle’s electrical system’s health. First, ensure that your amp gauge matches the vehicle’s wiring and that your wiring is correctly installed and undamaged. Next, find a place to mount the gauge that’s visible but won’t obstruct your view while driving.
Once installed, connect the gauge to your vehicle’s battery, and you’re good to go. Keep in mind that if you’re not confident in your abilities, seek the help of a professional. Overall, installing an amp gauge is crucial for maintaining your vehicle’s electrical system and preventing potential issues.
Conclusion
And that, dear friends, is how you hook up an amp gauge. With these simple steps, you’ll be able to monitor your battery’s status like a pro. Just remember to always be safe and cautious when dealing with electrical components.
And if you’re not feeling confident in your abilities, don’t hesitate to call in a professional. After all, it’s better to be safe than sorry – and trust us, your car’s electrical system will thank you for it!”
FAQs
What is an amp gauge and why is it important to hook it up properly in a car?
An amp gauge, also known as an ammeter, measures the amount of electrical current flowing through a car’s charging system. It is important to hook it up properly because it helps monitor the health of the battery and alternator, and prevents any damage to the vehicle’s electrical system.
Can I hook up an amp gauge myself or do I need a professional mechanic to do it?
It is possible to hook up an amp gauge yourself if you have some knowledge about electrical wiring and your car’s charging system. However, if you are not familiar with this process or do not feel confident, it is recommended to seek the help of a professional mechanic.
Is there a specific type of amp gauge required for a certain type of vehicle?
Yes, there are different types of amp gauges available in the market such as analog or digital gauges, and they may vary depending on the vehicle make and model. It is important to check the specifications before purchasing and installing an amp gauge in your car.
How can I troubleshoot my amp gauge if it is not working properly?
If your amp gauge is not working properly, start by checking the wiring and connections. Make sure the gauge is properly grounded, the connections are tight, and the wires are not damaged. You can also use a multimeter to check the voltage output and see if it matches with the reading on the gauge. If the issue persists, it is recommended to seek the help of a professional mechanic.

