Bleeding Edge: Master the Art of Hydroboost Brake System Bleeding Like a Pro!
Are you experiencing a spongy brake pedal or decreased stopping power in your vehicle? It could be due to a bleeding hydroboost brake system. Hydroboost brake systems use hydraulic pressure generated by power steering fluid to assist in braking. When air enters the system, it can cause a loss of pressure and lead to a compromised braking experience.
Bleeding the hydroboost brake system can restore proper pressure and ensure safe driving. But how do you bleed a hydroboost brake system? In this step-by-step guide, we’ll walk you through the process, from gathering necessary tools and materials to completing the final steps. We’ll also provide tips and troubleshooting advice to help ensure success.
Don’t let a bleeding hydroboost brake system compromise your vehicle’s safety. Keep reading and learn how to solve this issue like a pro.
Introduction
If you’re looking to bleed your hydroboost brake system, the good news is that it’s not overly complicated. However, it is something that requires some attention to detail and a bit of patience. Essentially, bleeding a hydroboost brake system involves removing the air from the brake lines in order to ensure maximum stopping power.
The process usually involves opening the bleeder valves on each brake, pumping the brakes several times, and then repeating the process until all the air is removed. It’s important to use the correct type of brake fluid for your vehicle, and to follow the manufacturer’s instructions carefully. If you’re not confident in your ability to do this yourself, it’s always best to seek the help of a professional mechanic, as safety is paramount when it comes to brakes.
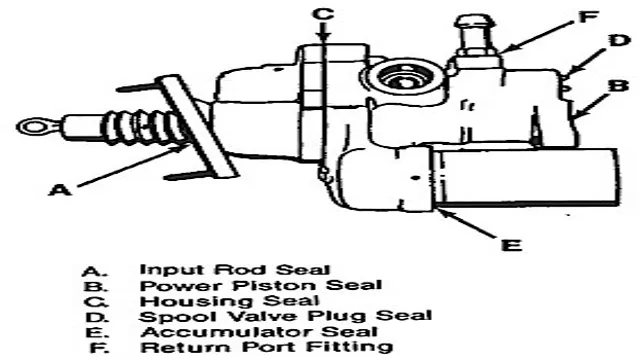
Understanding Hydroboost Brake System
Hydroboost Brake System Introduction: The Hydroboost Brake System is a hydraulic power assist braking system that utilizes pressurized power steering fluid to amplify brake pedal force. This system is often used in heavy-duty vehicles such as trucks and SUVs that require more braking power than conventional vacuum-assisted brake systems can provide. Hydroboost Brake Systems are designed to improve braking performance by increasing the hydraulic pressure applied to the brake pads or shoes, resulting in shorter stopping distances and better overall control of the vehicle.
This article will cover the basics of the Hydroboost Brake System, including its components, how it works, and the benefits of using a Hydroboost system over traditional vacuum-assisted brake systems.
Tools Needed
When it comes to starting a project, having the right tools is crucial for success. Whether you’re a novice or a professional, having the necessary tools will not only save you time but also help you create better quality work. Here are some essential tools that you’ll need for any project.
First, it’s important to have a reliable computer or laptop and a stable internet connection. You’ll also need specific software based on the project’s requirements, such as editing software, design software, or coding software. Additionally, investing in a good camera, microphone, and lighting equipment can go a long way if your project requires video or audio content.
Having a dedicated workspace, desk, and chair can also help increase productivity and prevent physical strain. Remember that having the right tools not only helps you create a better project but also makes the process more enjoyable.
Step 1: Locate the Bleeder Valve
Bleeding a hydroboost brake system may seem like a daunting task, but with the right steps, it can be done easily and efficiently. The first step in this process is to locate the bleeder valve. This is typically located on the brake caliper and is a small valve that allows air and fluid to escape from the system.
To find the bleeder valve, locate the brake caliper, which is the part that holds the brake pads. Once you have located the caliper, look for a small valve near the top of the caliper. This is the bleeder valve and it is typically a small screw that can be opened and closed with a wrench or other tool.
By opening this valve, you will allow any air trapped in the system to escape. Once the air has been released, you can then close the valve and move on to the next step in the bleeding process. With this knowledge in hand, you can begin to bleed your hydroboost brake system with confidence, knowing that you have the skills and tools necessary to complete the process successfully.
Identify the type of brake system
When it comes to identifying the type of brake system on your vehicle, the first step is to locate the bleeder valve. This valve is typically found on the brake caliper, and it’s used to release any air or fluid that may be trapped in the system. Depending on the type of brake system you have, the bleeder valve may be located in different places.
For example, on disc brakes, the bleeder valve is usually found on the brake caliper, while on drum brakes, it’s typically located on the brake cylinder. Once you’ve identified the location of the bleeder valve, you can move on to the next steps in identifying the type of brake system you have. Whether you have a hydraulic brake system or a mechanical one, locating the bleeder valve is an essential first step in properly identifying and maintaining your brakes.
Locate the bleeder valve
If you’re planning on bleeding your brakes, the first thing you’ll need to do is locate the bleeder valve, which is a small, typically circular valve located on the brake caliper. It’s important to identify the valve before you start working because you don’t want to accidentally damage any other parts of the vehicle. The valve’s location can vary depending on the make and model of your car, but it’s typically found on either the front or rear calipers.
You can use your car’s manual to locate the valve, or you can do some online research to find a diagram or video that demonstrates where it is. Once you’ve found the valve, take a good look at it to ensure it’s not damaged or rusted, as this may indicate that it needs to be replaced before you can begin the bleeding process. With the bleeder valve located and inspected, you can now move on to the next step in preparing your car for the brake bleeding procedure.
Step 2: Get the Brake Fluid Ready
To bleed a hydroboost brake system, the second step is to get the brake fluid ready. This is a crucial step as it involves ensuring that the brake fluid is clean and free from any contaminants. To get started, first, find the brake fluid reservoir and remove the cap.
It’s essential to ensure that the brake fluid level is above the minimum line. Top up the reservoir with new brake fluid if necessary. This step will help prevent the introduction of air into the system during the bleeding process.
It’s also helpful to use a high-quality brake fluid recommended by the manufacturer to ensure optimum performance and longevity of the hydroboost brake system. Next, open the bleeder valve on each brake caliper or wheel cylinder one at a time and attach a clear plastic tube to the valve’s nipple. Ensure that the tube reaches into a container or bottle to collect the old brake fluid.
With these preparations, you are now ready to start the bleeding process and enjoy a fully functioning hydroboost brake system!
Use the right type of brake fluid
When it comes to maintaining your brakes, using the right type of brake fluid is crucial. This is because brake fluid plays an essential role in ensuring your vehicle can brake effectively and safely. Different types of brake fluids have varying levels of viscosity and boiling points, so it’s important to choose the one that’s compatible with your vehicle’s brake system.
To get the brake fluid ready, you should start by checking the owner’s manual or consulting a mechanic to determine the type of fluid your vehicle needs. Common types include DOT 3, DOT 4, and DOT 1, each with its specific properties and recommended usage.
Once you’ve determined the correct type, ensure you also have enough brake fluid on hand to fill the reservoir. Remember, using the wrong type of brake fluid could lead to braking system failure, resulting in an accident. Taking the time to use the correct brake fluid will help ensure safe and reliable braking performance, giving you greater peace of mind while driving.
Fill the brake fluid container
Step 2: Get the Brake Fluid Ready Now that you’ve lifted up the car and are armed with all the necessary equipment, it’s time to get the brake fluid ready. The first thing you’ll need to do is locate the brake fluid container, usually found near the car’s firewall on the driver’s side. Once you find it, remove the cap and wipe it down with a clean rag.
It’s important to make sure no dirt or debris gets into the container, as this can lead to contamination of the brake system. Afterward, you’ll need to select the right brake fluid type for your car. This information can usually be found in your car’s manual or by consulting with your mechanic.
Once you have the right type of brake fluid, carefully pour the fluid into the container until it reaches the “maximum” line indicated on the side of the container. Be sure not to overfill the container, as this can also cause damage to the brake system. With the container full, replace the cap and you’re now ready to move on to the next step in the process.
Remember that the safety of you and your passengers is at stake, so don’t skip any of the necessary steps in preparing the brake fluid.
Step 3: Start Bleeding Process
Now that you have properly installed your hydroboost brake system and checked for any leaks, it’s time to start the bleeding process. Bleeding is crucial in ensuring that there is no air trapped inside the system, which could result in reduced brake performance or even complete brake failure. You will need a helper for this step, as it’s much easier to have someone assist you when bleeding the brakes.
Begin by topping off the brake fluid reservoir with the appropriate type of fluid, as recommended by the manufacturer. Next, identify the bleeder valve on each brake caliper and attach a clear vinyl hose to it. Place the other end of the hose into a container to catch the old fluid.
Have your helper slowly press the brake pedal and hold it down, then open the bleeder valve using a wrench. You should see brake fluid and air bubbles come out of the hose. Once the fluid is steady and free of bubbles, tighten the valve and instruct your helper to release the brake pedal.
Repeat this process on each brake caliper until all four wheels have been bled. Congratulations, you have successfully bled your hydroboost brake system!
Precautionary Measures
Before starting the bleeding process, it’s crucial to take precautionary measures to ensure a safe and sanitary experience. First, make sure to wash your hands thoroughly with soap and water to reduce the risk of infection. Then, gather all the necessary materials, including a sterile blade or lancet, cotton balls or gauze, and an alcohol swab to cleanse the area.
It’s also essential to choose a clean and quiet area to conduct the procedure, away from any distractions or potential sources of contamination. Once you’ve taken these steps, you’re ready to start the bleeding process. Remember to proceed with caution and be mindful of any pain or discomfort.
With these precautions in place, you can feel confident in your ability to safely and effectively complete the procedure.
Bleed brakes furthest from the master cylinder first
When bleeding your brakes, it is essential to start the process by tackling the furthest brake from the master cylinder first. This may seem like a strange step, but it is crucial to ensure that all air is removed from the brake lines. Starting with the furthest brake ensures that any air bubbles in the line are pushed towards the master cylinder, where they can be more easily removed.
Once you have bled the furthest brake, work your way towards the master cylinder and repeat the process on each brake until all the air has been expelled. This process may take some time, but it is important to take your time and do it properly. By following this process, you can be confident that your brakes will operate smoothly, ensuring your safety on the road.
So, remember to always start bleeding your brakes from the furthest point before working your way towards the master cylinder.
Turn the key to the “On” position.
To begin the bleeding process, it’s important to turn the key to the “On” position. This step will prime your car’s fuel pump and prepare it for bleeding. Ensure that your car is in park or neutral before continuing.
Once the key is in the “On” position, head back to the engine and locate the fuel injector rail. Next, locate the schrader valve near the end of the rail and remove its cap. This valve will release any air or gas buildup in the fuel line as you bleed it.
Additionally, it serves as a pressure relief valve that will prevent damage to the engine in case of a clog or blockage. Be sure to have a clean cloth ready before the next step; you’ll need it to catch any fuel or debris that may be released during the bleeding process. With the cap removed, you’re ready to start bleeding your fuel line until the air bubbles have stopped and pure fuel is flowing through the line.
Make sure to closely monitor the fuel pressure gauge on your car while you’re bleeding the fuel line to avoid over-bleeding as well. Following these steps will help keep your car running smoothly and efficiently.
Loosen the bleeder valve.
When it’s time to start the bleeding process in your brake system, the third step is to loosen the bleeder valve. This is an essential part of the process because it allows the built-up air and brake fluid to escape from the system. To get started, locate the bleeder valve – it’s usually located on the brake caliper or wheel cylinder.
Once you’ve found it, get your wrench ready and begin to loosen the valve. You’ll want to loosen it just enough to allow the brake fluid to flow out while still maintaining some control over how fast it comes out. Remember to have your brake fluid catch can in place to prevent any mess.
With the bleeder valve loosened, you’re now ready to move on to the next step in the bleeding process. Don’t forget to tighten the valve back up once the process is complete. By properly loosening and tightening the bleeder valve, you can ensure that your brake system will work efficiently and effectively.
Pump the brake pedal
Now that you’ve prepared your brake system and attached the tubing, it’s time to start the bleeding process. First, pump the brake pedal a few times until it becomes firm. This will help to create pressure in the brake system, making it easier to remove any air bubbles that have accumulated.
Next, locate the bleeder valve on the brake caliper and open it using a wrench. It’s important to keep an eye on the brake fluid reservoir and top it up as needed throughout the process. As you pump the brake pedal, you should see a stream of fluid come out of the bleeder valve.
Once the stream becomes steady and free from air bubbles, close the valve and move onto the next wheel. Remember to work in a diagonal pattern, starting with the wheel furthest from the master cylinder. This will help to ensure that all four corners of the brake system are properly bled.
By following these steps, you’ll be well on your way to having a properly functioning brake system.
Close the bleeder valve.
When it comes to bleeding your brakes, it’s crucial to start the process off right. That’s where step 3 comes in: close the bleeder valve. This valve controls the flow of brake fluid and needs to be tight to prevent any air from getting in.
When bleeding your brakes, you want to make sure you have the right tools on hand to make this process as easy and efficient as possible. Start by loosening the valve cap and then attaching a clear tube to the valve. Once the tubing is connected, slowly press the brake pedal, making sure you have someone else there to monitor the fluid level.
As the brake pedal is pressed, you’ll see the fluid begin to flow into the tubing. Once the fluid is flowing smoothly and has no air bubbles, it’s time to close up the valve. Make sure it’s tight and then move onto the next wheel until you’ve completed the process on all four wheels.
By taking your time and following these simple steps, you’ll have a perfectly functioning brake system in no time.
Step 4: Repeat As Needed
Now that you have completed the initial bleeding process on your hydroboost brake system, it’s time to repeat the process as needed until all the air bubbles have been completely removed from the brake lines. This may take a few rounds of bleeding, so be patient. Remember to check the brake fluid level frequently throughout the process.
If the fluid level gets too low, it may introduce more air into the system. Also, be sure to check for any leaks or loose connections that need to be tightened. Finally, take the car for a test drive to ensure that the brakes are working smoothly and that there is no spongy feeling in the brake pedal.
With the brakes functioning properly, you can now enjoy a safer and more reliable driving experience.
Repeat this process until all air has been removed from the system
The key to successfully bleeding air from your car’s brake system is to be thorough and to repeat the process until all air has been removed. After opening the bleed valve and pumping the brakes, you will need to check the brake fluid level and add more if necessary. Then, close the bleed valve and repeat the process.
This may seem tedious, but it is important to remove all air from the system to ensure that your brakes are functioning properly and keeping you safe on the road. By taking the time to do it right, you can avoid potential accidents and costly repairs down the line. So, don’t skip any steps and keep repeating the process until there is no more air left in the system!
Step 5: Check Brake Fluid
When it comes to bleeding a hydroboost brake system, checking the brake fluid is a crucial step. Start by locating the brake fluid reservoir under the hood of your vehicle. The reservoir should be transparent, allowing you to easily see the fluid level.
If the level falls below the marked minimum level, it’s time to add brake fluid. Remember to use the type of fluid recommended by the manufacturer for your vehicle. Brake fluid absorbs moisture over time, leading to a decrease in effectiveness.
Therefore, it’s important to regularly check the fluid level and replace it when necessary to ensure the safety of your braking system. Keep in mind that brake fluid is highly corrosive, so it’s important to handle it with care and wear gloves to protect your skin. By checking the brake fluid during the bleeding process, you can ensure that your hydroboost brake system is fully functional and safe to use on the road.
Check brake fluid level
Checking your brake fluid level is important to ensure the smooth functioning of your brakes. To start with, locate the brake fluid reservoir, typically found in the engine bay near the firewall. Remove the cap and check the fluid level.
The fluid level should be between the minimum and maximum marks. If the level is below minimum, add brake fluid until it reaches the maximum mark. It should be noted that brake fluid is hygroscopic and absorbs moisture over time, which can cause corrosion and damage to the braking system.
Thus, regular checking and replacing of brake fluid is essential to maintain safety on the roads. Make sure to use the recommended brake fluid type as mentioned in your vehicle’s manual to prevent any potential damage. In conclusion, taking the time to check your brake fluid level is a simple but crucial step to promote your safety on the road.
Conclusion
In conclusion, bleeding a hydroboost brake system may seem daunting at first, but with the right tools and technique, it can be a breeze. Just remember to be patient, keep a steady hand, and don’t be afraid to ask for help from a friend or mechanic if needed. And if all else fails, just pretend you’re a magician performing a hydraulic magic trick – because let’s be real, getting your brakes to work properly is nothing short of magic.
“
FAQs
What is a hydroboost brake system?
A hydroboost brake system is a type of power brake system that uses hydraulic pressure from the power steering pump to assist in applying the brakes.
Why would a hydroboost brake system need to be bled?
Air can get trapped in the system during maintenance or repairs, causing a spongy or unresponsive brake pedal. Bleeding the system removes any trapped air and ensures proper brake function.
How do you locate the bleed valve on a hydroboost brake system?
The bleed valve is typically located on the brake caliper or wheel cylinder. Consult your vehicle’s manual for specific instructions on locating the valve.
What is the proper procedure for bleeding a hydroboost brake system?
First, locate the bleed valve and attach a clear hose to it. Submerge the other end of the hose in a container of brake fluid. Have an assistant pump the brakes and hold down the pedal while you open the bleed valve. Repeat until all air bubbles are gone and clean brake fluid is visible in the hose. Top off the master cylinder with brake fluid as needed.