Get Your Engine Running: A Beginner’s Guide to Bench Starting a Starter
Have you ever tried starting your car only to find that your starter is dead? It’s an incredibly frustrating experience, but luckily, there’s a solution: bench starting your starter. This process involves removing your starter from your car and attaching it to a bench for testing and repairs. Bench starting your starter can seem intimidating at first, especially if you’re not familiar with automotive repairs.
However, it’s a relatively straightforward process that can save you time and money in the long run. In this step-by-step guide, we’ll walk you through the process of bench starting your starter, so you can get back on the road as quickly as possible. Whether you’re a DIY enthusiast or just looking to save some cash on car repairs, bench starting your starter is a skill worth mastering.
With the right tools and a bit of know-how, you’ll be able to diagnose and fix starter issues with ease. So, let’s dive into the world of bench starting your starter and get your car up and running again!
Understanding the Process
If you’re having issues with starting your car, the problem may lie with the starter. There are times when the starter will fail, which can cause all sorts of problems for your vehicle. Fortunately, you can bench start the starter to see if it’s working properly.
The process is actually very simple and only requires a few tools. First, you’ll want to disconnect the battery to ensure safety. Next, you’ll want to remove the starter and connect it to a battery charger.
Once you have the charger connected, you can turn it on and listen for the starter to engage. If it doesn’t, then there is a high likelihood that the starter is faulty and should be replaced. Bench starting a starter is an effective way to troubleshoot problems with your vehicle and can save you time and money down the line.
So, if you’re having problems getting your car started, give bench starting a try and see if it helps!
Why Bench Starting is Important
Bench starting is an essential process that shouldn’t be overlooked. It’s the first step towards achieving success in any project. The idea behind bench starting is to test the waters by running a small-scale test on a project before diving headlong into it.
This helps you understand the intricacies of the project, identify any potential pitfalls, and fine-tune your strategy. It’s like taking a practice swing before a major golf tournament or practicing your lines before delivering a speech. Bench starting allows you to identify any bottlenecks, refine workflows, and reallocate resources if needed.
It’s a crucial part of any project planning process, and it helps you avoid costly mistakes that can set you back weeks, even months, in your project timeline. So, don’t skip the bench starting process. It might take some extra time, but it will save you time and money in the long run.
Tools You Will Need
When embarking on any new project, it’s important to have the right tools for the job. An essential tool for any DIYer or home renovator is a set of necessary tools that will be used in the remodeling process. You’ll need measuring tape, a utility knife or saw, a hammer, and various screwdrivers, pliers, and wrenches to install and remove fixtures and hardware.
Additionally, don’t forget the safety gear like safety goggles, gloves, and a dust mask to keep yourself protected. Once you have the tools needed, understanding the process is critical to completing the project smoothly. Taking the time to read through instructions and plan your steps will save you time and stress during the renovation process.
With the right tools and preparation, your remodeling project will be smooth sailing.
Step 1: Preparing the Starter
If you want to bench start a starter, the first step is to prepare the starter itself. Before you do anything else, give your starter a good feeding. This means adding fresh flour and water to the existing mix and giving it a good stir.
Make sure you really incorporate the new flour and water well, so there are no lumps or dry spots left in the mix. Once you’ve done that, it’s time to let the starter sit and “digest” for a bit. This will give the wild yeasts and bacteria living in the starter time to get busy and start digesting the flour and water.
After a few hours, you should see some activity in your starter, and it may even start to bubble or rise a bit. That’s when it’s ready to use for bench starting your bread dough. By getting your starter active and healthy, you will be setting yourself up for success when it comes time to bake your bread.
Disconnecting the Battery
Disconnecting the battery of a car is an essential task that needs to be done before starting any repair work. And the first step to do this is to prepare the starter of your car. Make sure that all the accessories, such as the radio, lights, and air conditioning system, are turned off.
Then, open the hood of the engine and locate the battery. If you’re not sure where it is, check your car’s manual. Before disconnecting the battery, take a picture of the setup using your phone.
This will help you remember how everything was connected before you disconnect the wires. The starter is located near the battery, and it will aid you in getting a good view of the battery wires. Now, use a wrench or pliers to loosen the bolt or screw that holds the negative cable or terminal firmly.
Once you remove it, twist and pull the cable off, making sure it doesn’t touch anything metal. You have now successfully prepared the starter, and you can now move on to the next step in disconnecting the battery.
Removing the Starter
Before removing the starter, you need to prepare it first. Disconnect the battery to avoid electric shocks and make sure the engine has cooled down. Locate the starter and determine the type of bolts that hold it in place to know the right wrench to use.
If the starter has rust or corrosion, spray it with a penetrating oil to make the bolts easier to remove. Also, make sure you have enough space to maneuver the starter out of the engine compartment. Preparing the starter beforehand can save you time and avoid damaging other parts of the engine during removal.
By taking these precautions, you’re protecting yourself and your car.
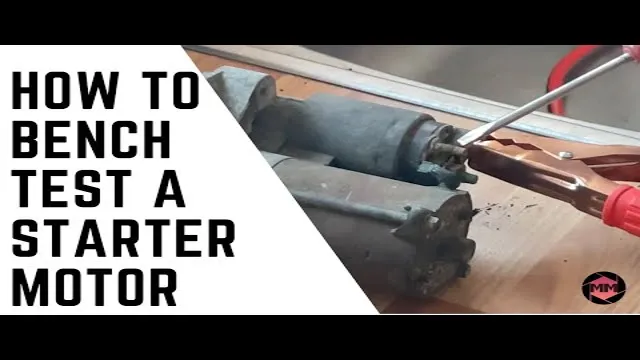
Step 2: Bench Starting the Starter
Bench starting a starter can be an easy process, but it requires a lot of caution, especially when it comes to dealing with electrical circuits. After ensuring you have the proper protective gear and tools, you can begin bench starting the starter by connecting it to a power source like a battery or a battery charger. You’ll need to connect the positive and negative terminals to the starter, making sure that you follow the installation instructions provided in the manual.
Then, double-check that the starter is secured to the bench before turning on the power. Once everything is set up, turn on the power source and listen for the starter motor engaging. If it starts spinning smoothly, you’re all set! If not, double-check the connections and make adjustments to ensure that the starter is working correctly.
With these steps carefully followed, bench starting a starter can be a quick and simple way to test your equipment.
Connecting Wires to Starter
If you’re planning to bench start your starter, you need to know how to connect wires to it properly. Here’s a step-by-step guide to help you out. First, find the positive and negative terminals on your starter.
The positive terminal should be marked with a “+” sign, while the negative terminal should be marked with a “-” sign. Next, connect the positive terminal to the positive terminal on your battery. Then, connect the negative terminal to a ground.
You can use the engine block or any other metal part that’s grounded to the negative terminal of your battery. Make sure the connections are tight and secure before moving on to the next step. Now, you’re ready to bench start your starter and test if it’s working as it should.
Applying a small amount of voltage to the starter should make it spin. If it does, you’re good to go. If not, you may need to troubleshoot your wiring or check if there are any other issues with your starter.
With these simple steps, you’ll be able to bench start your starter with ease.
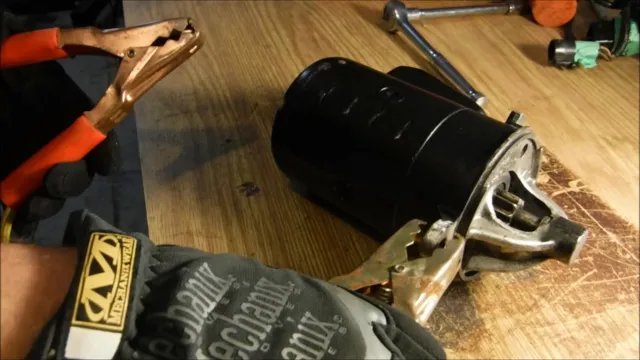
Using the Jumper Cables
If your car’s battery is dead and jumping it didn’t work, you may have a problem with the starter. The next step is bench starting the starter. This can be a bit tricky, but with some patience and the right tools, you can do it.
To bench start the starter, you’ll need to remove it from the engine and place it on a stable surface. Then, connect the positive jumper cable to the positive terminal of the starter and the negative cable to a suitable ground on the engine. Once everything is connected, you can use a screwdriver to bridge the gap between the positive and negative terminals on the starter.
This should cause the starter to engage and turn the engine over. If it doesn’t, you may have a problem with the starter itself and it may need to be replaced. It’s always a good idea to consult a mechanic if you’re unsure about your ability to bench start a starter.
Step 3: Installing the Starter
After checking the connections of your starter, it’s time to install it on the car’s engine. The first thing to do is to locate the starter relay module and remove it. Once done, you need to slide the starter motor with attached solenoid into the proper placement on the engine mount.
Make sure the starter’s nose lines up with the flywheel on the engine before tightening the bolts. It’s also recommended to replace the starter relay with a new one to ensure that the system is working properly. After securing the starter, connect its electrical connections, including the positive and negative cables.
Double-check all the connections and wires before tightening them up with a socket wrench. Once done, turn the ignition key to see if the starter turns over the engine. If it does, congratulations! You have successfully bench-started a starter.
Re-Attaching the Starter
Installing the starter can seem daunting, but with a little perseverance, it’s a pretty straightforward job. Reattaching the starter is step three in the process, and it’s crucial to getting your car up and running. Once you’ve attached the starter, be sure to check all of the bolts and nuts to ensure they’re tight; any looseness could lead to further problems down the road.
It’s also important to double-check that all of the electrical connections are secure, so you’re not left stranded on the side of the road. If you’re not confident in your abilities, there’s no shame in calling a mechanic for help. However, if you’re feeling up to the challenge, take your time, and follow the instructions carefully, and you’ll have a successfully installed starter in no time.
Re-Connecting the Battery
Now that the battery has been re-connected, it’s time to move on to installing the starter. The starter is a crucial component to getting your engine up and running. It works by using an electric motor to turn the engine’s flywheel, which in turn rotates the engine’s crankshaft, starting the combustion process.
To install the starter, first locate it on your engine block. It is typically at the forward bottom end of the engine. Once you have located the starter, use a wrench to loosen the bolts that are holding it in place.
You’ll then need to disconnect the wiring that is connected to the starter. After this is done, carefully remove the starter from the engine block. Now, take your new starter and attach it in the same location as the old one.
Tighten the bolts back up and re-connect the wiring to the starter. Once this is done, you’re one step closer to having a fully functioning engine.
Testing Your Starter
If you suspect that your car’s starter might be malfunctioning and want to test it before taking it to a mechanic, bench starting your starter is one way to do it. This method involves connecting your starter motor to a battery to see if it can spin properly. To bench start your starter, first disconnect the battery and remove the starter from your car.
Then, clamp the starter securely to a bench or other solid surface and connect a fully charged battery to the starter’s terminals. If the starter spins when the battery is connected, it’s working properly. If not, it may need to be repaired or replaced.
Bench starting your starter can save you time and money by helping you diagnose the issue yourself before taking it to a professional. Just make sure to follow proper safety precautions, such as wearing gloves and eye protection, to avoid any accidents.
Common Issues and Troubleshooting Tips
Testing Your Starter When it comes to your vehicle’s starter, it’s important to know how to test it to avoid any surprises. A weak or failing starter can leave you stranded and in need of expensive repairs. The first step in testing your starter is to check its connections.
Ensure that the battery terminals are clean and tight and that the starter wires are securely connected. If the connections are good, the next test is to check the battery voltage. You should have at least 1
5 volts, but preferably closer to 13 volts. If the voltage is low, your battery may need charging or replacement. Finally, you can perform a simple test by turning the key to the start position while monitoring the voltage at the starter.
Ideally, you should see a voltage drop of no more than 0.5 volts. Anything more than that indicates a problem with the starter, and it may need to be repaired or replaced.
By taking these steps to test your starter, you’ll be able to catch any issues early and avoid being stranded.
Conclusion
In conclusion, bench starting a starter may seem intimidating, but it’s a handy skill to have when your car won’t start. All you need is a set of jumper cables, a flat surface, and a willing friend with a car. Just remember to stay safe, follow the instructions carefully, and don’t be afraid to ask for help if you need it.
With these tips in mind, bench starting a starter can be as easy as taking a Sunday drive. Now go forth and start your engines, folks!”
FAQs
What is bench starting a starter and why is it necessary?
Bench starting a starter is manually turning the starter with a breaker bar or socket to test its functionality before installing it back into the vehicle. It is necessary to ensure that the starter motor is working properly before reinstallation to prevent any future starting issues.
How do I bench start a starter?
To bench start a starter, remove it from the vehicle and connect a fully charged battery to the starter’s positive and negative terminals. Use a breaker bar or socket to manually turn the starter and see if it spins without any resistance.
What tools do I need to bench start a starter?
To bench start a starter, you will need a fully charged 12-volt battery, battery cables, a breaker bar or socket set, and some basic hand tools.
Can bench starting a starter fix a starting issue?
Bench starting a starter can help diagnose a starting issue, but it cannot fix a starter that is damaged or worn out. If the bench test reveals that the starter is faulty, it will need to be replaced to resolve the starting issue.