Revive Your Wheels: A Comprehensive Guide on How to Fix Peeling Clear Coat
Have you ever found yourself looking at your car’s wheels only to notice that the once-pristine clear coat is now peeling? It can be frustrating to see your wheels look less than perfect, but luckily, fixing peeling clear coat on wheels is a relatively straightforward process. With a bit of patience and some elbow grease, you can restore your wheels to their former glory and make them look as good as new. In this step-by-step guide, we’ll walk you through the process of fixing peeling clear coat on wheels, so you can get back to cruising in style.
So, let’s get started!
Diagnose the Problem
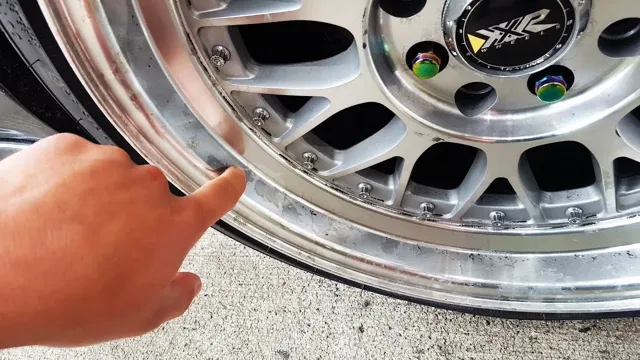
If you’re experiencing peeling clear coat on your wheels, the first step is to diagnose the problem. The clear coat is the topmost layer of protection that keeps your wheels looking new and shiny. However, over time, it can become damaged due to various reasons such as exposure to sun, salt, and environmental pollutants.
The easiest way to determine if your wheels have a clear coat issue is to inspect the affected area for flaking or peeling. If the peeling is extensive, you may need to remove the clear coat completely and start over. On the other hand, if the damage is minor, you can repair the clear coat by sanding down the affected area until it’s smooth and reapplying another layer of clear coat.
Remember to choose high-quality clear coat products to ensure long-lasting, durable protection. With these steps, your wheels will be back to looking their best in no time!
Identify Signs of Clear Coat Failure
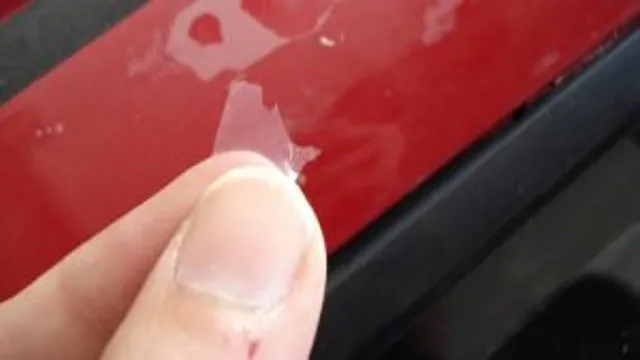
Clear coat failure is a common issue that car owners face, and it can have a significant impact on your vehicle’s appearance. Identifying the signs of clear coat failure can help you diagnose the problem and take appropriate action. One of the most noticeable signs of clear coat failure is peeling or flaking of the clear coat layer.
This can occur due to a range of reasons, such as exposure to harsh weather conditions or improper paint application. Other signs that indicate clear coat failure include hazing, fading, or discoloration of the clear coat. If you notice any of these signs, it is essential to address the issue as soon as possible to prevent further damage to your car’s paintwork.
In some cases, the only solution may be to repaint the affected area or the entire car. However, it is always best to consult a professional to understand the extent of the damage and the best course of action. By taking care of clear coat failure promptly, you can maintain your car’s appearance and protect its resale value.
Assess the Severity of Damage
When it comes to assessing the severity of damage on your property, diagnosing the problem is the first step. It’s important to take a close look at the affected area and identify exactly what’s going on. Is there water damage, mold growth, or structural issues? Whatever the problem may be, understanding it will help you determine the necessary next steps.
This could involve calling in professionals or attempting to fix it yourself. Keep in mind that some issues may not be immediately visible and require further investigation, so don’t be afraid to ask for help. In the end, diagnosing the problem is crucial in order to successfully address the damage and prevent it from worsening.
By being proactive and taking the necessary steps, you can ensure the longevity and safety of your property.
Prepare the Wheels for Repair
When it comes to fixing peeling clear coat on wheels, the first step is to prepare the wheels for repair. This involves thoroughly cleaning them with soap and water, then using a degreaser to remove any dirt or oils that may be present. Once the wheels are completely clean, it’s important to sand them down to remove any remaining clear coat.
This can be done using a fine-grit sandpaper with a gentle touch. After sanding, wipe the wheels down with a clean cloth to remove any dust or debris. Now you’re ready to apply the new clear coat.
Choose a high-quality product designed specifically for wheels, and follow the manufacturer’s instructions carefully. With a little time and effort, your wheels will look as good as new!
Clean, Sand and Strip the Wheels
When it comes to repairing wheels, preparation is key. Before you can start fixing any damage, you need to make sure the wheels are clean, sanded, and stripped of any previous coatings. This process is crucial in order for new coatings to properly adhere and protect your wheel from further damage.
To clean the wheel, start by removing any dirt and debris using a brush or cloth. Then, use a degreaser or wheel cleaner to remove any grease or grime. Next, you’ll want to sand the wheel down with fine-grit sandpaper to ensure a smooth, even surface for the new coating to adhere to.
Finally, it’s important to strip any previous coatings or paint using a chemical stripper or sandblasting. This may take some time and effort, but it will ultimately ensure the longevity and effectiveness of your wheel repair.
Mask Tires and Valves
To begin preparing your wheels for repair, it is important to mask off the tires and valves. This will protect them from any damage that may occur during the repair process. You can use masking tape or a specialized masking product to cover the entire tire and valve.
Make sure to press the masking tape down firmly to ensure that no paint or other materials seep through. By masking off these areas, you can be sure that your tires and valves will remain in good condition and function properly after the repair is complete. It’s like putting a bandage on a wound, protecting the area while it heals.
So, take the time to properly mask off your tires and valves before beginning any repairs to ensure your wheels stay safe and functional. By doing so, you’ll be able to extend the life of your wheels and maintain their performance for a longer period of time.
Remove Any Rust Spots
When preparing your wheels for repair, it’s essential to remove any rust spots that may have developed. Rust is not only unsightly, but it can also weaken the integrity of the wheel, making it less safe to use. To remove rust, you can use a wire brush or sandpaper to scrub away any visible rust.
For stubborn spots, you might need to use a rust dissolver or a rust converter. These products can chemically alter the rust to prevent it from spreading further. Once you have removed the rust, it’s crucial to clean and dry the area thoroughly.
Any remaining rust or moisture can cause further damage over time, so it’s essential to be diligent. By removing any rust spots, you can ensure that your wheels are in top condition and safe to use on the road.
Apply New Clear Coat
One of the best solutions to fixing peeling clear coat on wheels is by applying a new clear coat. This not only restores the wheels to their former glory but prevents further damage from occurring. When applying a new clear coat, it’s important to ensure that the wheels are thoroughly cleaned and dried beforehand.
You can use a mild cleaner or solvent to remove any dirt build-up and then use a polishing compound to smoothen the surface. Afterward, sandpaper can be used to smooth out any imperfections before wiping away the dust and ensuring the surface is completely dry. Once ready, you can apply the new clear coat using a paint sprayer or brush, ensuring a smooth and even layer.
Wait for it to dry completely before applying a second coat if needed. With proper preparation and application, your wheels will look brand new and last for a long time to come.
Select the Right Clear Coat and Equipment
When it comes to applying new clear coat, it’s crucial to select the right clear coat and equipment for the job. Not all clear coats are created equal, and choosing the wrong one can result in a subpar finish. The first step in selecting a clear coat is considering the type of surface it will be applied to and the level of gloss desired.
Additionally, the equipment used to apply the clear coat is just as important as the product itself. A high-quality spray gun and proper ventilation are both necessary for a successful application. Don’t skimp on either of these factors, as they can make all the difference in achieving a flawless finish.
Remember, taking the time to select the right clear coat and equipment will result in a professional-looking paint job that will last for years to come.
Apply Multiple Thin Coats
When it comes to applying a new clear coat to your car, the key is to apply multiple thin coats rather than one thick one. This may seem counterintuitive – you may think that it’s better to get it all done in one shot. However, applying one thick coat can lead to problems such as bubbling and orange peel texture.
By applying multiple thin coats, you allow each layer to dry properly and evenly, resulting in a smoother and more durable finish. Keep in mind that it’s important to wait for each coat to dry completely before applying the next one. This technique takes a bit more time and effort, but it’s worth it for a flawless finish.
Let Dry Overnight
When refinishing any wooden surface with a clear coat, it’s crucial to let the first layer completely dry overnight before adding a new one. Rushing the process may cause the coat to peel or bubble up, resulting in a patchy and uneven finish. Furthermore, applying a new coat before the previous one has adequately cured can cause the solvents in the new layer to penetrate the first one, leading to discoloration or even complete failure of the finish.
So, let patience be your virtue, and wait until the surface is fully dry before giving it another layer. This step may seem trivial, but it ensures a pristine and long-lasting finish that enhances the natural beauty of the wood. Taking the time to apply the clear coat correctly will make the difference between a mediocre finish and a professional-looking one that will protect your project for years to come.
Remember, patience is key.
Protect and Maintain Your Wheels
If you have peeling clear coat on your wheels, don’t worry because you can fix it yourself. First, wash the wheels with soap and water to remove dirt and grime. Next, use 400-grit sandpaper to lightly sand the affected areas until the clear coat is removed.
Then, clean the surface with rubbing alcohol before applying a new clear coat with a spray can. Finally, let the new clear coat dry for at least 24 hours before driving the car. To prevent future damage, it’s important to maintain your wheels by cleaning them regularly and avoiding harsh chemicals or rough surfaces.
Remember to always protect your wheels and keep them in tip-top shape.
Use Wax or Sealant to Protect the Clear Coat
When it comes to maintaining your car, your wheels can really make or break the look of your vehicle. And let’s face it, nobody wants dirty or rusted wheels. So, what can you do to keep them looking their best? One key step is to protect and maintain the clear coat on them.
The best way to do this is by using either wax or sealant. By applying these products, you can help to prevent damage from things like road salt, brake dust, and dirt from getting onto your wheels and causing damage. This will help to keep your wheels looking clean and shiny for longer.
Plus, if you live in an area with harsh weather conditions, using wax or sealant can help to prevent rust from forming on your wheels. So, take the time to protect and maintain your wheels – they’ll thank you for it!
Do Regular Cleaning and Maintenance to Extend Clear Coat Life
Keeping your wheels in top condition is essential to their longevity and appearance. Regular cleaning and maintenance are great ways to extend the life of your clear coat. The clear coat is a protective layer that shields your wheels from damage caused by dirt, grime, and other environmental factors.
Failure to maintain a clean and functional clear coat can result in scratches, chipping, and corrosion. To protect and maintain your wheels, you should avoid using abrasive cleaners or harsh chemicals that can erode the clear coat. Instead, opt for mild soap and water, microfiber cloths, and specialized wheel cleaners that are safe for use on clear coat finishes.
By taking the time to keep your wheels clean and protected, you can enjoy their beauty and functionality for years to come.
Conclusion
In conclusion, fixing peeling clear coat on wheels is as simple as following these steps: sanding down the affected area, cleaning and drying the surface, applying a new layer of clear coat, and finally, letting it dry for at least 24 hours. The key is to have patience and persistence – much like fixing a flat tire, this too requires effort and attention. But with a little determination and some elbow grease, your wheels will be looking brand new once again! So, don’t let peeling clear coat bring your ride down – take charge and give your wheels the TLC they deserve.
“
FAQs
What causes clear coat on wheels to peel?
Clear coat on wheels can peel due to various factors such as exposure to sunlight, moisture, and chemicals, as well as improper cleaning and maintenance.
Can clear coat peeling on wheels be fixed?
Yes, clear coat peeling on wheels can be fixed by sanding down the affected area, applying a new clear coat, and allowing it to dry properly. Professional help may be required for severe cases.
Is it necessary to remove the wheel to fix clear coat peeling?
It is not always necessary to remove the wheel to fix clear coat peeling, but it may make the process easier and more effective, especially if the affected area is large.
How can I prevent clear coat peeling on my wheels?
Clear coat peeling on wheels can be prevented by regular washing and detailing, avoiding acidic or abrasive cleaners, and using protective coatings like wax or sealant. Additionally, avoiding high-speed driving and extreme temperature changes can also help.

