Don’t Get Stuck: A Step-by-Step Guide on How to Adjust Your Parking Brake on Disc Brakes
Parking brake is an essential component of any vehicle, providing added safety and security when you need it the most. However, when the parking brake on your disc brakes fails, it can become a major inconvenience. Not only can it cause a safety hazard, but also damage to your car’s transmission.
This is why it is essential to keep your parking brake adjusted and in excellent working condition. Adjusting parking brakes on disc brakes may seem like a daunting task, but with the right guidance, it can be done easily. In this blog post, we will take you through the step-by-step process of adjusting the parking brake on disc brakes.
So, if you want to avoid those unexpected slips and jerks when parking, buckle up and keep reading!
Gather Necessary Tools and Materials
Adjusting the parking brake on disc brakes can seem like a daunting task, but gathering the necessary tools and materials beforehand can make the job much easier. You will need a few things, such as a jack or lift, jack stands, lug wrench, pliers or a screwdriver, a brake adjusting tool, and brake cleaner. Before beginning, ensure that you follow standard safety protocols and apply the parking brake while the vehicle is on level ground.
Once the car is safely elevated, remove the wheels and locate the brake adjustment mechanism on the brake calipers. Follow the vehicle’s manufacturer guidelines and take your time when making adjustments. Check your work by testing the parking brake’s effectiveness before replacing the wheels and lowering the car back down.
With the right tools and a bit of patience, adjusting your parking brake can be a simple DIY task that will improve your car’s safety and handling.
Brake Adjustment Tool, Jack Stands, Wheel Chocks
Before starting any brake adjustment work, it’s important to gather all the necessary tools and materials. One tool you’ll definitely need is a brake adjustment tool, which can be found at any auto parts store or online. Additionally, you’ll want to have jack stands to securely lift your vehicle off the ground and wheel chocks to prevent it from rolling.
Safety is paramount when working on your vehicle, so make sure you have all the necessary equipment before starting your brake adjustment. Don’t skimp on quality, either – poorly made tools can lead to accidents and injuries. Better to invest in high-quality tools now than to suffer the consequences later.
So, whether you’re a seasoned mechanic or a DIY enthusiast, make sure you have everything you need to tackle your brake adjustment with confidence.
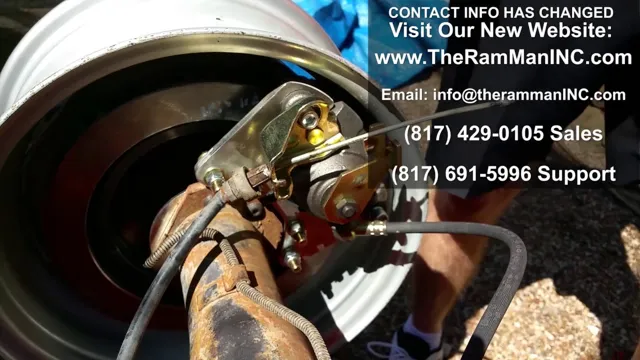
Preparing Your Vehicle
Adjusting the parking brake on disc brakes can be essential to ensure your car stays in place when parked. Start by ensuring that your vehicle is on a flat surface and the engine is off. Locate the parking brake adjuster, which is typically found under the center console or beneath the backseat.
Then, use a wrench to turn the adjuster until the brake pads start to move inward. Next, pull the parking brake lever up all the way and check that the rear wheels don’t move. If they do, repeat the process until there’s no movement.
Lastly, repeat the process on the other side, if your vehicle has 4-wheel disc brakes. Remember that it’s essential to consult your car’s owner’s manual, as different brands and models may have unique processes for adjusting the parking brake. A well-functioning parking brake is fundamental to your safety and your vehicle’s longevity on the roads.
Engage Emergency Brake, Lift Vehicle
When it comes to preparing your vehicle for any situation, it is important to engage the emergency brake and lift it off the ground. This may seem like a simple task, but it is a crucial step in ensuring the safety of yourself and others. By engaging the emergency brake, you prevent the vehicle from moving while you work on it.
Lifting the vehicle off the ground allows for easy access to the parts you need to work on without having to crawl under the car or contort yourself in difficult positions. Additionally, lifting the vehicle off the ground provides you with a clear view of the underside, making troubleshooting and repairs a breeze. Remember, a well-prepared vehicle is a safe vehicle, and by taking the time to engage the emergency brake and lift it off the ground, you can ensure that you are ready for anything that comes your way.
Locate the Adjustment Screw
Adjusting the parking brake on disc brakes can seem like a daunting task for some, but locating the adjustment screw is the first step in the process. The adjustment screw is typically located on the backside of the brake caliper, and it can be accessed by removing the wheel and rotor. Once the screw is located, it can be turned clockwise or counterclockwise to adjust the tension of the parking brake.
It’s important to note that proper adjustment of the parking brake is crucial to ensure the vehicle is safe and secure when parked. So, don’t hesitate to give your parking brake some attention and locate the adjustment screw to ensure it’s functioning properly.
Behind the Rear Brake Caliper
When it comes to adjusting the rear brake caliper on your vehicle, one of the first steps is to locate the adjustment screw. Typically, this screw can be found behind the caliper itself, and is used to fine-tune the position of the brake pads in relation to the brake rotor. Adjusting the caliper can help to improve braking performance, reduce brake noise, and extend the life of your brake components.
However, it’s important to ensure that the job is done correctly, as inaccurate adjustments can lead to brake drag or premature wear. If you’re not comfortable working on your brakes, it’s always best to seek assistance from a professional mechanic to ensure your safety on the road. By taking the time to locate and adjust the rear brake caliper screw, you can help to maintain the safety and performance of your vehicle’s braking system.
Adjust the Parking Brake
Adjusting the parking brake on disc brakes may seem like a daunting task, but it’s actually quite simple. The first step is to locate the parking brake cable. It’s usually near the back of the brake rotor and connects to the caliper.
Once you’ve located the cable, there should be an adjustment nut that you can turn to tighten or loosen the cable. To tighten the parking brake, turn the adjustment nut clockwise. To loosen it, turn it counterclockwise.
It’s important to test the parking brake after each adjustment to make sure it’s working properly. A loose parking brake can be dangerous, especially on steep inclines, so it’s important to keep it adjusted correctly. By following these steps, you can ensure that your parking brake on disc brakes is working properly and keeping you safe on the road.
Tighten or Loosen Adjustment Screw to Desired Tension
Adjusting the parking brake is an essential and straightforward task for any driver, and learning to do it yourself can save you time and money. One of the first things to consider is tightening or loosening the adjustment screw to reach your desired tension levels. This adjustment screw can easily be found under the parking brake lever, and you can use a wrench to turn it according to your preference.
Loosening the screw will lessen the tension on the brake cable, making it easier to activate the brake. Tightening the screw, on the other hand, will increase the tension and make it tougher to activate the brake. It’s essential to find the perfect balance between holding your car in place and allowing the wheels to turn without resistance.
You can test your adjustments by pulling the brake lever and ensuring that the brake holds the vehicles in place while not engaging the wheels in any way. By following these simple steps, you can adjust your parking brake in no time and get your vehicle ready for the road.
Test the Parking Brake
Adjusting the parking brake on disc brakes is a simple task that can save you a lot of trouble down the line. Start by parking on a level surface and making sure the car is in park or neutral. Locate the parking brake adjustment nut, which is usually found on the back of the brake caliper.
Loosen the nut and then tighten it until the parking brake is snug against the rotor. Test the parking brake by trying to move the car. If the car moves, tighten the adjustment nut a little more and test again.
Keep repeating until the parking brake is holding the car firmly in place. Remember that it is always better to have a parking brake that is too tight than one that is too loose.
Take Vehicle off Jack Stands and Test Brake Tension
After successfully tightening the brake pads, it’s time to take your vehicle off the jack stands. But before you hit the road, there’s one more crucial step you should take: testing the parking brake. Testing the brake tension is essential to ensure your vehicle doesn’t roll away when parked.
To test the parking brake tension, engage the parking brake and attempt to move the vehicle. If the brake has enough tension, the vehicle won’t move. If it does move, further adjustments may be necessary.
Remember, the parking brake is a vital safety feature that should never be overlooked. Taking the time to test it can save you from a dangerous situation down the road.
Final Tips and Safety Precautions
Adjusting the parking brake on disc brakes can seem like a daunting task, but with the right steps and precautions, it can be easily accomplished. For starters, ensure that your vehicle is parked on a flat surface, with all the wheels chocked and the transmission in park or first gear. Next, locate the brake adjuster.
This can be accessed either from under the vehicle or through the wheel hub. Turn the adjuster until you feel it tightening, but make sure not to overdo it. Finally, test the parking brake to ensure that it holds the vehicle in place, without any dangerous slipping or screeching noises.
Safety should always be your top priority, so take your time and double-check your work to ensure a job well done. By following these simple steps, you can adjust your parking brake on disc brakes with confidence and ease.
Check Brake Fluid, Ensure Vehicle is on Flat Surface
When it comes to taking care of your vehicle, checking the brake fluid level is a crucial step in ensuring your safety and the longevity of your car. It’s important to check the fluid on a flat surface to get an accurate reading. If your brake fluid is low, it can affect the performance of your vehicle, and in some cases, it can be dangerous.
That’s why it’s essential to keep an eye on it regularly. Additionally, before performing any maintenance on your vehicle, make sure you have the necessary tools and understand what you’re doing. If you’re unsure, it’s always best to consult a professional.
By following these simple tips and safety precautions, you can keep your vehicle in top shape and avoid potential accidents on the road. So, remember to check your brake fluid and service your car regularly to keep things running smoothly.
Conclusion
Ultimately, adjusting the parking brake on disc brakes is a simple process that requires patience, precision, and a little bit of know-how. It’s important to take the time to inspect your brakes regularly and ensure that they’re functioning properly in order to maintain optimal safety and performance. So, don’t let your car roll away without a fight – follow these steps to keep your parking brake operating smoothly and confidently!”
FAQs
What tools do I need to adjust parking brake on disc brakes?
You will need a ratchet, socket set, pliers, and a brake adjusting tool.
How do I know if my parking brake needs adjustment on disc brakes?
If you notice that your car is rolling when the parking brake is engaged, or if the parking brake lever or pedal has excessive travel, it may be time to adjust the parking brake.
Can I adjust the parking brake on disc brakes myself?
Yes, with the right tools and some basic knowledge, you can adjust the parking brake on disc brakes yourself.
What’s the proper adjustment procedure for parking brakes on disc brakes?
The procedure may vary slightly depending on the make and model of your vehicle, but generally, it involves removing the brake drum or rotor, adjusting the brake shoes, and testing the parking brake’s holding ability. Consult your vehicle’s manual for specific instructions.


